Pages

So Easy, It’s Scary! Candy Corn Trees & “Finger” Food

Halloween countdown is underway and here's what I am brewing up in the West kitchen . . .

Candy Corn Trees
Yes, candy corn does grow on trees . . . and here's the proof!
Candy Corn
Hot glue gun
Tree branch

1.  Add a bead of hot glue to a piece of candy corn and then add it to a tree branch. Continue until the branch is filled with candy corn buds. It may be necessary to hold “buds” in place for a couple of seconds to insure they adhere to the branch. As you work with the hot glue, thin strings of glue may appear, resembling a cob web.

2.  Add candy corn tree to a vase.

“Finger” Food
 Lay these “fingers” around on counters and cupboards or offer them as favors at guest’s table setting.
Clear plastic glove
Candy Corn
Popcorn
Thin ribbon or string


1.  Add a candy corn to each finger of the glove – arrange so each appears to be a fingernail.
2.  Fill each finger with popcorn (beginning careful to keep the fingernail in place) and then fill the hand leaving enough room to tie off the top with a piece of ribbon or string.

Check out these Halloween-themed recipes:
Caramel Pop Corn
Eye of Newt Pudding
Hoot Owl Cookies

Rise n’ Shine — Bacon & Egg Skillet


     As Emeril would say, “It’s not rocket science!” — just a simple to prepare homey and hearty breakfast. A recipe that is great for guests or family weekend breakfast or brunches. Start it in a skillet and then pop it into the oven to finish cooking as you read the morning paper.
     Technically this egg skillet is a frittata. In culinary lingo, a frittata is a flat Italian-style omelet that's usually prepared in a cast-iron skillet and then typically sliced into wedge-shaped portions for serving. A brunch menu classic, the frittata may also have its origin in Spanish cuisine. The recipe that follows includes onions, mushrooms and tomatoes but spinach, peppers, or potatoes are other tasty additions.

Bacon & Egg Skillet
½ lb. bacon
1 small onion
½ cup sliced mushrooms, optional
1 (15 oz.) can diced tomatoes, well drained
1 cup milk
9 eggs
½ teaspoon salt
½ teaspoon pepper
1 to 2 cups shredded Cheddar cheese

1.     Preheat oven to 400°.
2.     Fry the bacon in a large, oven-safe skillet. Remove and set aside to drain on paper toweling.
3.     Drain off most of the fat from the pan. Add the onions and mushrooms (if using) and  cook under tender. Add the tomatoes and heat to absorb any excess liquid.
4.     In a mixing bowl beat the milk into the eggs. Stir in salt and pepper. Crumble the bacon and add it to the bowl. Pour mixture into the skillet with the onions and mushroom; stir to combine ingredients and sprinkle with cheese.
5.     Bake for 30 to 40 minutes, until eggs are set.
Menu Suggestion: Serve w/ sliced tomatoes, wedges of avocado and toasted bread or biscuits.

Santa Fe-style Quinoa Salad

     Mentioned in a previous post that quinoa could be interchanged with pasta or rice and that it was quite versatile It takes center stage in this salad that is packed with flavors of the Southwest. This flavorful (and healthy) recipe came from Jane Medina. 


Santa Fe-style Quinoa Salad
1½ cups water
½ cup. mild or medium picante sauce or salsa
1 cup quinoa, rinsed under cold water
¼ to ½ teaspoon ground cumin
¼ teaspoon salt
Freshly ground black pepper to taste
1 (15 oz.) can black beans, rinsed and drained
1½ cups fresh or frozen yellow corn kernels, cooked, drained and cooled
1 cup cherry or grape tomatoes, halved or quartered
4 scallions (green onions), thinly sliced (including white and green parts)
jalapeño pepper, seeded, finely chopped
1 tablespoon canola oil
Jane also added some toasted pinon (pine) nuts

1.  In a medium saucepan over high heat, combine water, picante sauce, quinoa, cumin, salt and pepper. Bring to a boil, then reduce heat to medium, cover and cook until liquid is absorbed, 15 to 20 minutes. 
2.  Remove from heat and let stand 5 minutes. Uncover and toss with fork. Transfer to large bowl and let cool slightly. 
3.  Add remaining ingredients to quinoa, tossing well to combine. Serve slightly warm or let cool to room temperature. Alternatively cover and refrigerate for up to 2 days and serve chilled.

Review basic cooking methods and the benefits of quinoa at our previous post — "Supergrain of the Future®".

Roasted Tomatoes -- a side dish revisited!


     Back in the day, both our mom’s used to make breaded tomatoes. Seemed to be a popular side dish when we were young; one that you don’t see much anymore. I tried making them a couple of times as an adult . . . but they tasted like cooked tomatoes with some soggy bread! However, since I’ve began roasting them, we have added them to our list of everyday side dishes. (Check out our menu for Sautéed & Steamed Salmon over Veggie Quinoa and Roasted Grape Tomatoes.)
     Roasting is also a way to preserve an excess of tomatoes. The process intensifies the tomato flavor and the resulting fruit is good on pizza, on sandwiches, in salads, soups, pasta sauce, etc. They will keep in the refrigerator for 4 to 5 days, or up to 8 months in the freezer.

Roasted Tomatoes
A bunch of tomatoes, any variety

Olive oil

Kosher salt

Coarsely ground pepper

Several garlic cloves, optional
Chopped fresh herbs of your choice (such as basil and oregano), optional

1.     Cut tomatoes. If you’re using small romas, grape or cherry tomatoes, just cut in half; quarter anything larger and remove at least part of the seeds.
2.     Place tomatoes and garlic cloves in a large bowl and drizzle with enough olive oil to just coat; sprinkle with salt, pepper, and sugar. Lightly toss together, coating everything.
3.     Arrange tomatoes (and garlic cloves, if using) in a single layer, skins down, on a cookie sheet lined with foil or parchment paper.
4.     Baking options:
a.     For a quick roast: 350 - 400° for about 15 to 30 minutes (depends on the size; I roasted the grape tomatoes, pictured above,  for just about 20 min. @ 350°). This removes just a little liquid leaving a less juicy and flavorful tomato with a little bit of caramelization.
b.     For a slow roast: 300° for from about one (1) hour until tomatoes shrivel and edges start to turn brown and most of the liquid around the tomatoes has caramelized.

“Supergrain of the Future®” – Quinoa w/ Veggies

Salmon w/ Quinoa & Roasted Tomatoes
     We’ve been experimenting with quinoa for awhile and it has now become a staple in our pantry. Using the basic cooking method provided by the quinoa distributors, Barry added onions, carrots and peas to create a yummy side dish that he served with sautéed and steamed salmon. Roasted grape tomatoes were the perfect complement to a delicious meal.
     Quinoa (prounoucned keen-wa) is an ancient grain (technically a seed) that comes from the Andes Mountains of South America – “the “gold of the Incas.” Despite it’s early history, the Quinoa Corporation touts it as the “Supergrain of the Future®”. Besides being easy and quick to prepare, there are many reasons for that title – check out a few of those reasons in the section that follows Barry’s recipe.

General Cooking Tips:
·    Before cooking, be sure to rinse quinoa. It has a natural soapy coating that helps protect the seed from pests and some of may linger even after commercial cleaning.
·    Generally, use one part quinoa to two parts liquid. Plain water works fine, but experiment with broth for added flavor. Place both quinoa and liquid in a saucepan, and bring it to a boil. Reduce heat to a simmer, cover and let seeds cook for 10 to 15 minutes or until water is absorbed and the seed is translucent.                          
      Variations:
o   Sauté veggies (such as chopped onions and diced carrots) before adding the liquid.
o   Add fresh herbs as the quiona cooks.
o   Add frozen veggies, such as peas, when the quinoa is almost cooked.
o   Or, add sautéed mushrooms when quinoa is ready to be served.
o   As the quinoa is finished, add flavoring (such as curry – about 1 T. per 1 cup of uncooked quinoa) of your choice.

Calico Quinoa (Basic Quinoa w/ Veggies)   Makes 3 cups (Although we could cut the recipe down, we make it all. We add a vinaigrette to create a lunchtime side salad but our favorite thing for the leftovers: re-heat in the microwave and top with a poached or fried egg for a protein-rich breakfast.) 

1 to 2 tablespoon oil (we prefer olive)
¼ to ½ of a medium onion, chopped fine 
1 carrot, peeled and diced into very small cubes
Optional Variations: Add chopped peppers, , garlic, etc., etc.
2 cups+ chicken broth (any other broth or even water works as the liquid)
1 cup quinoa
About ½ cup of frozen peas
Salt & pepper to taste

1.   Heat oil in a 1½-quart sauce pan. Add onions and carrot cubes, etc.; sauté until veggies are tender.
Vegetables sauté in olive oil until tender.
2.   Rinse quinoa thoroughly, either by using a strainer or by running water over the quinoa in a pot. Drain excess water.
Quinoa has been place in a fine strainer and rinsed. 
3.   Add quinoa and 2 cups broth to sauce pan and bring to a boil. Reduce to a simmer, cover, and cook until all the liquid is absorbed (about 15 minutes). You will know that the quinoa is done when all the grains have turned from white to transparent, and the spiral-like germ has separated. Note—if quinoa becomes dry before cooking all the way through, add additional broth.
Broth has been added to the quinoa.
After 15 minutes, the broth has been absorbed and it's ready to eat.
Add peans, if desired, and check seasonings before serving.
4.   Add peas and season to taste near the end of the cooking period.

Find other recipes from the Quinoa Corporation @ http://www.quinoa.net/181.html

Just a few reasons quiona is considered to be a "SuperGrain of the Future" and why we are now fans . . .
·    It is light tasty, and easy to digest.
·    Quinoa contains more protein than any other grain; an average of 16.2%, compared with 7.5% for rice and 15% for wheat. A ½ cup serving of dry quinoa has approximately 11 grams of protein. When cooked, one cup of quinoa is about 254 calories and has almost 9 grams of complete protein, meaning it contains all the essential amino acids our bodies can’t make on their own..
·    Quinoa is loaded with minerals and vitamins. 
It’s a great source of calcium and high in lysine the B vitamins and iron, contains potassium, magnesium and manganese. Of these three minerals, magnesium is one of the most common mineral deficiencies in the body. Magnesium helps regulate the absorption of calcium, energy production and aids with muscle contraction.
·    Quinoa is one grain that contains no gluten, so it is safe for anyone with Celiac’s disease or a suspected intolerance to wheat products.
·    Quinorais versatile. It can be substituted for almost any grain in almost any recipe. Use it as a side dish, in soups, or salads. Or serve it for breakfast mixed with walnuts, flaxseeds, berries or dried fruit and cow, soy or almond milk.

Beyond Basic – Sweet Potato Biscuits

     Great for breakfast, lunch and dinner, biscuits are basic . . . but this recipe goes way beyond basic! I’ve served them piping hot with bacon and eggs, with fried chicken or as a side with soups. Actually I’ve even made mini ham and sweet potato biscuits for cocktail parties . . . and they were a hit.
    But whenever my thoughts turn to biscuits, I am reminded of freshman foods class and the quick breads unit. Consequently, I couldn’t help myself — you’ll find the criteria for judging your own biscuits at the end of this post. And, yes, this recipe comes out on top every time! The sweet potato purée creates a flavorful and slightly moist biscuit. I can eat them without butter but Barry insists that a pat of butter makes them even better.

Sweet Potato Biscuits      Makes 27 (1 3/4") biscuits
1 3/4 cups all-purpose flour
2 tablespoons brown sugar
2 1/2 teaspoons baking powder
1 teaspoon salt
1/2 teaspoon baking soda
6 tablespoons chilled butter – cut into pieces (unsalted preferred, but I’ve also used salted with no adverse effects . . . and I did not decrease the salt)
3/4 cup chilled sweet potato purée (cook one average-sized sweet potato in microware, peel & mash with a little-1 to 2 Tbsp.-buttermilk to create the purée)
1/3+ cup buttermilk

1.  Adjust oven racks so that biscuits can be baked in lower quarter of oven. Preheat oven to 425°. Spray a baking pan; I’m using what is known as a “quarter” size sheet pan (9”x13”).
2.  In a large bowl, whisk together the flour, sugar, baking powder, salt and baking soda.
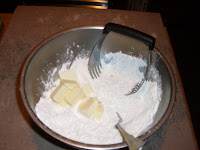
3.  With a pastry blender (or the flat blade of an electric mixer), cut butter into the dry mixture from step #2 until it resembles coarse meal, with some pea-size lumps of butter remaining.


4.  With a fork, gently stir in sweet potato purée (if using a mixer, use low speed & just barely mix in); sprinkle most of the 1/3 cup buttermilk over the dry areas in the mixture, gently stir in, adding more as needed. Do NOT overmix – at this point there are usually a few areas where you can see some dry mixture but the majority of the dough should be able to be rounded into a ball using your hands. When dough begins to form a ball, turn out on a lightly floured surface.
Notice that there is still dry ingredients that need to be incorporated into the dough.
5.  Begin to gently knead, working the dry mixture into the dough – knead about 5 or 6 times. If dough is sticky, work in a little additional flour.
6.  Shape into a disk, and pat or roll to an even 1” thickness.
Flecks of sweet potato are evident in the kneaded dough.
7.  With a floured 1 3/4" biscuit cutter, cut out biscuits as close together as possible (be sure to cut without twisting cutter or biscuits make have an uneven shape). Gather together scraps, and repeat to cut out more biscuits (the more you re-shape, the more the gluten is developed resulting in tougher biscuits). 

8.  Arrange biscuits snugly in prepared pan (to help them stay upright). Brush lightly with extra buttermilk.

9.  Place pan in lower section of oven and bake until golden, rotating once, 20 to 24 minutes.
When turned over, the biscuits should be brown on the underside.

BASIC CRITERIA for JUDGING BISCUITS
There are two types of biscuits – rolled and dropped. Both are leavened by baking powder and contain similar ingredients but differ in proportion of liquid and method of preparation. Rolled biscuits are more identical and dropped biscuits are more irregular in shape.
Following are the five standard criteria for judging rolled biscuits. Underneath each criteria is a list of possible problems and reasons they might occur.

1.  SHAPE - Smooth, level top. Straight sides.
If biscuits are an uneven shape, it could be due to improper cutting, or cutter twisted during shaping.
Uneven sides: dough might not have been a uniform thickness / uneven heat / improper mixing or careless handling
2.  VOLUME - About twice unbaked size.
Flat & heavy: might be due to incorrect proportions – Too much fat or not enough leavening, Too much flour or liquid  / Improperly mixed / Underbaked
Coarse, uneven: Improper mixing / Too much leavening / Ingredients inaccurately measured
Low volume: Improper manipulation / Not enough leavening or out-of-date leavening
/ Ingredients inaccurately measured / Wrong baking time & temperature
3.     COLOR - Creamy white with golden crust. Uniform, without streaks.
Yellow specks: Uneven distribution of soda or baking powder / Baking soda not dissolved or neutralized
Pale crust: Too slow oven / Too stiff dough or excess flour used
Dark bottom crust: Baked on too dark of a pan / baked too long
4.  TEXTURE - Moist and tender. Flaky, slightly crumbly, pulls apart in thin layers. Fine, even holes.
Tough: Lack of fat
Coarse, porous, dry: Improper mixing & too stiff dough / Overbaked / Too much fat or not enough / Fat under or overmixed with flour
Crumbly, oily: Too much fat
5.  FLAVOR – Delicate.
Bitter: Too much baking soda or powder / Ingredients not blended thoroughly
Bland, off flavor: Stale ingredients or overworked dough