Pages

Chef Alli's Pressure Cooked Creamy Penne Pasta with Ground Beef

Mom always had a stove-top pressure cooker so early on I was aware of their potential and basic operation. In Home Ec. classes at Abilene High School we covered a pressure cooking unit and I often used one at home to quick cook less-tender cuts of meat, chicken dishes and even bread pudding. So, when the latest electric pressure cooker craze hit, it was a concept that I thought I understood. After some deliberation, (Will I really use this or will it end up on a basement shelf? Do I really need it at this stage of the game?) I bought an inexpensive store brand at Aldis. I've used it a few times but mostly it set on the basement shelves! Stovetop versions hiss as they cook, the electronic one did not — was that normal I wondered. My Kitchen Living model has lots of buttons to push and a particular sequence to follow — was I doing it correctly? It seems I had more questions than answers and that made me uneasy!
So when I heard about a special event—Cows, Cooks and Conversation at Hildebrand Farms Dairy—I signed us up to attend. The cooking part featured electric pressure cooker tips and recipes with  Chef Alli. Long story short—Barry and I gave a thumbs up to both of the recipes she prepared and I gained confidence + was inspired to begin experimenting. On the way back to Abilene from JC, we stopped and purchased needed supplies for both of Chef Alli's recipes + I've also made rice pudding since then.
Although Chef Alli recommends Cuisinart brand pressure cooker for its simplicity of use, I have finally figured out the bells and whistles on my brand . . . and discovered that electric models do not hiss!
Besides her own website (Chef Alli), she also recommended This Old Gal, Pressure Cooking Today, and Hip Pressure Cooking. I've been to all those sites and bookmarked recipes I want to try.

Below is the pasta recipe that we sampled in the class -- once the pressure cooker is pressurized (took about 20 minutes for our cooker), the "meal-in-one" cooks in just 5 minutes followed by quick release and then it's ready to eat. Also everything is done in just one pan so clean up is easy.
I used sour cream instead of cream and less than suggested; I also cut down on the amount of Parmesan. Other ideas: substitute sausage or ground turkey for ground beef and vary the type of pasta. Of course, peppers and mushrooms could be added or substitute Cheddar for the Parmesan for Cheeseburger Pasta; use salsa instead of marinara and give it a Mexican twist. The recipe is quite versatile and the ideas for change are endless.

By the way, the Hildebrand Farms Dairy tour was so educational and interesting. People of all ages were on the tour and everyone seemed to enjoy themselves. And, their milk is SO good!

Creamy Penned Pasta with Ground Beef
About 2 tablespoons olive oil
1 small yellow onion, diced
3 cloves garlic, crushed
1 lb. lean ground beef (we used 85% lean)
1 teaspoon kosher salt
1/2 teaspoon black pepper
1 teaspoon Italian seasoning (I bumped it up to 1 tablespoon)
1/2 lb. mini penne pasta
24 oz. jar of marinara sauce (or homemade)
3 cups water (if broth is used, cut down on amount of salt added)
1 cup heavy whipping cream (I used about 1/2 cup of sour cream)
1 cup grated Parmesan cheese (I used less but more could also be added)
Fresh parsley for finishing if desired
  1. Set electric pressure cooker (EPC) to sauté setting, add olive oil to pot. When oil is hot (wait for the sizzle), add onions, garlic and ground beef, crumbling beef with a potato masher, cook until beef is no longer pink. Drain fat from pot if needed. 

  2. Season beef with salt, pepper, and Italian seasoning, stirring gently to combine.
  3. Evenly pour shells over ground beef in EPC pot, then add the marinara sauce and water. DO NOT STIR! (Stirring could cause the mixture to begin thickening and if the contents are too thick, the pot may not pressurize.) 
  4. Lock EPC lid into place (according to manufacture's directions) and choose High Pressure setting for 5 minutes. 
  5. When timer sounds, perform a quick release to remove all pressure from EPC (manufacture's booklet will provide quick release instructions).
  6. Carefully remove lid, then stir in cream (or sour cream) and Parmesan. (Dairy is added at this stage as  it curdles under pressure.) Note: the pasta and sauce will thicken as it sets.

  7. Finish by sprinkling with fresh parsley if desired.
Recipe without photos . . .
Creamy Penned Pasta with Ground Beef
About 2 tablespoons olive oil
1 small yellow onion, diced
3 cloves garlic, crushed
1 lb. lean ground beef (we used 85% lean)
1 teaspoon kosher salt
1/2 teaspoon black pepper
1 teaspoon Italian seasoning (I bumped it up to 1 tablespoon)
1/2 lb. mini penne pasta
24 oz. jar of marinara sauce (or homemade)
3 cups water (if broth is used, cut down on amount of salt added)
1 cup heavy whipping cream (I used about 1/2 cup of sour cream)
1 cup grated Parmesan cheese (I used less but more could also be added)
Fresh parsley for finishing if desired
  1. Set electric pressure cooker (EPC) to sauté setting, add olive oil to pot. When oil is hot (wait for the sizzle), add onions, garlic and ground beef, crumbling beef with a potato masher, cook until beef is no longer pink. Drain fat from pot if needed. 
  2. Season beef with salt, pepper, and Italian seasoning, stirring gently to combine.
  3. Evenly pour shells over ground beef in EPC pot, then add the marinara sauce and water. DO NOT STIR! (Stirring could cause the mixture to begin thickening and if the contents are too thick, the pot may not pressurize.) 
  4. Lock EPC lid into place (according to manufacture's directions) and choose High Pressure setting for 5 minutes. 
  5. When timer sounds, perform a quick release to remove all pressure from EPC (manufacture's booklet will provide quick release instructions).
  6. Carefully remove lid, then stir in cream (or sour cream) and Parmesan. (Dairy is added at this stage as  it curdles under pressure.) Note: the pasta and sauce will thicken as it sets.
  7. Finish by sprinkling with fresh parsley if desired.

Kolache Cookies -- reminiscent of a Kolache bun

Kolache Cookies filled with Red Raspberry Jam 
This is a yeast-based cookie recipe reminiscent of  Kolache buns. Years ago I saw Martha Stewart make Kolache Cookies on her TV show and I was intrigued. They were so good that I ended up making them for Kirby House catered events and so included the recipe in The Kirby House Cookbook. Since then I’ve made just a few adjustments in the recipe so this is the latest version.

Kolache Cookies    Makes about 4 1/2 dozen (1-inch) cookies
2 1/4 teaspoons active dry yeast (not rapid-rise; one whole 1/4-ounce envelope) 
1/4 cup sour cream, room temperature 
2 large eggs 
2 cups  all-purpose flour, plus more for dusting 
1/4 cup granulated sugar 
1 teaspoon kosher salt 
1 cup (2 sticks) unsalted butter, chilled and cut into small pieces 
About 6 tablespoons fruit jam, jelly or preserves
Glaze 
1 cup powdered sugar, sifted 
2 tablespoons unsalted butter, melted 
2 to 3 tablespoons whole milk 
  1. Cookies: In a small bowl, stir together yeast and sour cream. Let stand until yeast dissolves, about 10 minutes. Whisk in eggs until smooth. Set aside.
    Above: Yeast and sour cream combined.
    Below: Eggs whisked into yeast mixture.

  2. Add butter and flour to a medium mixing bowl and use electric mixer to cut the butter into flour until it resembles coarse meal (or use a pastry blender instead of mixter)

  3. Stir in yeast mixture until dough comes together. Wrap dough in plastic and flatten into a square. Refrigerate at least 30 minutes.
  4. Preheat oven to 400°.
  5. On a lightly floured surface, roll out dough 1/4-inch thick. (Note: I worked with just half of the dough at a time.) Using a 1 to 1 1/2-inch round cutter, cut out rounds. Reroll any uncut dough and continue to cut out rounds.
  6. Transfer to two parchment-lined baking sheets, spaced about 1 1/2 inches apart.
  7. Cover with a clean kitchen towel or plastic wrap. Let set for 15 minutes.
  8. Make a thumbprint in center of each cookie.
  9. Fill each thumbprint with a dollop of jam, jelly or preserves.
  10. Bake until edges are golden, 12 to 15 minutes.
  11. Let cookies cool on sheets on wire racks 5 minutes, then transfer cookies to racks to cool completely.
  12. Glaze: In a medium bowl, whisk together powdered sugar and butter.
  13. While whisking, drizzle in milk, a little at a time, until glaze has a runny consistency. 
  14. Using a spoon, drizzle glaze over cookies. (Note: I placed a sheet of waxed paper under cooling rack to catch the drips.)  Let stand until set, about 1 hour.
  15. Glazed cookies can be stored in an airtight container at room temperature up to 2 days.
Recipe without photos . . .
Kolache Cookies    Makes about 4 1/2 dozen (1-inch) cookies
2 1/4 teaspoons active dry yeast (not rapid-rise; one whole 1/4-ounce envelope) 
1/4 cup sour cream, room temperature 
2 large eggs 
2 cups all-purpose flour, plus more for dusting 
1/4 cup granulated sugar 
1 teaspoon kosher salt 
1 cup (2 sticks) unsalted butter, chilled and cut into small pieces 
About 6 tablespoons fruit jam, jelly or preserves
Glaze 
1 cup powdered sugar, sifted 
2 tablespoons unsalted butter, melted 
2 to 3 tablespoons whole milk 
  1. Cookies: In a small bowl, stir together yeast and sour cream. Let stand until yeast dissolves, about 10 minutes. Whisk in eggs until smooth. Set aside.
  2. Add butter and flour to a medium mixing bowl and use electric mixer to cut the butter into flour until it resembles coarse meal (or use a pastry blender instead of mixter)
  3. Stir in yeast mixture until dough comes together. Wrap dough in plastic and flatten into a square. Refrigerate at least 30 minutes.
  4. Preheat oven to 400°.
  5. On a lightly floured surface, roll out dough 1/4-inch thick. (Note: I worked with just half of the dough at a time.) Using a 1 to 1 1/2-inch round cutter, cut out rounds. Reroll any uncut dough and continue to cut out rounds.
  6. Transfer to two parchment-lined baking sheets, spaced about 1 1/2 inches apart.
  7. Cover with a clean kitchen towel or plastic wrap. Let set for 15 minutes.
  8. Make a thumbprint in center of each cookie.
  9. Fill each thumbprint with a dollop of jam, jelly or preserves.
  10. Bake until edges are golden, 12 to 15 minutes.
  11. Let cookies cool on sheets on wire racks 5 minutes, then transfer cookies to racks to cool completely.
  12. Glaze: In a medium bowl, whisk together powdered sugar and butter.
  13. While whisking, drizzle in milk, a little at a time, until glaze has a runny consistency. 
  14. Using a spoon, drizzle glaze over cookies. (Note: I placed a sheet of waxed paper under cooling rack to catch the drips.) Let stand until set, about 1 hour.
  15. Glazed cookies can be stored in an airtight container at room temperature up to 2 days.

Salt Free Seasoning “Salt”

My mom's on a restricted salt diet so here's a homemade salt-free seasoning I mixed up for her using the spices we had on hand (we have lots). Most all typical spices used in the salt-free seasoning recipes I checked out. However I added turmeric and curry powder since these are "healthy" spices we like to add while we are cooking.

Salt-free Seasoning “Salt”
1 tablespoons lemon pepper (salt free version or use a blend of black pepper & dried lemon peel)
1 tablespoon Italian seasoning
1 tablespoon garlic powder
1 tablespoon onion powder
1 tablespoon white pepper
1 tablespoon dry mustard
1 tablespoon paprika
1 tablespoon ground celery seed (grind celery seeds in a spice grinder)       
1 teaspoon turmeric  & 1 teaspoon curry powder                                                                                                                                                                                                                        
  1. Put lemon pepper and Italian seasoning in a spice grinder or NutraBullet and grind to make a powder. (All the remaining spices are already in powder form).
  2. Combine all ingredients.

  3. Store in an air-tight container.
Recipe without photos . . .
Salt-free Seasoning “Salt”
1 tablespoons lemon pepper  (salt free version or use a blend of black pepper & dried lemon peel)
1 tablespoon Italian seasoning
1 tablespoon garlic powder
1 tablespoon onion powder
1 tablespoon white pepper
1 tablespoon dry mustard
1 tablespoon paprika
1 tablespoon ground celery seed (grind celery seeds in a spice grinder)       
1 teaspoon turmeric & 1 teaspoon curry powder                                                                                                             
  1. Put lemon pepper and Italian seasoning in a spice grinder or NutraBullet and grind to make a powder. (All the remaining spices are already in powder form).
  2. Combine all ingredients.
  3. Store in an air-tight container.

Malted Milk Palmiers made from Homemade Puff Pastry

Today I took King Arthur’s Sunday Recipe Round Up challenge and made my own HOMEMADE PUFF PASTRY that was then used to prepare Malted Milk Palmiers!
A perfect challenge and project for a cold and dreary Sunday afternoon. And, YES, is did take all afternoon by then time I rolled the dough, rerolled, chilled and repeated the process several times.
I had several questions as I went along so consulted some other websites to double check that I was correctly interpreting the recipe. I have made some additions and provided some tips in the step-by-step instructions that follow.
King Arthur describes these palmiers as “Crispy, flaky, and utterly addictive, the classic palmier takes on a whole new character with the addition of malted milk and a hint of chocolate in the filling.”

Malted Milk Palmiers
3 cups King Arthur Unbleached Bread Flour
1 teaspoon active dry or instant yeast
1/2 cup malted milk powder (Carnation® is the brand I used)
24 tablespoons (1 1/2 cups or 3 sticks) cold unsalted butter, cut in 1/2" pieces
1/2 cup cold water + 1 to 2 tablespoons additional water as needed
1 1/2 teaspoons vanilla extract
1 1/2 teaspoons salt
Filling:
6 tablespoons granulated sugar
6 tablespoons malted milk powder 
2 teaspoons cocoa 
Extra granulated sugar, for rolling and sprinkling

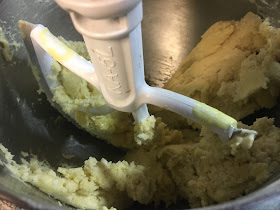
1.  To make the dough: Using a stand mixer with a paddle attachment, combine the flour, yeast, malted milk powder, and butter, mixing until the butter chunks are partly broken up and flattened. 


2.  In a separate container, stir together the water, vanilla, and salt.

3.  With the mixer running on low, add to the flour mixture. Mix until the dough just begins to come together but has lots of visible butter chunks intact.
4.  Turn the dough out onto a floured surface and fold it over on itself until it comes together.


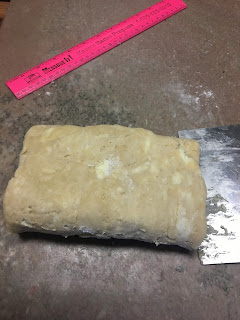
5.  Form the dough into a 6" x 14" rectangle and fold it in thirds, lining up the edges tidily to stack on top of each other – a marble surface and a bench knife are helpful for this process. Then, turn the folded dough 90° and again roll into a 6" x 14" rectangle. Again, fold in thirds like a letter again, being particular about having the edges line up.
Form the dough into a 6" x 14" rectangle
Fold dough in thirds, lining up the edges.
Turn the folded dough 90° and again roll into a 6" x 14" rectangle    
Again, fold in thirds. 

6.  Wrap and refrigerate for 30 minutes.
7.  After 30 minutes, repeat the rolling and folding process twice more (in other words, repeat the directions in step #5 twice).
8.  Wrap and return to the refrigerator for 45 minutes to 1 hour. 
9.  To make the filling: Whisk all the ingredients together. 

10. To shape the palmiers: Divide the dough in half and return one half to the refrigerator. Sprinkle your work surface with granulated sugar and roll the dough into a 15" x 10" rectangle. Note: I used a silicon mat to roll out the dough; it was easy to roll the dough on the mat and then transfer it to the refrigerator for chilling.

11. Sprinkle the dough with 4 to 5 tablespoons of the filling mixture. Place a piece of parchment over the dough and filling. Gently roll with your rolling pin, to press the filling into the dough.

12. Remove the parchment and, starting with the long edges, roll the two sides toward each other until they meet in the center, like a scroll. Repeat with the remaining dough, wrap the scrolls individually, and refrigerate for at least an hour (or freeze for 20 minutes.)

13. To bake: Preheat the oven to 400°F. Line two baking sheets with parchment.
14.  Using unflavored dental floss or a sharp knife, slice each roll into 1/3" pieces and lay the slices, cut side up, on the prepared baking sheets, leaving 1" of space between them. Sprinkle the top of each palmier with 1/2 teaspoon of granulated sugar. 

15. Bake the pastries for 9 to 10 minutes, until the sugar on the bottom has begun to brown. Remove them from the oven and turn them over with a spatula. Bake for an additional 5 to 6 minutes, until the sugar is lightly browned on the second side. Watch closely: these go from golden brown to scorched very quickly. 

16. Remove the palmiers from the oven and let them cool on a rack. They'll crisp up as they cool.


17. Store palmiers, well wrapped, at room temperature for several days; freeze for longer storage.

Recipe without photos . . .
Malted Milk Palmiers 
3 cups King Arthur Unbleached Bread Flour 
1 teaspoon active dry or instant yeast 
1/2 cup malted milk powder (Carnation® is the brand I used)
24 tablespoons (1 1/2 cups or 3 sticks) cold unsalted butter, cut in 1/2" pieces
1/2 cup cold water + 1 to 2 tablespoons additional water as needed
1 1/2 teaspoons vanilla extract 
1 1/2 teaspoons salt
Filling
6 tablespoons granulated sugar
6 tablespoons malted milk powder  
2 teaspoons cocoa 
Extra granulated sugar, for rolling and sprinkling

1.  To make the dough: Using a stand mixer with a paddle attachment, combine the flour, yeast, malted milk powder, and butter, mixing until the butter chunks are partly broken up and flattened. 
2.  In a separate container, stir together the water, vanilla, and salt. 
3.  With the mixer running on low, add to the flour mixture. Mix until the dough just begins to come together but has lots of visible butter chunks intact.
4.  Turn the dough out onto a floured surface and fold it over on itself until it comes together 
5.  Form the dough into a 6" x 14" rectangle and fold it in thirds, lining up the edges tidily to stack on top of each other – a marble surface and a bench knife are helpful for this process. Then, turn the folded dough 90° and again roll into a 6" x 14" rectangle. Again, fold in thirds like a letter again, being particular about having the edges line up. 
6.  Wrap and refrigerate for 30 minutes.
7.  After 30 minutes, repeat the rolling and folding process twice more (in other words, repeat the directions in step #5 twice). 
8.  Wrap and return to the refrigerator for 45 minutes to 1 hour. 
9.  To make the filling: Whisk all the ingredients together. 
10. To shape the palmiers: Divide the dough in half and return one half to the refrigerator. Sprinkle your work surface with granulated sugar and roll the dough into a 15" x 10" rectangle. Note: I used a silicon mat to roll out the dough; it was easy to roll the dough on the mat and then transfer it to the refrigerator for chilling.
11. Sprinkle the dough with 4 to 5 tablespoons of the filling mixture. Place a piece of parchment over the dough and filling. Gently roll with your rolling pin, to press the filling into the dough.
12. Remove the parchment and, starting with the long edges, roll the two sides toward each other until they meet in the center, like a scroll. Repeat with the remaining dough, wrap the scrolls individually, and refrigerate for at least an hour (or freeze for 20 minutes.)
13. To bake: Preheat the oven to 400°F. Line two baking sheets with parchment.
14.  Using unflavored dental floss or a sharp knife, slice each roll into 1/3" pieces and lay the slices, cut side up, on the prepared baking sheets, leaving 1" of space between them. Sprinkle the top of each palmier with 1/2 teaspoon of granulated sugar. 
15. Bake the pastries for 9 to 10 minutes, until the sugar on the bottom has begun to brown. Remove them from the oven and turn them over with a spatula. Bake for an additional 5 to 6 minutes, until the sugar is lightly browned on the second side. Watch closely: these go from golden brown to scorched very quickly. 
16. Remove the palmiers from the oven and let them cool on a rack. They'll crisp up as they cool.
17. Store palmiers, well wrapped, at room temperature for several days; freeze for longer storage.