Pages

Slow Cooker Country-Style Ribs and Kraut

Easy, homemade Sauerkraut (fermented by the quart), an apples and onions of course,
Slow Cooker Country-Style Ribs and Kraut combine to create a perfectly balanced and tasty  slow cooked meal. Barry commented that  sourness of the sauerkraut is offset by the sweetness of the apple and apple juice. Yum!


Slow Cooker Country-Style Ribs and Kraut   About 4+ servings
2 lb. boneless pork country-style ribs
Kosher salt & pepper
1 medium cooking apple, sliced
1 small onion, sliced
2 to 4 cups sauerkraut, drained — I used homemade and we like LOTS of kraut so I recommend 5 cups; this would be equivalent to about 2 (14 oz.) cans
1/4 cup apple juice or apple cider
  1. In a 3 1/2 to 4 quart slow cooker, add ribs and sprinkle with salt and pepper; then add apple and onion slices. Pour apple juice or cider over the top.

  2. Cover and cook 8 to 10 hours on Low. The meat will be tender and ready to eat in about 5 hours but the flavor is better if left longer + the kraut also browns if left in the cooker for the longer time period. Pork will also be fork-tender at the end of about 8 hours.
Recipe without photos . . .
Slow Cooker Country-Style Ribs and Kraut   About 4+ servings
2 lb. boneless pork country-style ribs
Kosher salt & pepper
1 medium cooking apple, sliced
1 small onion, sliced
2 to 4 cups sauerkraut, drained — I used homemade and we like LOTS of kraut so I recommend 5 cups; this would be equivalent to about 2 (14 oz.) cans
1/4 cup apple juice or apple cider
  1. In a 3 1/2 to 4 quart slow cooker, add ribs and sprinkle with salt and pepper; then add apple and onion slices. Pour apple juice or cider over the top.
  2. Cover and cook 8 to 10 hours on Low. The meat will be tender and ready to eat in about 5 hours but the flavor is better if left longer + the kraut also browns if left in the cooker for the longer time period. Pork will also be fork-tender at the end of about 8 hours.

Sand Plum Jelly

It’s that time of year –– sand plums are at their prime at the Henry farm. Barry, Steve and I picked and . . . after following the steps below, we ended up with 29 jars of Sand Plum Jelly + 3 ½ quarts of juice that went into the freezer.


Although unripe sand plums do have a high pectin content (3/4 ripe plus to ¼ unripe plums), after all the picking, sorting, and cooking, I prefer to rely on Sure Jell™, making sure after a labor intensive endeavor, that the jelly actually gells1
Here’s the instructions, in usable form, that are included in the package of Sure Jell™ with a few of my own additions (based on old time recipes) . . .

Sand Plum Jelly  Approximately 4 lbs. of plums yields about 9 cups of jelly 
5 1/2 cups prepared juice 
6 1/2 cups granulated sugar
1 (1.75 oz.) pkg. Sure Jell®
1/2 teaspoon butter or margarine
  1. To make juice: Sort plums using red, pink and partially pink plums; discard leaves and stems.
  2. Place in a large pot and barely cover with water.
  3. Cover and heat on high temperature; bring to a boil, then reduce temperature to medium high; reduce heat and simmer  approximately 10 minutes or until plums are soft and tender; stir often.
  4. Cool slightly and strain juice and plums through cheesecloth (a cheesecloth bag made by sewing 2-3 layers of cheesecloth into a e bag shape is ideal). Tie cheesecloth closed; hang and let drip into bowl until dripping stops. Press gently. (I usually let plums drip overnight and then proceed to next step.)
  5. To make jelly: Fill water bath canner with water (enough to cover jars); bring to a boil.
  6. In another container, sterilize  jars and lids by simmering in boiling water for at least 10 minutes while jelly is cooking. (Recipe for Crabapple Jelly contains photos of this process.)
  7. Measure EXACT amount of granulated sugar into a bowl and set aside. DO NOT REDUCE AMOUNT OF SUGAR AS THIS WILL RESULT IN SET FAILURE!
  8. Measure EXACT amount of prepared fruit juice into large saucepan.
  9. Stir in 1 pkg. Sure Jell® into prepared juice. Add 1/2 teaspoon butter or margarine to reduce foaming.
  10. Bring mixture  to full rolling boil—a boil that doesn’t stop bubbling when stirred—on high heat, stirring constantly.
  11. Add pre-measured sugar to juice in saucepan. Return to full rolling boil; boil exactly 1 minute stirring constantly.  I continue to cook longer until jelly starts to sheet off a spoon—an old time indication that jelly is gelled (see diagram below); usually about a minute of two longer.

  12. Remove from heat. Skim off any foam with a metal spoon.
  13. Immediately ladle into prepared jars, filling each to within 1/4” of top. Wipe jar rims and threads. Cover with two-piece lids. 
  14. Place jar on elevated rack in water-bath canner that is filled with boiling water (step 1) . Lower rack into canner. (Water must cover jars by 1 to 2 inches. Add boiling water if needed.) 
  15. Add water-bath canner lid and then bring water to a gentle boil. 
  16. Then, process jelly for 5 minutes for Kansa altitudes. (Adjust altitude as needed.)
  17. Remove jars and place upright on a cooling rack to cool completely.
  18. After jars cool, check seals by pressing center of lids with finger; if lid springs back, lid is not sealed and refrigeration is necessary
  19. Let prepared jars stand at room temperature 24 hours. Label and store jellies in cool, dry, dark place up to 1 year. Refrigerate opened jellies up to 3 weeks.
Recipe without photos . . .
Sand Plum Jelly  Approximately 4 lbs. of plums yields about 9 cups of jelly 
5 1/2 cups prepared juice 
6 1/2 cups granulated sugar
1 (1.75 oz.) pkg. Sure Jell®
1/2 teaspoon butter or margarine
  1. To make juice: Sort plums using red, pink and partially pink plums; discard leaves and stems.
  2. Place in a large pot and barely cover with water.
  3. Cover and heat on high temperature; bring to a boil, then reduce temperature to medium high; reduce heat and simmer  approximately 10 minutes or until plums are soft and tender; stir often.
  4. Cool slightly and strain juice and plums through cheesecloth (a cheesecloth bag made by sewing 2-3 layers of cheesecloth into a e bag shape is ideal). Tie cheesecloth closed; hang and let drip into bowl until dripping stops. Press gently. (I usually let plums drip overnight and then proceed to next step.)
  5. To make jelly: Fill water bath canner with water (enough to cover jars); bring to a boil.
  6. In another container, sterilize  jars and lids by simmering in boiling water for at least 10 minutes while jelly is cooking. (Recipe for Crabapple Jelly contains photos of this process.)
  7. Measure EXACT amount of granulated sugar into a bowl and set aside.DO NOT REDUCE AMOUNT OF SUGAR AS THIS WILL RESULT IN SET FAILURE!
  8. Measure EXACT amount of prepared fruit juice into large saucepan.
  9. Stir in 1 pkg. Sure Jell® into prepared juice. Add 1/2 teaspoon butter or margarine to reduce foaming.
  10. Bring mixture  to full rolling boil—a boil that doesn’t stop bubbling when stirred—on high heat, stirring constantly.
  11. Add pre-measured sugar to juice in saucepan. Return to full rolling boil; boil exactly 1 minute stirring constantly. (I continue to cook longer until jelly mixture sheets off a spoon—an old time indication that jelly is gelled—usually about a minute of two longer.)
  12. Remove from heat. Skim off any foam with a metal spoon.
  13. Immediately ladle into prepared jars, filling each to within 1/4” of top. Wipe jar rims and threads. Cover with two-piece lids. 
  14. Place jar on elevated rack in water-bath canner that is filled with boiling water (step 1) . Lower rack into canner. (Water must cover jars by 1 to 2 inches. Add boiling water if needed.) 
  15. Add water-bath canner lid and then bring water to a gentle boil. 
  16. Then, process jelly for 5 minutes for Kansas altitude. (Adjust altitude as needed.)
  17. Remove jars and place upright on a cooling rack to cool completely.
  18. After jars cool, check seals by pressing center of lids with finger; if lid springs back, lid is not sealed and refrigeration is necessary
  19. Let prepared jars stand at room temperature 24 hours. Label and store jellies in cool, dry, dark place up to 1 year. Refrigerate opened jellies up to 3 weeks.

Caramel Frosted Zucchini Pecan Bars

Zucchini season is in full swing in Kansas! So, it's time to try new recipes and this one in definitely a keeper! OH SO GOOD . . .

Caramel Frosted Zucchini Pecan Bars   Makes one 9”x13”  pan/dish or 12 bars
Bars
1 1/2 cups granulated sugar
3 large eggs
1 cup vegetable oil (canola)
1/2 teaspoons vanilla
2 cups all purpose flour
1 teaspoon baking powder
1/2 teaspoon salt
1 teaspoon ground cinnamon
2 cups lightly packed shredded zucchini (about 2 medium)
1 1/2 cups chopped pecans

Caramel frosting
1 cup (2 sticks) unsalted butter
1 cup lightly packed dark brown sugar
1/4 cup heavy cream
2 to 2 1/2 cups powdered sugar, sifted
  1. Preheat oven to 350°. Spray a 9”x13” pan/dish.
  2. Bars:Crack the eggs into a large mixing bowl. Whisk in the sugar, oil, and vanilla and blend really well.
  3. Sift in the flour, cinnamon, baking powder, and salt. Blend until combined.
  4. Fold in the zucchini and the nuts.

  5. Spread batter evenly in prepared pan.
  6. Bake for about 25 to 30 minutes, or until the top springs back when touched, and a toothpick inserted in the center comes out without any wet batter clinging to it. Check early to prevent overbaking; if using a glass or ceramic baking dish, cake tends to bake faster (oven temp could also be lowered in baking in glass or ceramic dish). 
  7. Frosting:  Cut butter into large chunks and in a medium-sized. saucepan. 
  8. Add the brown sugar and bring it to a boil over medium heat, stirring constantly. Boil for 2 minutes, stirring. 
  9. Add the heavy cream, and boil for another minute.
  10. Remove from the heat and carefully beat in the powdered sugar, a cup at a time. Stop adding sugar when the frosting seems thick enough to spread. 

  11. Pour the frosting over the cake a warm or cool cake. If frosting is too thick, thin with a little more water. If it begins to become firm, dip spreader in very hot water and continue.

Recipe without photos . . .
Caramel Frosted Zucchini Pecan Bars   Makes one 9”x13”  pan/dish or 12 bars
Bars
1 1/2 cups granulated sugar
3 large eggs
1 cup vegetable oil (canola)
1/2 teaspoons vanilla
2 cups all purpose flour
1 teaspoon baking powder
1/2 teaspoon salt
1 teaspoon ground cinnamon
2 cups lightly packed shredded zucchini (about 2 medium)
1 1/2 cups chopped pecans

Caramel frosting
1 cup (2 sticks) unsalted butter
1 cup lightly packed dark brown sugar
1/4 cup heavy cream
2 to 2 1/2 cups powdered sugar, sifted
  1. Preheat oven to 350°. Spray a 9”x13” pan/dish.
  2. Bars:Crack the eggs into a large mixing bowl. Whisk in the sugar, oil, and vanilla and blend really well.
  3. Sift in the flour, cinnamon, baking powder, and salt. Blend until combined.
  4. Fold in the zucchini and the nuts.
  5. Spread batter evenly in prepared pan.
  6. Bake for about 25 to 30 minutes, or until the top springs back when touched, and a toothpick inserted in the center comes out without any wet batter clinging to it. Check early to prevent overbaking; if using a glass or ceramic baking dish, cake tends to bake faster (oven temp could also be lowered in baking in glass or ceramic dish). 
  7. Frosting:  Cut butter into large chunks and in a medium-sized. saucepan. 
  8. Add the brown sugar and bring it to a boil over medium heat, stirring constantly. Boil for 2 minutes, stirring. 
  9. Add the heavy cream, and boil for another minute.
  10. Remove from the heat and carefully beat in the powdered sugar, a cup at a time. Stop adding sugar when the frosting seems thick enough to spread. 
  11. Pour the frosting over the cake a warm or cool cake. If frosting is too thick, thin with a little more water. If it begins to become firm, dip spreader in very hot water and continue.

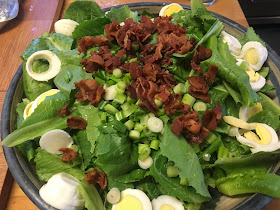
Wilted Lettuce Salad with Hot Bacon Dressing

Garden greens prepared in an old-fashioned way . . . 

Wilted Lettuce Salad with Hot Bacon Dressing   Serves about 6
Hot Bacon Dressing     Makes  2-1/2 cups
1/4 cup granulated sugar
2 tablespoons cornstarch
1 cup milk
1 tablespoon grainy mustard
1 teaspoon celery seed
1 teaspoon salt
1/2 teaspoon black pepper
1/4 cup bacon drippings left from bacon used in salad  (see salad ingredients below)
1/2 cup apple cider vinegar
1/2 cup water
  1. In a saucepan, whisk together sugar, and cornstarch; add the milk, mustard, celery seed, salt, black pepper,
  2. Add the bacon drippings, vinegar and water and stir until it reaches a boil.
  3. Chill until needed, heating before use.
Wilted Lettuce Salad 
6 large handfuls of lettuce—curly, romaine, spinach, etc.
6  green onions, chopped (both white & green parts)
2 hard cooked eggs, sliced
6 slices bacon, cooked crisp and crumbled — save bacon drippings for dressing
3/4 cup hot bacon dressing (see recipe above)
  1. Toss lettuce with scallions, hand cooked eggs and bacon.
  2. Heat dressing to a boil.
  3. Add dressing and toss, serve at once. Or, place dressing in a pitcher and let guests add their own dressing and toss.  
Recipe without photos . . .
Wilted Lettuce Salad with Hot Bacon Dressing   Serves about 6
Hot Bacon Dressing     Makes  2-1/2 cups
1/4 cup granulated sugar
2 tablespoons cornstarch
1 cup milk
1 tablespoon grainy mustard
1 teaspoon celery seed
1 teaspoon salt
1/2 teaspoon black pepper
1/4 cup bacon drippings left from bacon used in salad  (see salad ingredients below)
1/2 cup apple cider vinegar
1/2 cup water
  1. In a saucepan, whisk together sugar, and cornstarch; add the milk, mustard, celery seed, salt, black pepper,
  2. Add the bacon drippings, vinegar and water and stir until it reaches a boil.
  3. Chill until needed, heating before use.
Wilted Lettuce Salad 
6 large handfuls of lettuce—curly, romaine, spinach, etc.
6  green onions, chopped (both white & green parts)
2 hard cooked eggs, sliced
6 slices bacon, cooked crisp and crumbled — save bacon drippings for dressing
3/4 cup hot bacon dressing (see recipe above)
  1. Toss lettuce with scallions, hand cooked eggs and bacon.
  2. Heat dressing to a boil.
  3. Add dressing and toss, serve at once. Or, place dressing in a pitcher and let guests add their own dressing and toss.  

Cucumber-Lime Martini -- cool & refreshing


It's cool and refreshing. My sister, Marla Payne, introduced me to this taste of summer drink. She called it a Cucumber-Lime Martini and made it following the directions on bottle of Svedka Cucumber Lime Vodka . . . with the exception that she muddled a slice of cucumber and lime and then added the suggested ingredients.
FYI—The recipe on the bottle of vodka is called Cucumber Hither.


Cucumber-Lime Martini
1 1/2 parts Svedka Cucumber Lime Vodka
1/4 part fresh lime juice
1/4 part Simple Syrup (see directions below)
  1. Muddle a slice of cucumber and a sprig or two of mint in the bottom of a shaker or pitcher. Fill with ice.
  2. Add vodka, lime juice and simple syrup. Shake or stir.
  3. Add to a martini or cocktail glass filled with ice.
  4. Garnish with a sprig of fresh mint and a slice of cucumber.
  5. Enjoy!
To make Simple Syrup: Add equal amounts of granulated sugar and water; heat to a boil or until sugar dissolves in water. Store in refrigerator to use to sweeten drinks.

Japanese MILK BREAD


Brian Hart Hoffman, a spokesman for Red Star Yeast, demonstrated how to make Milk Bread at the 2019 National Festival of Breads in Manhattan KS. The bread incorporates a Japanese “tangzhong” — a technique that creates a milk-flour paste. (Briann Hart Hoffman's website: Bake From Scratch.)
Milk bread is a soft white bread but despite its softness, it does have body and an interesting, somewhat dense texture. The taste is incredible and I am definitely a fan. Brian also used the dough to create sweet rolls and said it make delicious dinner rolls and the cinnamon rolls stay soft for several days.. 
Barry used part of the loaf to make fantastic French toast. So good!


King Arthur Flour’s website has this to say about TANGZHONG:
This Japanese technique cooks a small percentage of the flour and liquid (water or milk) in a yeast recipe very briefly before combining the resulting thick slurry with the remaining ingredients.
How does this technique affect yeast dough? It pre-gelatinizes the starches in the flour, meaning they can absorb more water. In fact, flour will absorb twice as much hot water or milk as it does the cool/lukewarm water or milk you’d usually use in yeast dough.
Not only does the starch in the flour absorb more liquid; since heating the starch with water creates structure, it’s able to hold onto that extra liquid throughout the kneading, baking, and cooling processes. Which in turn means:
• Since there’s less free (unabsorbed) water in the dough, it’s less sticky and easier to knead;
• The bread or rolls may rise higher, due to more water creating more internal steam (which makes bread rise in the oven — along with the carbon dioxide given off by the yeast);
• Having retained more water during baking, bread and rolls will be moister, and will stay soft and fresh longer

I made the recipe exactly like the handout provided by Red Star Yeast (recipe with ingredients is on their website) except that in step 1, the recipe says to cook the tangzhong until it registers 149°F (65°C) on an instant-read thermometer—the milk-flour turned into a thick paste long before it reached that temp so I took it off the heat, cooled it and proceeded with the recipe. This is a Red Star recipe in partnership with Genie Prado. 

Milk Bread  Makes 1 9x5-inch loaf
(See Red Star recipe for list of ingredients)

1. Tangzhong: In a small saucepan, whisk together milk and flour. Cook over medium-low heat, whisking constantly, until mixture thickens and whisk leaves lines on bottom of saucepan. Transfer to a small bowl, and let cool to room temperature before using.

After a few minutes of cooking, the Tangzhong should look like this.
2. In a mixing bowl,  stir together flour, sugar, yeast, and salt by hand. Add Tangzhong.
3. In another smaller bowl, lightly whisk together warm milk, melted butter, and 1 egg. 
4. Then, add milk mixture to flour mixture; beat at low speed (using a stand mixer with the flat blade attachment) until a soft dough forms, about 3 minutes. Scrape sides of bowl, and switch to the dough hook attachment. Beat at low speed for 3 minutes. Increase mixer speed to medium-low, and beat for about 8 minutes. 

Above: After 3 minutes using dough hook, the dough is still sticky.
Below: After 8 additional minutes, without added flour, the dough is cohesive and ready to form into a ball.
5. Lightly oil a large bowl. Shape dough into a smooth ball, and place in bowl, turning to grease top.     6. Cover and let rise in a warm, draft-free place until doubled in size, about 1 hour. 

7. Spray a 9x5-inch loaf pan with pan release.
8. Punch down dough, and turn out onto a lightly floured surface. Divide dough into 3 equal portions . Shape each portion into a ball. Roll each ball into a 12x5-inch oval. With one oval horizontally in front, fold right third over middle third. Fold left side over middle. Using a rolling pin, flatten dough, and reroll into a 12x5-inch oval. Starting with one short side, roll up dough, jelly roll style, into a tube-like shape. Place seam side down in the center of the prepared pan. Repeat with remaining two portions of dough and place in the pan on either side of the first tube. Cover and let rise in a warm, draft-free place until puffed and dough fills pan, 30 to 45 minutes.
Weigh the dough for equal sized balls.
Roll each ball into a 12x5-inch oval.
Fold right third over middle third.
Fold left side over middle.
Using a rolling pin, flatten dough, and reroll into a 12x5-inch oval. Starting with one short side, roll up dough, jelly roll style, into a tube-like shape. Place seam side down in the center of the prepared pan.
 Place seam side down in the center of the prepared pan.
Repeat with remaining two portions of dough and place in the pan on either side of the first tube.
9. Preheat oven to 350°F.
10. In a small bowl, whisk together milk and remaining 1 egg . Brush top of loaf with egg wash.

11. Bake until golden brown and an instant-read thermometer inserted in center registers 190°F., about 30 minutes, covering with foil during last 10 minutes of baking to prevent excess browning. Let cool in pan for 15 minutes. Remove from pan, and let cool completely on a wire rack.