Pages

Creamy Italian Dressing

A tasty dressing to have on hand. We've been using it on some of our Salads-in-a-Jar.

1 1/2 teaspoons of dried Italian seasoning may be used in place of the dried basil, oregano and thyme. 

Creamy Italian Dressing      Makes about 1 1/4 cups

1/4 cup white vinegar

2 tablespoons lemon juice

1/3 cup olive oil

1/2 cup mayonnaise

1/2 teaspoon dried basil or about 1 1/2 teaspoons fresh chopped basil

1/2 teaspoon dried oregano or about 1 1/2 teaspoons fresh chopped oregano

1/2 teaspoon dried thyme or about 1 teaspoon fresh thyme leaves

2 teaspoons honey

1/4 cup finely grated Parmesan cheese

Salt & pepper to taste

A few tablespoons of water (only if needed) to thin the dressing

  1. Add all ingredients except water to a jar with a tight-fitting lid. Add lid and shake well to combine. Taste and adjust seasonings as desired.
  2. Store in the refrigerator for up to 5 days. 
  3. Shake well before serving and add water if dressing is too thick. 

Homemade Noodles . . . Cuisine style!

Chicken and noodles hit the spot on a cool, crisp day that has us looking forward to fall. I made the noodles. Barry made the thickened chicken mixture using homemade stock and a few diced veggies and I made homemade noodles. 

This is not your ordinary recipe or even the ones my mom used to make. It is one that was included in Issue # 143 (Sept/Oct) of Cuisine At Home. We have subscribed to this magazine from almost the beginning so have about 130 of their back issues. Photos are included with each step of the directions and there are always lots of good tips along with interesting recipes. 

Their pasta recipe caught my eye as it included cake flour and was mixed in a food processor. The homemade pasta recipes I usually make often call for part semolina flour but certainly not cake home. I had farm fresh eggs on hand so I decided to give the Cuisine version a try. 

Oh my! Our chicken and noodles were out of this world and of course we served them Kansas style . . . over mashed potatoes. We did opt for a thicker noodle so I didn’t go past #4 setting on the pasta maker’s roller.

The recipe rather abruptly ends after the dough is rolled! It shows a photo of using the cutter blade of the pasta maker but provides no additional instructions. In subsequent pages, it provides sauce recipes but no cooking instructions for the fresh pasta. I’ve included my own.


Cuisine At Home says, “Cake four keep the dough supple so it’s easy to work with. If you don’t have cake flour, use all-purpose.”


Recipe without photos . . .

Basic Pasta Dough  Make 1 1/4 lbs. (10 servings)

2 1/2 cups all-purpose flour

1/2 cup cake flour

1 teaspoon table salt

5 eggs

1 tablespoon olive oil 

  1. Pulse all-purpose flour, cake flour and salt in a food processor until combined.
  2. Whisk together eggs and oil in a measuring cup with a pour spout. 
  3. With machine running, add egg mixture to flour until dough forms a ball around the blade. 
  4. Transfer dough to a floured surface and knead by hand until smooth. (I kneaded about 10 minutes.)
  5. Divide dough into 4 portions; wrap each in plastic, and let rest at least 15 minutes before kneading with the pasta maker. According to Cuisine, “A bit o down time allows the gluten that was formed during kneading a chance to relax so the dough doesn’t spring back when rolling.
  6. Set up your pasta maker according to manufacturer’s instruction.
  7. To knead, turn rollers to widest setting - #1. 
  8. Dust one portion of the dough with additional flour, brushing off excess and fold in thirds. Repeat kneading until dough is smooth – about 10 times. Rewrap (I laid the dough on a floured tea towel and enclosed the towel over the top, letting it rest as I proceeded with 3 other dough portions.)

  9. Beginning the dough that was kneaded first, start on the rolling process that is similar to kneading except you gradually adjust the rollers to roll the dough thinner. Start by rolling a knead piece of dough at #2, then flour, fold in thirds, and roll it a #3, and so on. If dough starts to stick, dust the maker with flour and remove dough debris. (I also dusted my dough with additional flour as needed.)
  10. After rolling at #4, cut the pasta in half (it’s easier to handle, and fold both halves into thirds. Continue rolling each pasta half up to #6 or #7, depending on how think to you want it, before cutting strands or shapes. 
  11. Attach the cutting section to the pasta maker. Run each rolled piece of cutter through the desired cutter.
  12. Either cook fresh pasta immediately in a large pot of boiling salted water — fresh pasta takes just minutes to cook but test and cook to the your preferred doneness. (Homemade recipes usually say 2 to 3 minutes for noodles, linguine, spaghetti but I usually end up cooking it longer until tender but still firm to the tooth ). Or, return pasta to floured tea towels and allow to partially or completely dry. I let mine partially dry and then added part of it to the chicken broth where it cooked and simmered. 

    Top photo: Noodles allowed to partially dry. Bottom: Noodles cooking in thickened chicken broth.
  13. Uncooked noodles can be frozen and then the frozen noodles can be added to boiling salted water at a later date.

Basic Pasta Dough  Make 1 1/4 lbs. (10 servings)

2 1/2 cups all-purpose flour

1/2 cup cake flour

1 teaspoon table salt

5 eggs

1 tablespoon olive oil 

  1. Pulse all-purpose flour, cake flour and salt in a food processor until combined.
  2. Whisk together eggs and oil in a measuring cup with a pour spout. 
  3. With machine running, add egg mixture to flour until dough forms a ball around the blade. 
  4. Transfer dough to a floured surface and knead by hand until smooth. (I kneaded about 10 minutes.)
  5. Divide dough into 4 portions; wrap each in plastic, and let rest at least 15 minutes before kneading with the pasta maker. According to Cuisine, “A bit o down time allows the gluten that was formed during kneading a chance to relax so the dough doesn’t spring back when rolling.
  6. Set up your pasta maker according to manufacturer’s instruction.
  7. To knead, turn rollers to widest setting - #1. 
  8. Dust one portion of the dough with additional flour, brushing off excess and fold in thirds. Repeat kneading until dough is smooth – about 10 times. Rewrap (I laid the dough on a floured tea towel and enclosed the towel over the top, letting it rest as I proceeded with 3 other dough portions.)
  9. Beginning the dough that was kneaded first, start on the rolling process that is similar to kneading except you gradually adjust the rollers to roll the dough thinner. Start by rolling a knead piece of dough at #2, then flour, fold in thirds, and roll it a #3, and so on. If dough starts to stick, dust the maker with flour and remove dough debris. (I also dusted my dough with additional flour as needed.)
  10. After rolling at #4, cut the pasta in half (it’s easier to handle, and fold both halves into thirds. Continue rolling each pasta half up to #6 or #7, depending on how think to you want it, before cutting strands or shapes. 
  11. Attach the cutting section to the pasta maker. Run each rolled piece of cutter through the desired cutter.
  12. Either cook fresh pasta immediately in a large pot of boiling salted water — fresh pasta takes just minutes to cook but test and cook to the your preferred doneness. (Homemade recipes usually say 2 to 3 minutes for noodles, linguine, spaghetti but I usually end up cooking it longer until tender but still firm to the tooth ). Or, return pasta to floured tea towels and allow to partially or completely dry. I let mine partially dry and then added part of it to the chicken broth where it cooked and simmered. 
  13. Uncooked noodles can be frozen and then the frozen noodles can be added to boiling salted water at a later date.

Apple Butter Cookies . . . soft and chewy and reminding us that fall is just around the corner

Cookies have been a mainstay in our household during this pandemic. I’ve made all-time favorites and tried quite a few new recipes, too. These snickerdoodle-like cookies use last season’s apple butter and remind me that fall is just around the corner. 

Allow at least 2 hours chilling time for this recipe.


Apple Butter Cookies   Makes about a dozen larger-sized cookies

1/4 cup butter, room temperature

1/4 cup apple butter (We recommend Lousiburg Cider Mill’s Old-Fashioned Apple Butter or our So-Easy Apple Butter )

1 cup granulated sugar  

1 egg

1/2 teaspoon vanilla 

1 teaspoon ground cinnamon

1 1/2 cups all-purpose flour

1/4 teaspoon baking soda

1/4 teaspoon cream of tartar

1/2 cup chopped walnuts, optional 

About 1/2 cup+ cinnamon sugar (mix 1/2 cup granulated sugar with 2 tablespoons ground cinnamon)

  1. In a mixing bowl, cream together butter, apple butter, and sugar.
  2. Add egg, and vanilla. Mix until well combined.

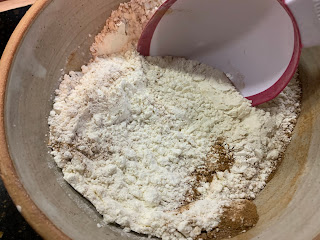
  3. In a medium bowl, combine cinnamon, flour, baking soda, and cream of tartar. 
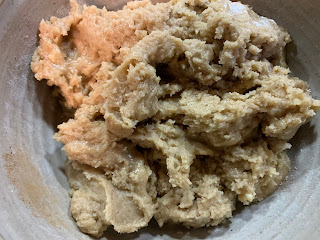
  4. Slowly add dry ingredients to butter mixture. Add walnuts if using and mix and until dough pulls together.
  5. Place into fridge and chill for at least 2 hours. 
  6. Preheat oven to 375°
  7. Using a cookie scoop (mine held 2 tablespoons) to portion out cookies, roll cookies into a ball and roll each ball in cinnamon sugar.
  8. Place cookies onto ungreased baking sheet and flatten just slightly; baking sheet can be lined with parchment for easier cleaning.
  9. Bake 13 minutes or until cookies are set and nicely browned. Sprinkle with a little extra cinnamon sugar if desired.
  10. Move baked cookies to wire rack to cool. 
Recipe without photos . . . Apple Butter Cookies   Makes about a dozen larger-sized cookies

1/4 cup butter, room temperature

1/4 cup apple butter (We recommend Lousiburg Cider Mill’s Old-Fashioned Apple Butter or our So-Easy Apple Butter )

1 cup granulated sugar  

1 egg

1/2 teaspoon vanilla 

1 teaspoon ground cinnamon

1 1/2 cups all-purpose flour

1/4 teaspoon baking soda

1/4 teaspoon cream of tartar

1/2 cup chopped walnuts, optional 

About 1/2 cup+ cinnamon sugar (mix 1/2 cup granulated sugar with 2 tablespoons ground cinnamon)

  1. In a mixing bowl, cream together butter, apple butter, and sugar.
  2. Add egg, and vanilla. Mix until well combined.
  3. In a medium bowl, combine cinnamon, flour, baking soda, and cream of tartar. 
  4. Slowly add dry ingredients to butter mixture. Add walnuts if using and mix and until dough pulls together.
  5. Place into fridge and chill for at least 2 hours. 
  6. Preheat oven to 375°
  7. Using a cookie scoop (mine held 2 tablespoons) to portion out cookies, roll cookies into a ball and roll each ball in cinnamon sugar.
  8. Place cookies onto ungreased baking sheet and flatten just slightly; baking sheet can be lined with parchment for easier cleaning.
  9. Bake 13 minutes or until cookies are set and nicely browned. Sprinkle with a little extra cinnamon sugar if desired.
  10. Move baked cookies to wire rack to cool. 

Zucchini Date-Walnut Muffins

One taste of Marcia Williamson’s Zucchini Date-Nut Muffins and I was hooked. She shared the recipe and I made them yesterday. Barry’s response was much the same as mine. “These are SO good” he repeated more than more. He described them as crisp on the outside, tender on the inside and bursting with flavor.

The recipe, originally from Linda Strandberg, can be used to make either muffins or loaves of quick bread. Personally I like the idea of muffins as they can be frozen for future use. 

On the original recipe card, Linda also notes that cranberries or rhubarb could replace the zucchini.


Zucchini Date-Walnut Muffins   Makes 2 dozen standard size muffins 

1 cup vegetable (canola) oil

2 cups granulated sugar 

3 large eggs

1 1/2 teaspoon vanilla

2 cups grated zucchini (I left peel on and patted off excess moisture)

3 cups all-purpose flour (or use half all-purpose and half whole wheat; I actually used 1 cup white whole wheat and 2 cups all-purpose)

1/2 teaspoons salt

1 teaspoon baking soda

1/2 teaspoon baking powder

1/2 teaspoon cinnamon (I used 1 teaspoon)

1 1/2 cups nuts or date & nut mixture (I used 3/4 cup chopped walnuts and 3/4 cup chopped dates

  1. Grease and flour or spray muffin tins (I used silicon so omitted this step). Preheat oven to 325°. 
  2. In a mixing bowl, blend oil. sugar and eggs.
  3. Add zucchini (or substitute cranberries, rhubarb, etc.) and stir. Add vanilla.
  4. Mix in dry ingredients, dates and nuts. Avoid overmixing. The batter will be thick.

  5. Fill muffin tins about 3/4 full.
  6. Bake for 25 or 30 minutes or until set and toothpick inserted in muffin comes out clean. 
    Dessert Fare: I served our muffins with Fluffy Tapioca Pudding sprinkled with cinnamon.

Variations:

Mini Muffins — Bake 15 minutes.

Quick Bread — divide batter between 3 standard loaf pans and bake 1 hour.


Recipe without photos . . .

Zucchini Date-Walnut Muffins   Makes 2 dozen standard size muffins 

1 cup vegetable (canola) oil

2 cups granulated sugar 

3 large eggs

1 1/2 teaspoon vanilla

2 cups grated zucchini (I left peel on and patted off excess moisture)

3 cups all-purpose flour (or use half all-purpose and half whole wheat; I actually used 1 cup white whole wheat and 2 cups all-purpose)

1/2 teaspoons salt

1 teaspoon baking soda

1/2 teaspoon baking powder

1/2 teaspoon cinnamon (I used 1 teaspoon)

1 1/2 cups nuts or date & nut mixture (I used 3/4 cup chopped walnuts and 3/4 cup chopped dates

  1. Grease and flour or spray muffin tins (I used silicon so omitted this step). Preheat oven to 325°. 
  2. In a mixing bowl, blend oil. sugar and eggs.
  3. Add zucchini (or substitute cranberries, rhubarb, etc.) and stir. Add vanilla.
  4. Mix in dry ingredients, dates and nuts. Avoid overmixing. The batter will be thick.
  5. Fill muffin tins about 3/4 full. 
  6. Bake for 25 or 30 minutes or until set and toothpick inserted in muffin comes out clean. 

Variations:

Mini Muffins — Bake 15 minutes.

Quick Bread — divide batter between 3 standard loaf pans and bake 1 hour.

Mexican Eggplant


A friend (Deanna Whitehair) gave us the eggplant. Another friend (Gwyn Johnson) recommended the recipe. Mexican Eggplant appears on p. 267 of the Colorado Cache Cookbook that was compiled by The Junior League of Denver. I own a copy of third edition that was published in 1988. I made a few changes in the recipe so I'm including my version of Mexican Eggplant followed by the original recipe in Colorado Cache Cookbook. Since there are only two of us, I made 2 small casseroles—one went into the oven, the other into the freezer to be baked and enjoyed later. We served our Mexican Eggplant with chips and a side of Cucumber Salsa/Salad

A layer of baked eggplant serves as the base for this Mexican flavored casserole that we will definitely make again . . .

Mexican Eggplant, Meta's Version     Makes 2 small casserole, about 3 servings each

1 large eggplant

1/4 cup olive oil

About 1/2 lb. ground sausage (we recommend fresh ground pork sausage from Zey’s Market)

About 1/2 on a yellow onion, diced

4 or 5 sliced button mushrooms

1 pint tomato sauce w/ peppers, onions & garlic (click on homemade tomato sauce for our version)

1 (4 oz.) can chopped, mild green chiles

1/2 teaspoon ground cumin

1/2 teaspoon garlic salt 

1 cup (4 oz.) Cheddar cheese

Sour cream and parsley or cilantro for garnishing

  1.  Peel and slice eggplant—about 1/4" thick slices. Brush both sides of each slice with oil. Place in a single layer on a greased baking sheet and bake at 450° for 20 minutes. 
  2. Meanwhile, in a small Dutch oven, partially brown sausage  add then add onion and mushrooms and cook until vegetables are tender.
  3. Add tomato sauce, chiles, cumin and garlic salt to browned sausage. Simmer uncovered for 10 minutes.
  4. Grease, oil or spray 2 small casserole dishes and layer half of the ingredients in each dish in the following order: baked egg plant slices, meat and tomato sauce, cheese. 


  5. Bake uncovered at 350° for 20 minutes. Let stand for 5 to 10 minutes to set.
  6. Serve with dollop of sour cream and parsley or cilantro.


Mexican Eggplant, Original Recipe from Colorado Cache Cookbook

Makes a 9”x13” casserole; 6 servings

1 large eggplant

1/4 cup vegetable oil

1 (15 oz.) can tomato sauce 

1 (4 oz.) can chopped, mild green chiles

1/2 teaspoon ground cumin

1/2 teaspoon garlic salt 

1 cup (4 oz.) Cheddar cheese

1 cup (8 oz.) sour cream

8 ripe olives, sliced

  1. Peel and slice eggplant.Brush both sides of each slice with oil. Place in a single layer on a greased baking sheet and bake at 450° for 20 minutes. 
  2. Combine tomato sauce, chiles, green onions, cumin and garlic salt to browned sausage. Simmer uncovered for 10 minutes.
  3. In a greased 9”x13” casserole, layer eggplant, sauce and cheese. 
  4. Top with sour cream and olives.
  5. Bake uncovered at 350° for 20 minutes. 
Meta's version without photos . . . Mexican Eggplant, Meta's Version     Makes 2 small casserole, about 3 servings each

1 large eggplant

1/4 cup olive oil

About 1/2 lb. ground sausage (we recommend fresh ground pork sausage from Zey’s Market)

About 1/2 on a yellow onion, diced

4 or 5 sliced button mushrooms

1 pint tomato sauce w/ peppers, onions & garlic (click on homemade tomato sauce for our version)

1 (4 oz.) can chopped, mild green chiles

1/2 teaspoon ground cumin

1/2 teaspoon garlic salt 

1 cup (4 oz.) Cheddar cheese

Sour cream and parsley or cilantro for garnishing

  1.  Peel and slice eggplant—about 1/4" thick slices. Brush both sides of each slice with oil. Place in a single layer on a greased baking sheet and bake at 450° for 20 minutes. 
  2. Meanwhile, in a small Dutch oven, partially brown sausage  add then add onion and mushrooms and cook until vegetables are tender.
  3. Add tomato sauce, chiles, cumin and garlic salt to browned sausage. Simmer uncovered for 10 minutes.
  4. Grease, oil or spray 2 small casserole dishes and layer half of the ingredients in each dish in the following order: baked egg plant slices, meat and tomato sauce, cheese. 
  5. Bake uncovered at 350° for 20 minutes. Let stand for 5 to 10 minutes to set.
  6. Serve with dollop of sour cream and parsley or cilantro.

Ripe Tomato Pie - perfect at the peak of summer's tomato season.

When Deanna Whitehair shared this recipe she remember when her daughter-in-law Patti first served it to her for lunch.  Now, it’s a favorite and she said, “Every time I serve it, someone asks for the recipe.”                                                             WE DEFINITELY AGREE AND GIVE THIS RECIPE A THUMBS UP! It is a savory pastry full of summer goodness and lots of cheese, too.

This recipe was previously published in the January 28, 2014 edition of Abilene’s Reflector Chronicle. It was included in the monthly cooking column I used to write about local cooks: Home-Cooking—Dickinson County Style “Capturing the Present and Remembering the Past”©. Deanna’s article was titled, “Still Cooking Mostly From Scratch”.
In the past I’ve even added cooked bacon and called it a Tomato-Bacon Pie. A perfect recipe for the peak of summer's tomato season. 


Ripe Tomato Pie   Makes one 8 or 9-inch pie

1 baked pie shell (click on links to traditional rolled or no-roll recipes )

9 to 10 large tomatoes (scald & peel, then slice, about 1/4” thick)

½ cup chopped onions

10 basil leaves or about 1/2 to 1 teaspoon dried basil

1 cup real mayonnaise

1 cup shredded Cheddar cheese

1 cup shredded mozzarella cheese

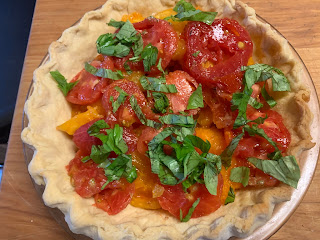
  1. Layer tomatoes slices, onions and basil in pie shell.  (I used a comb of ripe red & yellow tomatoes and also chopped up the basil.)
  2. Mix mayonnaise and 2 cheeses. Spread over tomatoes, covering completely.
  3. Bake for 30 minutes in a 350° oven. Allow to cool; it will set up as it cools. I serve it either at room temperature or chilled.
If you like tomato pie, we also have a recipe for Tomato & Basil Tart on our blog.

Recipe without photos . . .
Ripe Tomato Pie   Makes one 8 or 9-inch pie

1 baked pie shell  (click on links to traditional rolled or no-roll recipes)

9 to 10 large tomatoes (scald & peel, then slice, about 1/4” thick)

½ cup chopped onions

10 basil leaves or about 1/2 to 1 teaspoon dried basil

1 cup real mayonnaise

1 cup shredded Cheddar cheese

1 cup shredded mozzarella cheese

  1. Layer tomatoes slices, onions and basil in pie shell. (I used a comb of ripe red & yellow tomatoes and also chopped up the basil.)
  2. Mix mayonnaise and 2 cheeses. Spread over tomatoes, covering completely.
  3. Bake for 30 minutes in a 350° oven. Allow to cool; it will set up as it cools. I serve it either at room temperature or chilled.

Cucumber Salsa/Salad

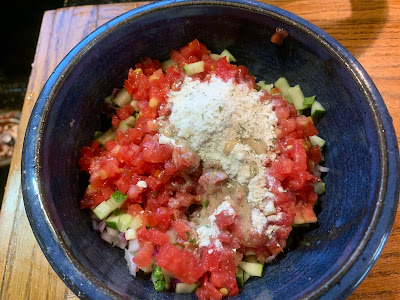
This recipe popped up on Facebook and I had to give it a try. However, with a counter full of ripe tomatoes and spicy peppers, I opted to use those instead of the can of RoTel tomatoes called for in the original recipe. Ranch dressing mix is definitely the secret flavor ingredient. I had Barry taste it even before it had a chance to marinate and meld flavors. He thought it was full of flavor and a great use of our garden produce. This is definitely a recipe where ingredients can be adjusted according to preference or what's on hand!

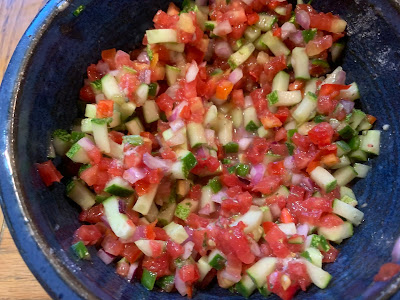
SALSA OR SALAD? Although this is good chips, we think it is a great summer salad!

Cucumber Salsa/Salad

1 medium to large cucumber, finely diced

1/2 medium onion, finely diced (I used red)

2 ripe tomatoes, cored & finely diced  

2 jalapeño, seeded & finely diced

2 tablespoons cider vinegar

1 1/2 to 2 tablespoons Ranch dressing mix

Kosher salt & coarse pepper to taste

  1. Mix the veggies together.
  2. Add the vinegar and dry ranch dressing mix; mix well.
  3. Chill. 
Recipe without photos . . .

Cucumber Salsa/Salad

1 medium to large cucumber, finely diced

1/2 medium onion, finely diced (I used red)

2 ripe tomatoes, cored & finely diced  

2 jalapeño, seeded & finely diced

2 tablespoons cider vinegar

1 1/2 to 2 tablespoons Ranch dressing mix

Kosher salt & coarse pepper to taste

  1. Mix the veggies together.
  2. Add the vinegar and dry ranch dressing mix; mix well.
  3. Chill. 

Power Packed Salami Pasta

During Covid-19 Michael Symon has been making daily meals in his home kitchen using pantry items—often in his slippers. His “can do” attitude is encouraging as he urges viewers to use his recipes as guides and adapt them to whatever is on hand. He even provides a substitution list. 

Recently his recipe titled Pasta with Beans, Crispy Lunch Meat, Greens and Garlic caught my eye as I had leftover salami, a half can of cannelini beans, fresh tomatoes and some spinach—all in need of use.  Instead of making his full recipe, I cut in in half (full recipe is included below), adapted it to what I had on hand and changed the name . . . with full credit still going to Michael!  

This is a  20-MINUTE MEAL that’s PACKED WITH FLAVOR, PROTEIN and PANTRY ITEMS! It's creamy, too . . . without added cream or butter. 

This recipe took me on a trip down memory lane as I remembered standing at the meat counter as the butcher sliced luncheon meats according to my mom’s specifications. Dad liked bologna but my sister and I begged for the mac & cheese and/or pickle-pimento varieties. And, then there was a memorable fried bologna sandwich that Barbara Partin and I fried up in her mom's kitchen when we were teens. We cut a large slice of her sister’s German Chocolate Cake to accompany our sandwiches and dined “al fresco” near the tent she had set up in the  back yard.  


Power Packed Salami Pasta    4 to 6 servings

Salt 

One 1-pound box pasta (I used large elbow macaroni)

1/4 cup oil (I used olive oil)

8 ounces lunch meat, sliced thin (I used hard uncured salami)

2 cloves garlic, sliced

One 15-ounce can beans, rinsed (I used cannelini)

2 cups fresh greens (I used  spinach)

About 1 ½ cups tomatoes (I used fresh tomatoes that I peeled, seeded and cut into chunks)

2 tablespoons grated hard cheese (I used Parmesan)

1 teaspoon chili flakes, optional (I used just a sprinkling)

  1. Bring a pot of water to a boil and salt liberally. Drop the pasta in the water and give it a stir. Cook according to the package instructions for al dente. Reserve 3/4 cup of the pasta cooking water and then drain the pasta.
  2. Meanwhile, heat a large sauté pan over medium heat and add the oil. Once the oil is hot, add the salami and cook until crisp. 
  3. Add the garlic and cook, stirring, an additional minute. Add the beans, greens, and tomatoes; cook, stirring, 1 minute more.
  4. Add the pasta and reserved pasta water (because I added tomatoes and they expelled their juices as the mixture cooked, I did not need the extra pasta water) to the pan and simmer for several minutes as sauce thickens.


  5. Remove from the heat, toss in the cheese and chili flakes if using and serve.
    We served our pasta with Turkish Bread..
Recipe without photos . . .

Power Packed Salami Pasta    4 to 6 servings

Salt 

One 1-pound box pasta (I used large elbow macaroni)

1/4 cup oil (I used olive oil)

8 ounces lunch meat, sliced thin (I used hard uncured salami)

2 cloves garlic, sliced

One 15-ounce can beans, rinsed (I used cannelini)

2 cups fresh greens (I used  spinach)

About 1 ½ cups tomatoes (I used fresh tomatoes that I peeled, seeded and cut into chunks)

2 tablespoons grated hard cheese (I used Parmesan)

1 teaspoon chili flakes, optional (I used just a sprinkling)

  1. Bring a pot of water to a boil and salt liberally. Drop the pasta in the water and give it a stir. Cook according to the package instructions for al dente. Reserve 3/4 cup of the pasta cooking water and then drain the pasta.
  2. Meanwhile, heat a large sauté pan over medium heat and add the oil. Once the oil is hot, add the salami and cook until crisp. 
  3. Add the garlic and cook, stirring, an additional minute. Add the beans, greens, and tomatoes; cook, stirring, 1 minute more.
  4. Add the pasta and reserved pasta water (because I added tomatoes and they expelled their juices as the mixture cooked, I did not need the extra pasta water) to the pan and simmer for 1 minute.
  5. Remove from the heat, toss in the cheese and chili flakes if using and serve.

Turkish Bread


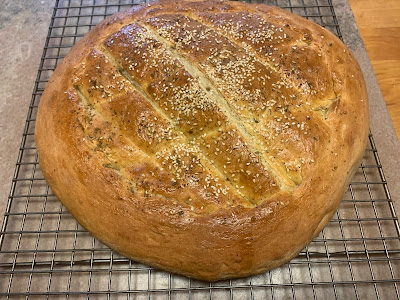
The Red Star Yeast Bakers group I joined on Facebook is full of ideas for breads. This one caught my eye; the person who posted it said it was done in just about an hour so that was even more of a reason to add it to my TO BAKE list. It is a Turkish Ramadan Pide bread, a soft bread baked during the month of Ramadan in Turkey. 


The recipe came from Turkish Style Cooking blog and I made it as instructed except I added a note about needing more flour than specified, added temps for milk and water. The recipe called for nigella seeds; I have none so used za’atar instead. I also added some details about shaping and baking. It reminds me of focaccia-style bread. We ate a third of this delicious loaf with our Power Packing Salami Pasta


Turkish Bread  Makes one loaf 

3 cups all purpose flour+ more as needed (1 used 1 cup white whole wheat is place of a cup of all purpose)

2 teaspoons instant dry yeast

2 teaspoons salt

1 tablespoon granulated sugar

1/2 cup lukewarm whole milk (120-130° F.)

1 cup lukewarm water (120-130° F.)

2 tablespoons olive oil

For topping; 1 egg yolk, sesame seeds & za’atar

  1. Combine 3 cups flour, yeast, salt and sugar in a bowl.
  2. Add milk and water gradually and start kneading.
  3. Add olive oil and keep kneading.
  4. Knead until you reach an elastic dough, adding more flour as needed but keeping in mind the dough should be soft and pliable.
  5. Make a ball and cover the bowl with a plastic wrap, set aside for 30 minutes.
    Dough after 30 minutes.
  6. Knead the dough once again – I kneaded it about 20 times.
  7. Transfer to a greased oven tray and your palm to flatten the dough into a flat rounded shape — I added the dough to a standard pizza pan (12” diameter). 
  8. Make a circle pressing with your fingers about 3/4 to 1” inside the round, then diamond shapes in the middle — I used a bench knife to make deep pressed diamond shapes in the dough. 
  9. Brush the bread with egg yolk, sprinkle with sesame seeds and za’atar.
  10. Bake in a 375° pre-heated oven until golden on top, around 30 minutes or until it reaches an internal temp of at least 190° F. — insert an instant read thermometer into the center of the loaf once bread has been removed from the oven.
Recipe without photos . . .
Turkish Bread  Makes one loaf 

3 cups all purpose flour+ more as needed (1 used 1 cup white whole wheat is place of a cup of all purpose)

2 teaspoons instant dry yeast

2 teaspoons salt

1 tablespoon granulated sugar

1/2 cup lukewarm whole milk (120-130° F.)

1 cup lukewarm water (120-130° F.)

2 tablespoons olive oil

For topping; 1 egg yolk, sesame seeds & za’atar

  1. Combine 3 cups flour, yeast, salt and sugar in a bowl.
  2. Add milk and water gradually and start kneading.
  3. Add olive oil and keep kneading.
  4. Knead until you reach an elastic dough, adding more flour as needed but keeping in mind the dough should be soft and pliable.
  5. Make a ball and cover the bowl with a plastic wrap, set aside for 30 minutes
  6. Knead the dough once again – I kneaded it about 20 times.
  7. Transfer to a greased oven tray and your palm to flatten the dough into a flat rounded shape — I added the dough to a standard pizza pan (12” diameter). 
  8. Make a circle pressing with your fingers about 3/4 to 1”  inside the round, then diamond shapes in the middle — I used a bench knife to make deep pressed diamond shapes in the dough. 
  9. Brush the dough with egg yolk, sprinkle with sesame seeds and za’atar.
  10. Bake in a 375° pre-heated oven until golden on top, around 30 minutes or until it reaches an internal temp of at least 190° F. — insert an instant read thermometer into the center of the loaf once bread has been removed from the oven.