Pages

Mixing It Up – Garlic Mashed Potatoes w/ Corn

     We had these incredible mashed potatoes at a covered dish dinner over the weekend. Although I like to mix corn with mashed potatoes, I’d never thought about combining the two into one dish – very good! And, the garlic adds another flavor component.
     Jean Mohler, who provided this recipe for the covered dish, said she assembled the potatoes early in the afternoon and set them in the fridge; then put them in the oven to thoroughly heat for the evening meal. She also commented, “The garlic seemed very strong initially, but it mellowed as the potatoes were in the refrigerator.”
     Jean provided the link to the recipe and that’s when I discovered the recipe came from Stephan Pyles (appeared in the July 2000 issue of Bon Appétit). We’ve been fans of Chef Stephan since we ate in one of his Dallas restaurants. His The New Texas Cuisine cookbook is full of interesting recipes.

Garlic Mashed Potatoes with Corn
1½ tablespoons olive oil
3/4 cup chopped onion
1 cup fresh corn kernels (Jean used frozen)
3 garlic cloves, minced
3/4 cup whipping cream
2 tablespoons (1/4 stick) butter
1/4 teaspoon saffron threads
1 3/4 pounds russet potatoes, peeled, cut into 1” pieces
Salt & pepper to taste

1.     Heat oil in heavy medium skillet over medium heat. Add onion; sauté 5 minutes. Add corn and garlic; sauté until onion is golden and corn is tender, about 5 minutes longer. Add cream, butter and saffron. Bring to boil. Remove from heat. Cover; let stand 20 minutes.
2.     Meanwhile, cook potatoes in large pot of boiling slated water until tender, about 20 minutes. Drain well.
3.     Transfer to large bowl. Mash until smooth. Stir in corn mixture. Season with salt and pepper.

Cinnamon-Craisin English Muffin Bread

     These easy-to-make yeast-based loaves boast the same texture as English muffins; their flavor is reminiscent of cinnamon rolls but without the fat and excess sugar. You could leave out the craisins and walnuts, but we love the added flavor and texture. Slice it thin and toast for breakfast. A loaf also makes a nice gift.

Cinnamon-Craisin English Muffin Bread     Makes 2 (9” x 5”) loaves
½ cup water
2 cups milk
5 cups all-purpose flour, divided (could use part white whole wheat for a nutrition boost)
2 tablespoons active dry yeast
¼ teaspoon baking soda
2 teaspoons salt
1 tablespoon granulated sugar
2 teaspoons ground cinnamon
1 cup craisins or substitute raisins
¾ to 1 cup coarsely chopped walnuts, optional

1.     Spray or grease 2 (9” x 5”) loaf pans, and sprinkle with cornmeal. Set aside. 

2.     Combine water and milk in a saucepan (or in a microwave safe bowl); heat until just hot (120 to 130°). 
3.     Combine 3 cups flour, yeast, baking soda, salt, sugar and cinnamon in a large mixing bowl.  Gradually add liquid mixture to flour mixture, beating at high speed with an electric mixer. Beat 2 more minutes at medium speed. Stir in craisins and walnuts.  Gradually stir in remaining 2 cups flour to make a soft dough.
4.     Spoon dough into prepared loaf pans (use your fingers to push the dough into the shape of the pan). Sprinkle top with cornmeal. 
Before rising . . .
5.     Cover and let rise in a warm place (85°), free from drafts, 45 minutes or until doubled in bulk. 
After rising; ready to go into the oven.
6.     Preheat oven to 400°. Bake bread for 25 minutes. 
7.     Remove bread from pans immediately; cook on wire rack.

Avocado Salsa Salad

It’s almost too simple to post! Actually it’s not even a recipe but Barry’s brainstorm! He simply cut an avocado in half (the long way), removed the seed but left the skin intact. Salsa was added to the seed cavity and it’s ready to serve (use a spoon to scoop it out). Great with sandwiches, a Mexican entrée, or just about anything, including scrambled eggs.
Avocado Salsa Salad paired with a Meatloaf Sandwich.      

If you are unfamiliar with how to cut an avocado, check out this You Tube videoCutting an Avocad

Maple-infused Tapioca Pudding w/ Spicy Candied Walnuts

If you happen to be making this at Halloween time, you
might prefer to call this comforting dessert . . .   
Eye of Newt Pudding Parfait
     Either you like it or you don’t! But if you are a fan of tapioca pudding, this is a nice variation on the usual recipe. EatingWell was the inspiration for this comforting dessert.
     Maple syrup replaces the traditional granulated sugar usually found in tapioca pudding. I used almond milk in place of the low-fat and made a few other minor adjustments. But, it is the spicy candied nuts that make really make this comforting dessert a real treat. Even if you are not a tapioca fan, you may want to give these a try.

Maple-insfused Tapioca Pudding w/ Spicy Candied Walnuts    2 servings, about 2/3 cup each
Pudding
1 cup low-fat milk or, use almond milk
1 large egg, well beaten
1 tablespoon + 1 teaspoon quick-cooking tapioca
1/8 teaspoon salt
¼ cup plus 1 tablespoon pure maple syrup, divided (maple-flavored also works)
½ teaspoon vanilla extract

Spicy Candied Nuts
2 tablespoons chopped walnuts
Pinch of ground cinnamon
Pinch of freshly grated nutmeg

1.  Combine milk, egg, tapioca and salt in a medium saucepan. Let stand for 5 minutes.
2.  Place the saucepan over medium-low heat and cook, stirring constantly, until the mixture comes to a boil, 6 minutes+ (depending on your stove). 
      Remove from the heat; stir in ¼ cup syrup and vanilla.
3.  Divide the pudding between 2 ramekins, custard cups, parfait or even a martini glass. Let cool for at least 30 minutes or refrigerate until chilled and firm (it will be somewhat thin when it is poured into the serving containers).
4.  Meanwhile set out a piece parchment or wax paper on the counter. Spray with cooking spray. Combine walnuts, the remaining 1 tablespoon syrup, cinnamon and nutmeg in a small saucepan or skillet. Heat over medium-low heat, stirring, until most of the syrup has evaporated, 1 to 4 minutes ant the nuts are toasted. 
     Spread the nuts out onto the prepared paper and let cool.
5.  Crumble the chilled walnut topping into pieces. Serve the pudding topped with the maple walnuts.
Make Ahead Tip: Cover and refrigerate the pudding for up to 3 days. Add the Spicy Candied Nuts just before serving.

Check out our other Halloween-related posts:

Quest for the Perfect Meatloaf!

Thoughts on Meatloaf
    Wish I had Barry’s mother’s recipe for meatloaf. Unfortunately she is gone and her recipe box has disappeared. However, chances are that even if I did have her recipe, my rendition would never measure up to hers – just can’t capture a lifetime of memories in something as supposedly simple as meatloaf!
     Think Barry liked the thick day-after meatloaf sandwiches (slathered with butter and mayo + topped with a slice of American cheese) almost as well as he liked it hot out of the oven served with Fern’s scalloped potatoes and green salad.

Continuing Quest
     My quest has taken me through several recipes. I’ve made it with oats, soft breadcrumbs, even bugler; all were okay but not noteworthy. Most didn’t hold up to cutting (that’s an essential quality in my mind), so we just recently purchased a Perfect Meatloaf® pan. As we perused recipes and discussed ingredients for yet another experiment, Barry noted, “No parsley please. I don’t like green things in my meatloaf!” Also a ketchup-based topping is another priority and he wanted me to try using Panko rather than more traditional soft breadcrumbs.
Yeah, it cut into perfect slices!

The Verdict
Well, the meatloaf held up to slicing – one criteria met. But, how will Barry judge the taste? He said, “It’s really good. Much better than any of the rest.” I thought so too. Pretty sure it didn’t quite compare with his mother’s but (as mentioned before) how can one simple meatloaf ever capture the memories of childhood?

Observations
·      Think the reason that past meatloaves broke apart is due (at least in part) to the fact that they set in excess fat as they bake; the Perfect® pan alleviated this problem. It was a worthwhile purchase.
·      In the past, I’ve used prepared mustard in the topping. The dry mustard was better, giving it a little kick.
·      This will be our go-to meatloaf . . . and least until something better comes along.
·      Makes great day-after sandwiches! We recommend soft wheat bread spread with mayo, a thin slice of Cheddar cheese and a lettuce leaf. Oh yeah, Barry needs butter, too.

Glazed Meatloaf   
2 lb. lean ground beef (I used 85% lean)
½ cup minced onion
1 cup Panko bread crumbs (in most grocery stores these day; find them in the same section as other bread crumbs)
½ cup milk
2 eggs, lightly beaten
½ teaspoon Kosher salt
½ teaspoon coarsely ground black pepper
Topping:
  1/3 cup ketchup
  2 tablespoons packed brown sugar
  1 tablespoon dry mustard

1.     Preheat the oven to 355°.
2.     In a large bowl, mix the beef, onions, bread crumbs, milk, eggs, salt, and pepper until well combined (do not overwork or it will toughen the final product). Shape the mixture into a loaf and place in the Perfect Meatloaf® pan.
The Perfect Meatloaf® pan has an insert with handles. that allows a space
(between the loaf and the bottom of the pan) where excess fat cannot accumulate.
Handles also making it easy to lift out the finished product.
(Pan are available at the Abilene Alco store.)
3.     In a small bowl, whisk together the ketchup, brown sugar, and mustard. Slather the glaze on top of the meat loaf.
4.     Bake glazed meatloaf for1 hour. Increase oven temperature to 400° and continue to bake for 10 more minutes to crisp up surface.
5.     Remove from oven. Grip insert of Perfect Meatloaf® pan by handles. Lift meatloaf to platter or cutting board; tent with foil and let rest for 10 minutes before slicing. (Standing will help keep the meatloaf from breaking apart as it is sliced.)

Menu Suggestion:  I served our meatloaf with baked potatoes (threw them in the oven to bake along with the meatloaf) and a green salad (fresh or frozen veggies would be good, too). It’s a great make ahead menu – clean and wrap the potatoes in foil earlier in the day; make the meatloaf ahead and refrigerate and then bake for the evening meal. The salad can be made during the 10 minutes that the meatloaf is resting.

You’ll get a hoot out of . . . Hoot Owl Cookies!

     With the approach of Halloween, I am reminded of Hoot Owl Cookies. Kay Emel-Powell, who worked for Pillsbury in the Betty Crocker test kitchens, provided the recipe. It was a bribe of sorts, encouragement to her sorority sisters to provide holiday cookie recipes for a 1984 Chi-O newsletter.
     Despite the rather complicated recipe, I made them. Even without a picture to guide me, I figured out what to do and loved the finished products.
     As I thought about posting this recipe, I began to wonder about it’s origin. Through a google search, I discovered the cookies were actually a Pillsbury Grand National Bake-off® winner. However, after further investigation, I was dismayed to discover that several cooks claim credit for creating the cookies and for winning the prize money! So, I went to the Pillsbury website and sent a request for information. This is the response I received:
Dear Ms. West: Thank you for contacting with your recipe request. We are pleased to have the opportunity to share information from our recipe files . . .
Bake-Off® Contest 08, 1956
Natalie R. Riggin  ~  Olympia, WA
Prize Value: -$5,000 WINNER
     They also included the original recipe. It varies just slightly from the one I’ve used over the years . . . it called for 2¼ cups of flour to Kay’s 2½ cup measure. I used 2½ cups when making my recipe + added some tips and made a few changes (the original says to remove cookies from baking sheet immediately when they come out of oven . . . they are too soft and will break so let them set for a couple of minutes.)
     In addition, Pillsbury provided high altitude (3500-6500 ft) baking information: Decrease brown sugar to 3/4 cup; increase all-purpose flour to 2½ cups.
     Finally, for those of you interested in the Bake-off’s history or anyone desiring access to the winning recipes, dating back to 1949, go to http://www.pillsbury.com/bakeoff/history/1949/

Hoot Owl Cookies    Yield: about 48 cookies
¾ cup butter @ room temperature
1 cup firmly packed brown sugar
1 egg
1 teaspoon vanilla
2½ cups all-purpose flour
2 teaspoons baking powder
½ teaspoon salt
1½ squares (1½ oz.) unsweetened chocolate, melted and cooled (see my preferred substitution found at the bottom of this post)
¼ teaspoon baking soda
Semi-sweet chocolate chips – 80
Whole roasted, salted cashews – 40

1.  In large mixing bowl, cream butter with brown sugar until light and fluffy. Add egg and vanilla; blend well.
2.  In another bowl, blend flour with baking powder and salt, mixing until smooth. Add the flour mixture and mix to thoroughly combine.
3.  In small bowl, blend melted chocolate and baking soda.
4.  Remove 2/3 of the dough to floured surface. Blend chocolate mixture into remaining 1/3 of dough. If necessary, wrap both batches of prepared dough in plastic wrap and refrigerate until easy to handle. (I’ve always done this.)
5.  Divide each ball of dough in half. 

      Roll out half of plain dough to a 10”x4” rectangle (it is easiest for me to handle if I roll it out on wax paper). 
      Shape half of the chocolate dough into a 10” roll. Place chocolate roll on rectangle of plain dough. 
      
      Mold sides of plain dough around chocolate roll; wrap in plastic wrap. 

      Repeat with remaining dough. 
      Chill at least 2 hours.
6.  Preheat oven to 350’. Lightly grease (or spray) cookie sheets (or use parchment lined sheets or Silpat-type liners).
7.  Cut prepared rolls into 1/8” - ¼” thick slices (you’ll need to end up with 40 slices per roll for a yield of 40 cookies). Place 2 slices side-by-side and touching on prepared cookie sheets to form an owl’s face (gently push together so slices bond together). Pinch a piece of each slice to form ears. Place a chocolate chip in the center of each slice for eyes; press a whole cashew between slices for a beak.

8.  Bake in preheated oven for 8 to 12 minutes.
9.  Let baked cookies set for a few minutes and then remove to a wire rack to cool.

10. Store cooled cookies between layers of waxed paper in a flat, tightly covered container.

In their return email, Pillsbury also provided the nutritional info for the cookie  based on a yield of 40 cookies): 
1 Cookie: Calories 110 (Calories from Fat 60); Total Fat 7g (Saturated Fat 3.5g, Trans Fat 0g); Sodium 170mg; Total Carbohydrate 12g (Dietary Fiber 0g); Protein 1g  /  Exchanges: 1/2 Starch, 1 1/2 Fat

Other Halloween related posts:
Caramel Pop Corn
Eye of Newt Pudding Parfait

UNSWEETENED CHOCOLATE SUBSTITUTE
1 oz. unsweetened chocolate = 3 tablespoons unsweetened cocoa powder + 1 tablespoon cooking oil
For this particular recipe, you'll need 4 1/2 tablespoons (or 4 Tbsp. + 1 1/2 tsp. cocoa + 1 1/2 tablespoon oil (or 1 Tbsp + 1 1/2 tsp.). The ADVANTAGE of using this substitution is that you can skip the step for melting chocolate listed in the recipe.

Remembering Lylas - Hot Sauerkraut

     Following are excerpts from the June 2003 Abilene Reflector-Chronicle article I wrote about Lylas Gugler.
“Friends and family agree that Lylas Gugler is an exceptional cook. Over the years she has collected recipes that capture the unique and wholesome flavors of everything from zucchini and pea pods to other unusual vegetables such as brussel sprouts and kohlrabi.”
     Her recipes were not just run-of-the-mill and always had great crowd appeal. She once made this sauerkraut dish for a Beta Sigma Phi covered dish supper. It's one of those recipes that many might not be willing to try if they only saw a list of  ingredients . . . but just one taste of Lylas' dish and the Beta ladies were going back for more.
     Her daughter-in-law, Anna Gugler, recently made it (in a slow cooker) for an outdoor gathering and, as always, it was one of the first dishes to disappear. 
     Lylas’ cooking legacy continues to live on through her recipes . . . and I’m sure that would please her.  She was indeed, as I said back in 2003, “A hostess with the mostest!”

Hot Sauerkraut    Yield:  about 8 to 10 servings
1 quart sauerkraut, drained
1 quart canned tomatoes, drained & chopped (if using fresh, be sure to peel)
3/4 cup granulated sugar
6 slices bacon, fried and crumbled (reserve bacon grease)
1 onion, chopped & sautéed in a little bacon grease

1.     Combine all ingredients in casserole or in a 9”x13” baking dish or casserole dish.
2.     Bake for 1 hour at 350°.

What’s she brewing up now? Microwave Caramel Popcorn

If you don't like caramel
corn I'd be glad to share
my recipe for stewed toads!

    My mother used to make caramel popcorn – it started with a sugar sauce that had to be cooked to the firm ball stage (248°); the sauce was then poured over popped corn and baked in the oven at a low temperature for almost an hour. It was really good but time consuming and a bit complicated.
     When I found a microwave version in the Stafford Centennial Cookbook, I tried it out, making a few minor adjustments along the way. It was perfect for high school foods classes and also fast and easy for home use.
     Barry and I both grew up in Stafford – he was a “city” boy and I lived in the country so actually attended school at  Zenith for the first eight years (there were five in my class when we enrolled in 1st grade; the same five graduated from 8th grade and later from SHS). Stafford is not a large town but I did not know the person who had submitted the recipe for caramel corn.
     Have to admit that it has been awhile since I made the recipe but decided that I wanted to make it again this fall. Pulled out the cookbook and located the recipe only to realize that I had just recently met the person (Sue McMillan Duckworth) who had submitted the recipe to the cookbook. 
     We met at this year's Octoberfest in Stafford; just happened to be staying in the same B&B as the Duckworths. So, now when I make this yummy popcorn, I have a face to associate with the recipe.

Caramel Popcorn 
3 quarts (12 cups) popped corn (I usually use up to 16+ cups—depending on how caramel coated Iwant it)
Large brown grocery sack – actually 2 (with one inserted inside the other) is ideal
1 stick butter or margarine
1 cup brown sugar, packed
½ cup light corn syrup
½ teaspoon salt
½ teaspoon baking soda

1.   Pop corn (sort out any unpopped kernels, if possible) and put in the grocery sack.
2.   Combine butter, brown sugar, syrup and salt in a large micro-safe bowl; cook in microwave on HIGH until it starts boiling, about 1 minute.  Stir and cook another 2 minutes. 
This is what the syrup looks like after it has cooked.
      Add baking soda, stirring as you add. Baking soda, a base, will react with the acid in the brown sugar and syrup, creating some foaming action at this point. It the process the syrup will change in color and consistency.
Notice the lightened color and small bubbles formed after the baking soda was added.
3.  Pour syrup over corn in the bag and stir to distribute syrup. 

      Then, shake closed bag until caramel is well mixed with corn. Cook in bag on high in microwave for 1½ minutes. Remove, shake and cook another 1½ minutes. Pour into  low, flat pan(s) and allow to air dry (I use jelly-roll pans).

4.   Store dry caramel corn in a covered container.

Check out our other Halloween related posts:
Eye of Newt Pudding
Halloween decor
Hoot Owl Cookies

An Italian Classic - Panna Cotta

    Cortney Schields, Food Service Director for USD 435, brought dishes of Panna Cotta to a recent gathering of the school’s support staff. Topping the creamy custard was a homemade raspberry sauce along with fresh raspberries. Her dessert was a BIG hit and I literally had to force myself to not go back for seconds.
     The recipe comes from Cortney’s aunt, Jill Deeds, who lives in Goodland. According to Cortney, she makes it for family gatherings and everyone looks forward to this light (in terms of taste and feel) but rich (full of cream) dessert.
     Panna Cotta, which means "cooked cream," is a classic Italian dessert. It can be made the night before and is quite versatile. Portion it, as Cortney did, into individual serving dishes or pour the finished custard into a bowl (it can be served in the bowl or unmolded). Top it with other fruit sauces (even chocolate) or serve with assorted berries or other fruits.

Panna Cotta 
Cortney's dishes of Panna Cotta went fast
at a recent gathering.
1½ teaspoons unflavored gelatin*
2 tablespoons cold water
3 cups heavy whipping cream
½ cup granulated sugar, or more to taste
Pinch of salt
1½ teaspoons vanilla
1 cup (8 oz. container) sour cream

1.  Sprinkle the gelatin over cold water and let stand for 5 minutes.
2.  In a saucepan, warm the cream with the sugar, salt, and vanilla over medium-high heat. Do not let it boil.
3.  Stir gelatin into the warm cream until thoroughly dissolved. Take the cream off the heat and cool about 5 minutes. 
4.  Put the sour cream in a medium bowl. Gently whisk in the warm cream a little at a time until smooth.
5.  Rinse 8 (2/3 cup) ramekins, custard cups, or coffee cups with cold water. Fill each one 3/4 full with the cream. Chill at least 4-6 hours (more preferably). 

Also have my eye on a recipe for Chocolate Panna Cotta on The Food Channel's® website.

For more info. on unflavored gelatin click on  http://whatscookingamerica.net/gelatintip.htm

Science of Baking -- Baking Soda & Baking Powder

Chemical agents, such as baking soda and baking powder, found in many baked goods, function as leavening agents. They help lighten or aerate cakes and quick breads, and they help them rise.

Baking soda, known as sodium bicarbonate (NaHCO3), weighs in on a pH scale as a base. To activate it when baking, it MUST be mixed with an acid  -- this causes it to bubble, releasing carbon dioxide (CO2) that expands and helps baked products rise. In addition, the acid neutralizes the base and gets rid of the bitter taste that would occur if the baking soda was not activated. Common acids found in recipes that call for baking soda: sour milk, sour cream, yogurt, buttermilk, vinegar, lemon juice and other citrus juices, cream of tartar, cocoa (but not Dutch cocoa), chocolate, honey, molasses, maple syrup. brown sugar and fruits.

Baking powder is a chemical compound that contains baking soda, dry acids, and starch or some other filler. Since it contains both an acid and a base (baking soda), it can be activated with a cold liquid. Double-acting baking powder is the type found in American grocery stores; this means it actually contains two acids – one that reacts with cold liquid, another that reacts with the heat of the oven.

If your favorite cake or quick bread recipe is suddenly not working, chances are there might be something happening with the baking soda or baking powder. Perhaps the leavening is old and lost its leavening ability. Follow the suggestions below for checking the effectiveness of both baking soda and baking powder . . .

To test baking soda’s effectiveness — Mix 1/4 teaspoon baking soda with 2 teaspoons vinegar; the mixture should bubble immediately. Actually it has a very long (indefinite) shelf life if stored in an airtight container in a cool, dry place . . . so generally an acid will always activate it.
Baking Soda + Vinegar (an acid) = CO2 (release of carbon dioxide which 
helps baked products rise & also neutralizes the taste of the baking soda)

To test baking powder’s effectiveness — Mix 1 teaspoon of baking powder with 3 to 4 tablespoons of water; the mixture should bubble immediately. Store baking powder in a cool dry place; it should be replaced every 6-12 months.

Baking Powder + water (for this experiment hot water works best as it also simulates the effect of a hot oven) = CO2
And, if you want to substitute one chemical leavening agent for another, see what King Arthur Flour has to say @ http://www.kingarthurflour.com/recipe/leavens.html  -- scroll down to the SUBSTITUTE SECTION.

Or, if you’d like to create your own recipe, King Arthur again has advice on how much baking powder or soda to add @ http://www.kingarthurflour.com/tips/quick-bread-primer.html

A Great Fall Side: Pan-Fried Cabbage

     It’s cheap, it’s easy and it is a great side dish, especially for fall. We like it with brats and other pork dishes. Barry starts out with bacon and onions but the bacon could be omitted, using olive oil or another vegetable oil to sauté the onions. Or, for a main dish, add sliced brats to the frying pan and even some potatoes (Barry uses leftover baked potatoes, cut into chunks) for a “casserole” type meal. We generally use green cabbage but red could also be substituted.

Pan-Fried Cabbage  6 servings
3 slices bacon, chopped
About 1/4 cup chopped onion
6 cups cabbage, cut into thin wedges  -- see tips for prepping that follow the recipe
Fresh thyme sprigs, optional
About 2 tablespoons water or broth
Pinch granulated sugar
Kosher salt and coarsely ground pepper to taste
About a tablespoon cider vinegar

1.   Place bacon in a large, deep skillet. Cook over medium-high heat until evenly brown. Remove bacon, and set aside.
2.   Cook onion in the hot bacon fat until tender.
3.   Add cabbage, and stir in thyme, water, sugar, salt, and pepper. Cook until cabbage wilts and is tender, about 15 minutes, adding lid after about the first 5 minutes.


4.    Stir in bacon. Splash with vinegar before serving.


Prepping the cabbage:
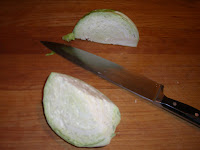
After washing the cabbage and removing any damaged outer leave, cut the cabbage in quarters
(a large knife works best for this task). Then cut out the core, as shown above.
Cut the cabbage into bite size pieces.

Her Chili – Helen Frieze’s Recipe

Helen's Chili topped with cheese and onions; served with Seasoned Crackers.
By the way, this is one of Barry's hand-thrown pottery soup bowls.
    You might say we have “his and her” chili at our house. When it’s my turn to make it, I pull out Helen Frieze’s quick-to-make recipe for thick, spicy chili that is sure to warm you up on a crisp fall day or during a cold winter evening.
    Helen taught Home Economics in Wichita and although I knew her, she did not give me the recipe. In fact, the recipe came from Judy Burgess who grew up in Wichita. Seems that the Burgess and Frieze families were friends and so I actually received the recipe indirectly. So now when I make this chili, I not only think of Helen but of Judy as well.
     So, here’s Helen’s chili. Barry has his own thoughts – his contains more ingredients and is much soupier, but I have to admit, just as good. Perhaps, his version will end up on the blog . . . but that’s always a bit tricky, as he never follows a recipe. Although it is always consistently good, he varies it just a little each time.  
    And, the good news . . . he did make a batch and even wrote down the ingredients -- see His Chili link.

Helen’s Chili    6 to 8 servings
(To stretch the chili, increase the can size of tomatoes &/or beans called for in the recipe.)
2 lbs. lean group beef
2 onions, diced – approximately 1 cup              
2 teaspoons salt
½ teaspoon pepper
2 teaspoons chili powder
¼ teaspoon garlic powder
2 teaspoons all-purpose flour                   
2 (15 oz.) cans tomatoes (crushed or diced) or substitute 1 can Ro-Tel tomatoes in place of the one of the cans
2 (15 oz.) cans chili beans, undrained – sometimes I use spicy chili beans and then cut down on chili powder (only because others often object to the fire!)

1. In a large soup pot, brown the ground beef and onions; add salt and pepper.
2. When nicely browned, stir in the chili powder, garlic powder and flour.
3. Add the tomatoes and chili beans and simmer on low heat for about 20 to 30 minutes or longer. Water or tomato juice may need to be added if the chili is simmered longer.

Caramel Apple Sundaes - A Fall Treat!


     On the way home from our class at The Cook’s Nook in McPherson, we stopped in Lindsborg for their Swedish festival. Despite the rain, they managed to have a parade and we took in some traditional Swedish dancing, and even saw a few friends.
     Caramel Apple Sundaes were being offered at one of the food booths. While they looked delicious, we were way too full to eat anything else. However, the idea stuck with us and so we’ve created our own version of a dessert that is sure to become a seasonal must at our house.

Caramel Apple Sundaes
Apples, peeled, cored, thinly sliced— such as Golden Delicious, Red Rome,
Granny Smith, Jonathan – allow about 1 apple for 2 to 3 sundaes
About 1 tablespoons butter per apple
About 1 to 2 tablespoons craisins per apple, optional
Pinch of ground cinnamon
Pinch of salt
About 2 to 3 tablespoons apple juice or cider for 1 apple (water would work, too)

1 recipe Creamy Caramel sauce or purchased prepared caramel ice cream sauce
Vanilla Ice Cream

Optional: Pie crust triangles -- made from your favorite recipe or use pre-made dough:  sprinkle dough with cinnamon & sugar, cut into triangles (no need to separate as dough will shrink as it bakes), prick and bake crust according to recipe directions,

1.     Apples - Melt butter in a skillet (non-stick works well) over medium heat. Add apples, craisins, cinnamon, and salt, and sauté until apples begin to soften, about 4 minutes. Add juice or cider and simmer until nearly evaporated; keep apple mixture warm until ready to serve. 

      Or cool, refrigerate and re-heat when ready to assemble. When ready to serve, add desired amount of warm caramel sauce to warm apples.
2.     Caramel Sauce – prepare according to recipe that follows.
3.     To assemble – Scoop ice cream into bowls, drizzle with warm caramel apples and sprinkle with toasted pecans.

Creamy Caramel Sauce
1 cup packed brown sugar
1 stick (1/2 cup) butter
½ cup heavy cream
1 tablespoon dark rum, optional

1.     In a saucepan combine sugar and butter. Cook stirring constantly, over medium heat, until mixture reaches a boil.  

      Turn to low and whisk in in cream and then rum. 

2.     Let cool and store in refrigerator. Sauce thickens as it cools.
3.     Serve at room temperature or re-heat.