Copycat Jiffy Corn Muffin Mix

I am a fan of Jiffy Corn Muffin Mix but there is none in the cupboard. So, instead of making a trip to the stores during COVID season, I goggled copycat recipes and the one I include below seems to be the standard. It uses basic ingredients and is almost easy as it’s namesake. And, the homemade is light and fluffy – just like it’s namesake and is the perfect accompaniment to Senate Bean Soup. 

Copycat Jiffy Corn Muffin Mix    Makes 6 muffins / Equal to an 8.5 ounces box (1 ½ cups) of Jiffy Corn Muffin Mix


COPYCAT JIFFY CORN MUFFIN MIX


2⁄3 
cup all-purpose flour

1⁄ 2 
cup yellow cornmeal

1⁄3
 cup granulated sugar 

1 
tablespoon baking powder

1⁄2 
teaspoon salt

2 
tablespoons vegetable oil


TO MAKE MUFFINS, add


1 
egg

1⁄3 
cup milk 

Optional additions: 

    1⁄2 
cup grated Cheddar cheese 

    2 
ounces canned chilies 

    1⁄4 
cup drained chopped pimiento 

    1⁄2 
cup chopped onion

  1. Combine first 5 ingredients in a bowl, mix well.
  2. To make Mis: Whisk in vegetable oil and mix until dry mixture is smooth and lumps are gone. Note—If another recipe is calling for a box of Jiffy Corn Muffin Mix, add the above mixed ingredients to that recipe.
  3. To make Corn Muffins: Preheat oven to 400F, spray muffin pan with non-stick cooking spray.
  4. Combine mix with egg and milk, mixing well. Add any combination of optional ingredient if desired. 
  5. Fill each muffin cup about 1/2 to 3/4  full.
  6. Bake in preheated oven for 15 to 20 minutes, until a toothpick inserted in center comes out clean.
    Corn Muffins accompany Senate Bean Soup.
Recipe without photos . . . Copycat Jiffy Corn Muffin Mix    Makes 6 muffins / Equal to an 8.5 ounces box (1 ½ cups) of Jiffy Corn Muffin Mix


COPYCAT JIFFY CORN MUFFIN MIX


2⁄3 
cup all-purpose flour

1⁄ 2 
cup yellow cornmeal

1⁄3
 cup granulated sugar 

1 
tablespoon baking powder

1⁄2 
teaspoon salt

2 
tablespoons vegetable oil


TO MAKE MUFFINS, add


1 
egg

1⁄3 
cup milk 

Optional additions: 

    1⁄2 
cup grated Cheddar cheese 

    2 
ounces canned chilies 

    1⁄4 
cup drained chopped pimiento 

    1⁄2 
cup chopped onion

  1. Combine first 5 ingredients in a bowl, mix well.
  2. To make Mis: Whisk in vegetable oil and mix until dry mixture is smooth and lumps are gone. Note—If another recipe is calling for a box of Jiffy Corn Muffin Mix, add the above mixed ingredients to that recipe.
  3. To make Corn Muffins: Preheat oven to 400F, spray muffin pan with non-stick cooking spray.
  4. Combine mix with egg and milk, mixing well. Add any combination of optional ingredient if desired. 
  5. Fill each muffin cup about 1/2 to 3/4  full.
  6. Bake in preheated oven for 15 to 20 minutes, until a toothpick inserted in center comes out clean.

Sheet Pan Dinner: Baked Sausages and Potatoes for two

We bought German sausages at Hildebrand Dairy and decided to bake them sheet pan style. Accompanied with Kansas-made sauerkraut from Hoganville Family Farms, it was an ethnic inspired menu . . . and easy, too. Our meal was for two but it’s easy to adjust the amounts.


Sheet Pan Dinner: Baked Sausages and Potatoes for two 


2 potatoes, peeled & cubed

1 apple, sliced

Several sprigs fresh sage

Several sprigs fresh rosemary

About 2 tablespoons olive oil 

Kosher salt & coarse black pepper to taste

2 1/2 pork sausages 

  1. Preheat the oven to 400°.
  2. In a large bowl combine the potatoes, apple slices, sage and rosemary. Drizzle with olive oil over, season generously with salt and pepper. (Note: Next time I would wait and add the apples during the last 15 minutes.)
  3. Arrange the potatoes, apples and herbs in a large shallow roasting pan. Arrange the sausages in and around the vegetables.
  4. Bake for 30 minutes or until golden and cooked through—turn sausages, potatoes, etc. after 15 minutes.

Recipe without photos . . .

Sheet Pan Dinner: Baked Sausages and Potatoes for two 

2 potatoes, peeled & cubed

1 apple, sliced

Several sprigs fresh sage

Several sprigs fresh rosemary

About 2 tablespoons olive oil 

Kosher salt & coarse black pepper to taste

2 1/2 pork sausages 

  1. Preheat the oven to 400°.
  2. In a large bowl combine the potatoes, apple slices, sage and rosemary. Drizzle with olive oil over, season generously with salt and pepper. (Note: Next time I would wait and add the apples during the last 15 minutes.)
  3. Arrange the potatoes, apples and herbs in a large shallow roasting pan. Arrange the sausages in and around the vegetables.
  4. Bake for 30 minutes or until golden and cooked through—turn sausages, potatoes, etc. after 15 minutes.

Twisted Chocolate Hazelnut Loaves

Just for fun, I’ve been experimenting. Using a honey and milk bread dough, I tried some new shaping techniques that are flooding the internet and Pinterest. I decided on smaller sized loaves for gift giving and was very happy with the results and plan to experiment with more fillings and flavors. 


Twisted Chocolate Hazelnut Loaves   
Yield: 3 or 4 smaller sized loaves (7 ½ x 3 ½” loaf pans)

1 recipe — Honey Milk Bread Buns 

Chocolate Hazelnut Spread (such as Nutella)

Egg wash (egg mixed with a few drops of water)

Chopped hazelnuts 

Powdered sugar for sprinkling, optional

  1. Prepare dough as instructed for Honey Milk Bread Buns through step #12.
  2. Then, divide dough into 3 or 4 pieces (about 9 ounces each; one was a little smaller so I made one smaller loaf).
  3. Line loaf pans with parchment cut to fit both lengthwise and crosswise allowing for overlaps on the ends and sides. Spray with parchment. Preheat oven to 350°. 
  4. Roll each piece of dough into a rectangle – approximately 10”x7”.
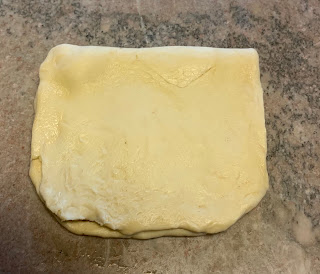
  5. Determine center of dough and then spread half of the dough with a thin layer of Chocolate Hazelnut Spread.
  6. Fold dough in half crosswise to encase the Chocolate Hazelnut Spread.
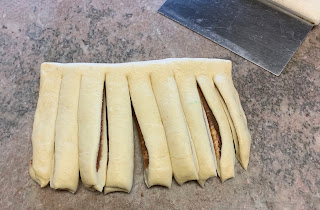
  7. Using a bench knife (or sharp knife), make vertical cuts in the dough, about 3/4 to 1” wide, leaving about 3/4 to 1” uncut at the folded top of the dough.
  8. Twist each cut section.
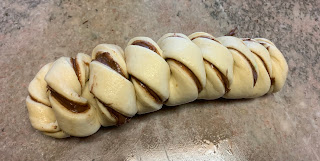
  9. Starting from the uncut folded end, roll up the bread dough as shown in the photo.

  10. Place in prepared pans, cover and let rise until loaves have doubled in size.
  11. Egg wash each loaf and sprinkle with chopped hazelnuts. 
  12. Bake loaves about 30 to 40 minutes or until an instant read thermometer inserted in the center of the loaf registers 190°.
  13. Use the parchment paper overlaps to remove the bread from the pan; place on a cooling rack.
  14. Sprinkle with powdered sugar when cool if desired.

Variations:

Cinnamon-sugar — I spread one of the loaves with butter and added brown sugar, cinnamon and ground pecans for a friend who does not care for chocolate! 


Savory — I’m thinking about using pesto and Parmesan as a spread and will experiment with other flavors, too.


Recipe without photos . . .

Twisted Chocolate Hazelnut Loaves   Yield: 3 or 4 smaller sized loaves (7 ½ x 3 ½” loaf pans)

1 recipe — Honey Milk Bread Buns 

Chocolate Hazelnut Spread (such as Nutella)

Egg wash (egg mixed with a few drops of water)

Chopped hazelnuts 

Powdered sugar for sprinkling, optional

  1. Prepare dough as instructed for Honey Milk Bread Buns through step #12.
  2. Then, divide dough into 3 or 4 pieces (about 9 ounces each; one was a little smaller so I made one smaller loaf).
  3. Line loaf pans with parchment cut to fit both lengthwise and crosswise allowing for overlaps on the ends and sides. Spray with parchment. Preheat oven to 350°. 
  4. Roll each piece of dough into a rectangle – approximately 10”x7”.
  5. Determine center of dough and then spread half of the dough with a thin layer of Chocolate Hazelnut Spread.
  6. Fold dough in half crosswise to encase the Chocolate Hazelnut Spread.
  7. Using a bench knife (or sharp knife), make vertical cuts in the dough, about 3/4 to 1” wide, leaving about 3/4 to 1” uncut at the folded top of the dough.
  8. Twist each cut section.
  9. Starting from the uncut folded end, roll up the bread dough as shown in the photo above.
  10. Place in prepared pans, cover and let rise until loaves have doubled in size.
  11. Egg wash each loaf and sprinkle with chopped hazelnuts. 
  12. Bake loaves about 30 to 40 minutes or until an instant read thermometer inserted in the center of the loaf registers 190°.
  13. Use the parchment paper overlaps to remove the bread from the pan; place on a cooling rack.
  14. Sprinkle with powdered sugar when cool if desired.

Variations:

Cinnamon-sugar — I spread one of the loaves with butter and added brown sugar, cinnamon and ground pecans for a friend who does not care for chocolate! 

Savory — I’m thinking about using pesto and Parmesan as a spread and will experiment with other flavors, too.

Toasted Pecan Butternut Squash Soup

Barry noticed a recipe for a quick butternut squash soup in yesterday’s Salina Journal. It included a few different flavor components that were different from our other squash soup favorites, including a topping of toasted pecans and chopped apples . . . so I made it (with a few minor adjustments) for lunch today but it would be great as a first course soup preceding a holiday/special dinner. It’s healthy and tasty! Recipe is definitely a keeper.

Most difficult thing about this recipe is peeling the butternut. To make is easier, I pierce the squash with a knife and then microwave it for about a minute; cool and then proceed with peeling. 
 

Toasted Pecan Butternut Squash Soup   Makes 2 servings

2 tablespoons olive oil

1/2 cup chopped onions (or shallots)

4 cups butternut squash cubes (about 1 lb.)

2 teaspoons minced garlic

1 teaspoon ground ginger

2 cups broth (vegetable, chicken or beef) + additional for thinning as needed

Kosher salt

1/2 cup toasted pecan pieces (toast on a baking sheet in oven – 350° for about 4 minutes)

1/4 cup diced gala or honeycrisp apples

2 slices toasted crusty bread

  1. Heat oil in a large saucepan over medium-high heat. Add the onions, garlic and butternut cubes. SautĆ© for about 5 minutes, stirring several times. 
  2. Add ginger and broth and bring to a simmer. Lower heat to medium, cover with a lid and simmer 15 to 20 minutes or until squash is tender. Taste and add salt if needed. 
  3. Using an immersion blender, blend to a smooth consistency. Or, cool and then add soup mixture to a blender. Additional broth may be added to thin as needed . . . cream could also be used to add a creamy effect. 
  4. To serve — ladle soup into bowls and garnish with toasted pecans and diced apples. Serve with slices of toasted crusty bread. 
Recipe without photos . . .Toasted Pecan Butternut Squash Soup   Makes 2 servings

2 tablespoons olive oil

1/2 cup chopped onions (or shallots)

4 cups butternut squash cubes (about 1 lb.)

2 teaspoons minced garlic

1 teaspoon ground ginger

2 cups broth (vegetable, chicken or beef) + additional for thinning as needed

Kosher salt

1/4 cup toasted pecan pieces (toast on a baking sheet in oven – 350° for about 4 minutes)

1/4 cup diced gala or honeycrisp apples

2 slices toasted crusty bread

  1. Heat oil in a large saucepan over medium-high heat. Add the onions, garlic and butternut cubes. SautĆ© for about 5 minutes, stirring several times. 
  2. Add ginger and broth and bring to a simmer. Lower heat to medium, cover with a lid and simmer 15 to 20 minutes or until squash is tender. Taste and add salt if needed. 
  3. Using an immersion blender, blend to a smooth consistency. Or, cool and then add soup mixture to a blender. Additional broth may be added to thin as needed . . . cream could also be used to add a creamy effect. 
  4. To serve — ladle soup into bowls and garnish with toasted pecans and diced apples. Serve with slices of toasted crusty bread. 

Chocolate Chip Orange Icebox Cookies

OLD-FASHIONED ICE BOX COOKIES—the theme of this year’s HOLIDAY BAKE in the West kitchen, was inspired by an article I wrote about Kansas community cookbooks (A Heritage of Flavor), I thought it would be both fun and convenient to make ahead rolls of freezer dough, ready to slice 'n bake for Christmas. My goal was to find a favorite of fun and festive flavors. Here goes . . 

Chocolate Chip Orange Icebox Cookies

If you plan to make your own Candied Orange Peel (which is SO much better than the purchased stuff), begin a couple of days in advance as it needs time to soak in a sugar solution and then to dry at room temp.)


Cookie Dough

1/2 cup  (1 stick) butter, softened

3/4 cup granulated sugar

1 medium egg

1 teaspoon vanilla 

1 1/4 cups all purpose flour

3/4 teaspon baking powder

1/2 teaspoon salt

1/2 cup mini semisweet or dark chocolate chips

1/4 cup minced Candied Orange Peel (recipe follows)

  1. Cream the butter with the sugar and beat until light and fluffy. 
  2. Add the egg and the vanilla. Beat until well combined. 
  3. Combine the flour, baking powder and salt. Add to the butter mixture and beat until blended. 
  4. Mix in the mini chocolate chips and the candied orange peel. Divide the dough in half. 
  5. Shape into logs about  8" long. Wrap in parchment or wax paper and refrigerate until firm. Can also be wrapped in foil and frozen (thaw when ready to use). 
  6. To Bake: Preheat oven to 350°. Line several sheet pans with parchment.
  7. Slice dough into 1/4" slices. Place approximately 2” apart on a sheet pan and bake for 10 to 12 minutes or until edges are lightly browned. 
  8. Remove to wire racks to cool.

Candied Orange Peel (this will make more than you need; recipe could be cut down)

3 oranges

2 cups water

2 cups sugar

1/4 cup corn syrup OR 1/4 teaspoon cream of tartar

Pinch kosher salt

1/2 cup+ additional sugar for finishing

  1. Cut the top and bottom off each orange. Using a knife, separate the colored part of the skin from the white membrane. 
  2. Place the peels in a saucepan and cover with water.
  3. Bring to a boil and reduce to a simmer. Simmer for 20 minutes or until peels are tender. Drain.
  4. In the same saucepan, combine the 2 cups of water, sugar and corn syrup or cream of tartar. Bring to a boil over medium high heat. 
  5. Add the peel. Reduce the heat and simmer for 30 minutes or until the peel is translucent and tender. 
  6. Remove from the heat and pour the syrup and peels into a heatproof container. 
  7. Let sit overnight at room temperature. Store, covered, in the refrigerator. 
  8. To coat peels with sugar—pour peel and syrup through a strainer. Separate and place peels on wax paper and sprinkle with additional sugar (1/2 cup or more); let dry overnight. Save orange syrup for other uses. Store extra peels in an airtight container for other uses; could use to garnish cookie trays that contain the Chocolate Orange Icebox Cookies


Other Holiday Ice Box Cookies on our 2020 menu include: 

Black Walnut Ice Box Cookies

Chocolate Walnut Shortbread Ice Box Cookies 

Date Pinwheel Ice Box Cookies

Pistachio Cranberry Ice Box Cookies

Recipes without photos . . .

Chocolate and Orange Icebox Cookies

If you plan to make your own Candied Orange Peel (which is SO much better than the purchased stuff), begin a couple of days in advance as it needs time to soak in a sugar solution and then to dry at room temp.)


Cookie Dough

1 cup  (2 sticks) butter, softened

1 1/2 cups granulated sugar

1 egg

1 teaspoon vanilla 

2 1/2 cups all purpose flour

1 1/2 teaspons baking powder

1 teaspoon salt

1 cup mini semisweet or dark chocolate chips

1/4 cup minced Candied Orange Peel (recipe follows)

  1. Cream the butter with the sugar and beat until light and fluffy. 
  2. Add the egg and the vanilla. Beat until well combined. 
  3. Combine the flour, baking powder and salt. Add to the butter mixture and beat until blended. 
  4. Mix in the mini chocolate chips and the candied orange peel. Divide the dough in half. 
  5. Shape into logs about  8" long. Wrap in parchment or wax paper and refrigerate until firm. Can also be wrapped in foil and frozen (thaw when ready to use). 
  6. To Bake: Preheat oven to 350°. Line several sheet pans with parchment.
  7. Slice dough into 1/4" slices. Place approximately 2” apart on a sheet pan and bake for 10 to 12 minutes or until edges are lightly browned. 
  8. Remove to wire racks to cool.

Candied Orange Peel (this will make more than you need; recipe could be cut down)

3 oranges

2 cups water

2 cups sugar

1/4 cup corn syrup OR 1/4 teaspoon cream of tartar

Pinch kosher salt

1/2 cup+ additional sugar for finishing

  1. Cut the top and bottom off each orange. Using a knife, separate the colored part of the skin from the white membrane. 
  2. Place the peels in a saucepan and cover with water.
  3. Bring to a boil and reduce to a simmer. Simmer for 20 minutes or until peels are tender. Drain.
  4. In the same saucepan, combine the 2 cups of water, sugar and corn syrup or cream of tartar. Bring to a boil over medium high heat. 
  5. Add the peel. Reduce the heat and simmer for 30 minutes or until the peel is translucent and tender. 
  6. Remove from the heat and pour the syrup and peels into a heatproof container. 
  7. Let sit overnight at room temperature. Store, covered, in the refrigerator. 
  8. To coat peels with sugar—pour peel and syrup through a strainer. Separate and place peels on wax paper and sprinkle with additional sugar (1/2 cup or more); let dry overnight. Save orange syrup for other uses. Store extra peels in an airtight container for other uses; could use to garnish cookie trays that contain the Chocolate Orange Icebox Cookies

Pistachio Cranberry Icebox Cookies

OLD-FASHIONED ICE BOX COOKIES—the theme of this year’s HOLIDAY BAKE in the West kitchen was inspired by an article I wrote about Kansas community cookbooks (A Heritage of Flavor), I thought it would be both fun and convenient to make ahead rolls of freezer dough, ready to slice 'n bake for Christmas. My goal was to find a favorite of fun and festive flavors. Here goes . . .

Red & cranberries and green pistachios add seasonal colors and tastes to these buttery cookies. 

Pistachio Cranberry Icebox Cookies    Yield: 46 Cookies

Tender, buttery cookies with a holiday blend of color and flavor.

1 stick (1/2 cup) butter, softened 

1/2 cup granulated sugar

1 teaspoon vanilla 

1 cup all purpose flour

1/2 tablespoon (1 1/2 teaspoons) cornstarch

Heaping 1/4 teaspoon salt (or omit this measure if pistachios are salted)

1/2 teaspoon baking soda

1/2 cup unsalted pistachios, roughly chopped 

1/2 cup dried cranberries, roughly chopped

  1. Whisk together flour, cornstarch, salt and baking soda, mix well and set aside.
  2. In a large bowl using a stand mixer fitted with a paddle attachment, beat the butter and sugar on medium high speed until fluffy, light and pale in color. 
  3. Add vanilla and continue beating for a minute. Scrape the sides and bottom of the bowl to make sure everything is combined well.
  4. On low speed, slowly mix dry ingredients into the wet ingredients until combined. Add pistachio and dried cranberries, mix on low for few seconds or until evenly distributed. If dough is crumbly, add a little milk or water.
  5. Dump dough out on parchment or waxed paper; smooth and evenly shape into log about 10” long and 2” wide. Roll up log in paper and twist ends.
    Pistachio Cranberry Icebox Cookies and other varieties of icebox cookies ready to chill until firm in the refrigerator. Once firm, they will be wrapped in foil and transferred to the freezer. 
  6. Refrigerator to chill for at least 2 hours, or up to 2 days. Or, wrap in foil and freeze; thaw before slicing. 
  7. To bake — preheat t oven to 350° F with the rack in the center of the oven. Line baking sheets with parchment paper or silicon mat. Set aside.
  8. Using a sharp knife, slice the logs into 1/4” slices. Place the cookies on the prepared baking sheet, spacing about 2” apart.
  9. Bake cookies about 10 to 12 minutes, or until just beginning to brown around the edges. Remove from oven and let it cool for 3 minutes into baking sheet. Then transfer onto cooling rack and let it cool completely.

Other Holiday Ice Box Cookies on our 2020 menu include: 

Black Walnut Ice Box Cookies

Chocolate Chip Orange Ice Box Cookies

Chocolate Walnut Shortbread Ice Box Cookies

Date Pinwheel Ice Box Cookies


Recipe without photos . . .

Pistachio Cranberry Icebox Cookies    Yield: 46 Cookies

Tender, buttery cookies with a holiday blend of color and flavor.

1 stick (1/2 cup) butter, softened 

1/2 cup granulated sugar

1 teaspoon vanilla 

1 cup all purpose flour

1/2 tablespoon (1 1/2 teaspoons) cornstarch

Heaping 1/4 teaspoon salt (or omit this measure if pistachios are salted)

1/2 teaspoon baking soda

1/2 cup unsalted pistachios, roughly chopped 

1/2 cup dried cranberries, roughly chopped

  1. Whisk together flour, cornstarch, salt and baking soda, mix well and set aside.
  2. In a large bowl using a stand mixer fitted with a paddle attachment, beat the butter and sugar on medium high speed until fluffy, light and pale in color. 
  3. Add vanilla and continue beating for a minute. Scrape the sides and bottom of the bowl to make sure everything is combined well.
  4. On low speed, slowly mix dry ingredients into the wet ingredients until combined. Add pistachio and dried cranberries, mix on low for few seconds or until evenly distributed. If dough is crumbly, add a little milk or water
  5. Dump dough out on parchment or waxed paper; smooth and evenly shape into log about 10” long and 2” wide. Roll up log in paper and twist ends.
  6. Refrigerator to chill for at least 2 hours, or up to 2 days. Or, wrap in foil and freeze; thaw before slicing. 
  7. To bake — preheat t oven to 350° F with the rack in the center of the oven. Line baking sheets with parchment paper or silicon mat. Set aside.
  8. Using a sharp knife, slice the logs into 1/4” slices. Place the cookies on the prepared baking sheet, spacing about 2” apart.
  9. Bake cookies about 10 to 12 minutes, or until just beginning to brown around the edges. Remove from oven and let it cool for 3 minutes into baking sheet. Then transfer onto cooling rack and let it cool completely.

Stollen (German Christmas Bread)


Stollen was my challenge . . . after binge watching The British Baking Show, I decided I needed to try something newThis was my first time to make Stollen and the first time to make marzipan. Actually the first time to taste Stollen and I think it is incredible . . . just to be sure I polished off four slices right after it cooled enough to eat.

The authentic German recipe came from The Daring Gourmet.  I did play around with the flavors—added cranberries and using less candied citrus, relying on just candied orange. 

It was a lot of work and I was a bit worried when the internal temperature was only 160° at the end of the baking time; the bottom of the loaves were also soft. So, I covered it with foil and put it back in the oven. It baked at least 15 more minutes in order to brown on the bottom. I also realized that I had to be careful to place the temperature probe so that it was not positioned in the log of marzipan in the middle of the loaf. 

Stollen (German Christmas Bread)   Makes 2 large or 3 medium Stollen.

Fruits & Nuts:

2 cups raisins & raisins

3/4 cups lightly packed candied orange peel (about 3 ozs., finely diced  (homemade recipe follows)

3/4 blanched slivered or sliced almonds , finely chopped

1/3 cup quality dark rum (or could substitute orange juice)

Dough:

1 cup lukewarm whole milk (110 – 115°)

1 tablespoon active dry yeast

1/2 cup granulated sugar

About 4 cups all-purpose flour 

1 large egg

2 large egg yolks

3/4 cup softened butter (1 1/2 sticks) 

2 teaspoons vanilla 

1 teaspoon salt

3/4 teaspoon ground cardamom

3/4 teaspoon ground nutmeg

1/2 teaspoon ground cinnamon

8 ounces Marzipan/Almond Paste (homemade recipe follows), divided in half 

Glaze & Dusting:

1/2 to 1 stick butter, melted (original recipe called for 1 cup but both loaves were saturated with butter)

Lots of powdered sugar for generous dusting

  1. Place the raisins, craisins, candied citrus peel and almonds in a medium bowl. |Pour the rum over them and stir to combine. Set aside and let the fruit mixture soak in the rum while the dough rises.
  2. Stir the yeast and 2 tablespoons of the sugar into the lukewarm milk and let sit in a warm place for 10 to 15 minutes until very frothy.
  3. Place 3 cups of flour, remaining sugar, egg, egg yolks, butter, vanilla extract, lemon zest, salt, cardamom, mace and cinnamon in the bowl of a stand mixer fitted with a dough hook. Add the yeast/milk mixture.  Use a spoon to stir the mixture until it comes together.  
  4. Knead the dough for 7 to 8 minutes.  
  5. Remove the dough ball, lightly spray the bowl with a little oil, return the dough ball, cover loosely with plastic wrap and place it in a warm place or lightly warmed oven (just barely warm), to rise until nearly doubled in size, at least 1 hour.
  6. Punch down the dough and add the soaked fruit/nut mixture to the dough (it should have absorbed all the rum by now but if there is excess liquid, pour it out before adding the mixture to the dough). Using the dough hook, knead the fruit/nut mixture into the dough until combined. If the dough is too wet to handle, add a little bit of flour until the dough pulls away from the sides of the bowl.  
  7. Turn the dough out onto a floured work surface and cut it in two equal halves. Press or roll each piece into an oval to about 1 inch thickness.  

  8. Roll each piece of marzipan into a log the length of the oval. Press the marzipan gently into the middle of the dough.  
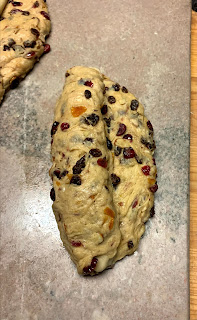
  9. Fold the left side of the dough over to cover the marzipan, then fold right side over on top of the left side so that the edge of it sits just left of the middle of the stolen. In other words, don't fold the right side all the way over to the left edge of the stollen. Pinch and tuck the top and bottom ends of the stollen to cover the marzipan.  
  10. Use the bottom edge of your hand to press down along the length of the stollen towards the right of the center to create a divot and characteristic hump.
  11. Place the stollen on a silicon lined baking sheet (or use sprayed parchement). Cover the stollen loosely with plastic wrap and let them rest in a warm place or lightly warmed oven for 40 to 60 minutes until puffy. At that point you can pick off any raisins that are sticking out of the dough (they will burn during baking).  
  12. Towards the end of the last rise, preheat the oven to 350° and bake the stollen for 30 to 40 minutes or until an instant read thermometer registers at 190°— the bread should be golden on top and should yield a hollow sound when tapped on the bottom. (It took mine an additional 15 minutes to bake. Note: Be sure to place the thermometer in the bread and not in the log of marzipan in the center of the loaf.)
  13. Let the bread sit for 5 minutes, then use a toothpick to poke holes all over the stollen (this will allow the butter to seep in), then generously brush the stollen with the melted butter while the stollen are still warm. 
  14. Immediately sprinkle with a generous amount of powdered sugar, rubbing it into the creases and down the sides. Let the stollen cool completely. Dust again with powdered sugar once loaves have cooled.
  15. The stollen can be sliced and eaten now or wrapped tightly (wrap in plastic wrap then foil) and left to "ripen" in a cool place for 2 weeks. The liquid from the dried fruits will further penetrate the dough for more flavor and moisture. Stollen can also be frozen for longer storage.

Homemade Marzipan or Almond Paste  Yield: 12 to 13 ounces

1 1/2 cups very finely ground blanched almond flour/meal or blanch, grind and dry your own almonds - I recommend the bought almond meal to ensure it's finely ground and sufficiently dry

1 1/2 cups powdered sugar

2 teaspoons quality pure almond extract

1 teaspoon quality food grade rose water (use vanilla if rose water is not available)

1 egg white (vegan: use egg substitute 3+ tablespoons corn syrup)

  1. Place the almond flour and powdered sugar in a food processor and pulse until combined and any lumps are broken up. Add the almond extract and rose water and pulse to combine. Add the egg white and process until a thick dough is formed. If the mass is still too wet and sticky, add more powdered sugar and ground almonds. Keep in mind that it will become firmer after it's been refrigerated.
  2. Turn the almond marzipan out onto a work surface and knead it a few times. Form it into a log, wrap it up in plastic wrap and refrigerate.
  3. Will keep for at least a month in the refrigerator or up to 6 months in the freezer. Bring to room temperature before using in any recipe.

NOTES: If concerned about raw egg, use pasteurized egg whites in the carton instead. 

DIFFERENCE between Marzipan vs. Almond Paste: Almond paste is softer and is used in baked goods. Marzipan is firmer and is used in making candies/chocolates or as fondant for cakes. Marzipan also uses rose water. To adjust this recipe according to what you're using it for, follow this recipe as instructed for almond paste (I still include the rose water because it tastes amazing), or add an extra 1/4 cup or more of almond flour/meal until you reach a firmer consistency (one that you can roll out with a rolling pin without it sticking) for marzipan.


Candied Citrus Peel   Yield: approximately 8 ounces

Candied citrus peel is easy to make yourself, contains no chemicals or additives, and tastes MUCH better than store-bought!

3 Valencia or Naval oranges and 4 lemons (can also use 4 lemons or the equivalent of grapefruits, Meyer lemons and limes, or any citrus of your choice) thoroughly washed and scrubbed

2 cups granulated sugar

1 cup water

Fine granulated sugar for coating (granulated sugar can be whirled in blender to make it finer)

  1. Slice both ends of the citrus fruits. Cut the peel on each into 4 or more vertical segments, depending on the size of the fruit. Peel off each segment of rind. (You can remove a little of the white pith, though not necessary. The pith is bitter but the blanching process below will help reduce the bitterness. Note that if you remove the white pith, the thinner the peels are the harder and more leathery they will be when they’re candied.) 
  2. Slice the peels into 1/4 inch wide strips. (Keep the peeled citrus for eating, cooking, juicing, etc.)

  3. Boil the peels in a pot of water for 15 minutes. Drain the peels in a colander, rinse and then drain again. Discard the water from the pot.

Repeat this process one or two more times to reduce the bitter flavor.

  4. Add the 1 cup of fresh water and the sugar to the pot and bring it to a boil. Boil it for a couple of minutes until the sugar is dissolved. Add the citrus peels, reduce the heat to low and simmer for 45 to 60 minutes, stirring occasionally, until the peels become translucent and the syrup becomes lightly syrupy (on a candy thermometer this will be be approximately soft ball stage).

  5. Use a slotted spoon to remove a few of the peels at a time and let the excess syrup drip off for a few seconds. Place the hot, wet peels in a bowl of sugar or a ziplock bag with sugar in it and toss/shake to coat.

  6. Spread the candied citrus peels out on a wire rack to cool and dry completely— 1 to 2 days.
  7. Stored in an airtight container in a cool, dry place, the candied citrus peel will keep for at least a month. They'll keep even longer in the fridge and for a few months frozen.


NOTES:  If candied citrus peel gets hard after a while don't worry - they will soften up  as they bake.


To keep the candied peels softer, you can limit the drying time, skip the final sugar coating step and put the peels in a ziplock bag and either refrigerate or freeze them.


Recipe without photos . . .

Stollen (German Christmas Bread)   Makes 2 large or 3 medium Stollen.

Fruits & Nuts:

2 cups raisins & raisins

3/4 cups lightly packed candied orange peel (about 3 ozs., finely diced  (homemade recipe above)

3/4 blanched slivered or sliced almonds , finely chopped

1/3 cup quality dark rum (or could substitute orange juice)

Dough:

1 cup lukewarm whole milk (110 – 115°)

1 tablespoon active dry yeast

1/2 cup granulated sugar

About 4 cups all-purpose flour 

1 large egg

2 large egg yolks

3/4 cup softened butter (1 1/2 sticks) 

2 teaspoons vanilla 

1 teaspoon salt

3/4 teaspoon ground cardamom

3/4 teaspoon ground nutmeg

1/2 teaspoon ground cinnamon

8 ounces Marzipan/Almond Paste (homemade recipe above), divided in half 

Glaze & Dusting:

1/2 to 1 stick butter, melted (original recipe called for 1 cup but both loaves were saturated with butter)

Lots of powdered sugar for generous dusting

  1. Place the raisins, craisins, candied citrus peel and almonds in a medium bowl. |Pour the rum over them and stir to combine. Set aside and let the fruit mixture soak in the rum while the dough rises.
  2. Stir the yeast and 2 tablespoons of the sugar into the lukewarm milk and let sit in a warm place for 10 to 15 minutes until very frothy.
  3. Place 3 cups of flour, remaining sugar, egg, egg yolks, butter, vanilla extract, lemon zest, salt, cardamom, mace and cinnamon in the bowl of a stand mixer fitted with a dough hook. Add the yeast/milk mixture.  Use a spoon to stir the mixture until it comes together.  
  4. Knead the dough for 7 to 8 minutes.  
  5. Remove the dough ball, lightly spray the bowl with a little oil, return the dough ball, cover loosely with plastic wrap and place it in a warm place or lightly warmed oven (just barely warm), to rise until nearly doubled in size, at least 1 hour.  
  6. Punch down the dough and add the soaked fruit/nut mixture to the dough (it should have absorbed all the rum by now but if there is excess liquid, pour it out before adding the mixture to the dough). Using the dough hook, knead the fruit/nut mixture into the dough until combined. If the dough is too wet to handle, add a little bit of flour until the dough pulls away from the sides of the bowl.  
  7. Turn the dough out onto a floured work surface and cut it in two equal halves. Press or roll each piece into an oval to about 1 inch thickness.  
  8. Roll each piece of marzipan into a log the length of the oval. Press the marzipan gently into the middle of the dough.  
  9. Fold the left side of the dough over to cover the marzipan, then fold right side over on top of the left side so that the edge of it sits just left of the middle of the stolen. In other words, don't fold the right side all the way over to the left edge of the stollen. Pinch and tuck the top and bottom ends of the stollen to cover the marzipan.  
  10. Use the bottom edge of your hand to press down along the length of the stollen towards the right of the center to create a divot and characteristic hump.
  11. Place the stollen on a silicon lined baking sheet (or use sprayed parchement). Cover the stollen loosely with plastic wrap and let them rest in a warm place or lightly warmed oven for 40 to 60 minutes until puffy. At that point you can pick off any raisins that are sticking out of the dough (they will burn during baking).  
  12. Towards the end of the last rise, preheat the oven to 350° and bake the stollen for 30 to 40 minutes or until an instant read thermometer registers at 190°— the bread should be golden on top and should yield a hollow sound when tapped on the bottom. (It took mine an additional 15 minutes to bake. Note: Be sure to place the thermometer in the bread and not in the log of marzipan in the center of the loaf.)
  13. Let the bread sit for 5 minutes, then use a toothpick to poke holes all over the stollen (this will allow the butter to seep in), then generously brush the stollen with the melted butter while the stollen are still warm. 
  14. Immediately sprinkle with a generous amount of powdered sugar, rubbing it into the creases and down the sides.  Let the stollen cool completely.  Dust again with powdered sugar once loaves have cooled.
  15. The stollen can be sliced and eaten now or wrapped tightly (wrap in plastic wrap then foil) and left to "ripen" in a cool place for 2 weeks. The liquid from the dried fruits will further penetrate the dough for more flavor and moisture. Stollen can also be frozen for longer storage.