Edible Bugs!


A platter for edible bugs!
Our Parents as Teachers staff were busy today assembling edible bugs for an evening picnic. We had a blast making them and let the creative juices flow. They were a "BUG" hit!

EDIBLE BUGS!
Here's what we used:
Celery
Strawberries slices
Blueberries
Green grapes
Grape tomatoes
Cucumber slices
Apple slice brushed with lemon juice
Rasins
Mini chocolate chips
Chex Mix
Chives
Mint for garnish
Spreadable cream cheese (in a tub)
Peanut butter

Here's what to do:
  1. Cut celery into sections and use a knife to trim the underside so it will set flat.
  2. Fill with cream cheese or peanut butter.
  3. Add fruit, veggies or whatever you want to create the bug of your choice. Cut pieces of chives for antennae. 
  4. Add some cream cheese to a baggie, trim end and pipe a dot in eye area; add a mini chocolate chip.
  5. Place bugs on tray and add mint or excess fruit to fill in empty spaces.
  6. Be creative and have FUN! 
    Grape tomato head, mini chocolate chip eyes, chive antennae, cucumber slice body. 
    Blueberry bug eyes, chive antennae, strawberry slice wings, blueberry body.

    Blueberry head with chocolate chip eyes, chive antennae, strawberry body.
    Blueberry bug eyes with Chex Mix antennae and body parts. 
Instructions without photos . . .
EDIBLE BUGS!
Here's what we used:
Celery
Strawberries slices
Blueberries
Green grapes
Grape tomatoes
Cucumber slices
Apple slice brushed with lemon juice
Rasins
Mini chocolate chips
Chex Mix
Chives
Mint for garnish
Spreadable cream cheese (in a tub)
Peanut butter

Here's what to do:
  1. Cut celery into sections and use a knife to trim the underside so it will set flat.
  2. Fill with cream cheese or peanut butter.
  3. Add fruit, veggies or whatever you want to create the bug of your choice. Cut pieces of chives for antennae. 
  4. Add some cream cheese to a baggie, trim end and pipe a dot in eye area; add a mini chocolate chip.
  5. Place bugs on tray and add mint or excess fruit to fill in empty spaces.
  6. Be creative and have FUN! 

Lemon Brownies

Moist, buttery and infused with lemon, these brownies are bursting with flavor without being too sweet. Great for summertime . . . or anytime! They are super easy and quick to make — just about 15 minutes prep time and 25 minutes in the oven. The lemon glaze on top is tart and sweet, and makes a perfect complement to the brownies without being overpowering.

Lemon Brownies  Makes an 8x8” pan or double the recipe and bake in a 9x13” pan for 30 minutes.
3/4 cup all-purpose flour
3/4 cup granulated sugar
1/4 teaspoon salt
1/2 teaspoon baking powder 
1 stick butter, soft
2 eggs
1 tablespoon lemon juice
Zest of 1/2 lemon, about 1/2 teaspoon
  1. Line a 8x8” baking pan with parchment paper, allow edges of paper to overlap ends for easy brownie removal (see below); spray with pan release. Preheat oven to 350°.
  2. Combine the flour, sugar, salt and baking powder in a large bowl.
  3. Mix in the softened butter.
  4. In another bowl whisk the eggs with the lemon juice and zest.
  5. Add to the larger bowl and mix well.
  6. Pour into a prepared 8X8 brownie pan.
  7. Bake in preheated 350° for 25 minutes.
  8. Remove and let cool, then glaze. (These brownies also freeze well.)
Lemon Glaze   -- stir together the following ingredients:
1/2 cup powdered sugar
1 tablespoon lemon juice
Zest of 1/2 lemon, about 1/2 teaspoon 


Recipe without photos  . . .
Lemon Brownies  Make an 8x8” pan or double the recipe and bake in a 9x13” pan for 30 minutes.
3/4 cup all-purpose flour
3/4 cup granulated sugar
1/4 teaspoon salt
1/2 teaspoon baking powder 
1 stick butter, soft
2 eggs
1 tablespoon lemon juice
Zest of 1/2 lemon, about 1/2 teaspoon
  1. Line a 8x8” baking pan with parchment paper, allow edges of paper to overlap ends for easy brownie removal; spray with pan release. Preheat oven to 350°.
  2. Combine the flour, sugar, salt and baking powder in a large bowl.
  3. Mix in the softened butter.
  4. In another bowl whisk the eggs with the lemon juice and zest.
  5. Add to the larger bowl and mix well.
  6. Pour into a prepared 8X8 brownie pan.
  7. Bake in preheated 350° for 25 minutes.
  8. Remove and let cool, then glaze. (These brownies also freeze well.)
Lemon Glaze   -- stir together the following ingredients:
1/2 cup powdered sugar
1 tablespoon lemon juice
Zest of 1/2 lemon, about 1/2 teaspoon 

Online Auction

Not my usual post . . . but if you are in the market for dishes, kitchen equipments, glassware or an array of other household items, check out my mom's estate ONLINE auction @ https://genkc.hibid.com/catalog/172987/super-clean-estate-auction--abilene-/?cpage=3&fbclid=IwAR2eZSZ-mSuyOk7TQKglZ0u1_Sc7tU-MrlWBERMagn-ewjYU9KIoHc4x4yM   Available through June 24, Monday @ 6 PM.


Rader's Taters -- Campfire Dutch Oven Style

Campfire recipe for Kansas State Parks Guide
2019 issue, released in April, page 10
Meta Newell West

The 2019 issue of KANSAS! State Parks is available and features a cast iron campfire recipe provided by Kate Rader. Info about the cook and the recipe  follows as it appears in the magazine.  I've also added some helpful tips that Kate provided below the recipe. 

About the cook and recipe — Kate Rader, a seasoned campfire cooking enthusiast and trail cook, likes to stack up a collection of camp Dutch ovens and prepare a full meal in her backyard in Carlton, Kansas. One of her favorites sides is this colorful and flavorful potato dish that daughter, Annette Satterfield, makes for the family. 
Kate Rader with her camp-style Dutch ovens.
About the cooking methods — This recipe may be prepared over the campfire in a regular Dutch oven or cooking pot, or cooked in a camp Dutch oven. The regular cast iron oven has a rounded top, a flat bottom and no legs so the pot sets on a grate over the coals of the campfire or can be suspended from a tripod. A camp Dutch oven has legs and a flanged lid; coals are added to the top of the collared, flat lid and also placed underneath the pot. Although the following recipe uses just one oven, several ovens can be stacked saving ground space and fuel, and allowing multiple dishes to be prepared at one time. When stacked, the coals on the lid of one oven serve as the 'underneath' coals for the oven stacked on top; the oven on top helps trap heat for the oven underneath.
A stack of camp Dutch ovens allows multiple dishes to be  cooked one-on-top of the other.  

Rader's Taters      6 servings                                                                 
Yukon Gold, new or fingerling potatoes — about 3 pounds
1 big sweet potatoes, peeled, cut in bite-size pieces
2 or 3 garlic cloves, crushed
Salt and pepper to taste
1 tablespoon fresh sage, finely chopped 
1 or 2 tablespoons fresh rosemary, finely chopped 
Olive oil, about 1/4 cup 
Butter, about 3 to 4 tablespoons

Layer potatoes, seasonings, oil and butter in Dutch oven. 
Regular Dutch oven method—Cover and cook on medium heat until potatoes are tender, about 35 to 45 minutes, stirring frequently. Adding a lid will help steam the potatoes and speed up the cooking.
For camp Dutch Oven method—For a temperature of 350°F, use about 16 charcoal briquettes on top and 8 on bottom; this system provides more uniform internal heat and lets the inside of the pot act as an oven. Kate advised, “I also heat a few extra briquettes to be on the safe side.” Baking requires more heat on top of the oven than is needed on the bottom. Rotate oven a quarter to a half turn once or twice while baking; this regulates the uneven heat caused by wind and/or the uneven distribution of coals on the top and bottom of the oven.
----------
Additional Cast Iron Camp Cooking  Info  . . .
Equipment: Kate recommends starting with a good quality, pre-seasoned cast iron 12" camp Dutch oven that has three legs. Other needs: lid lifter, heavy gloves, long handled tongs, a small shovel, a lid holder, and a tote bag for each oven.
Cleaning Dutch ovens: Loosen stuck-on food by adding hot water to pot. After soaking, use a non-abrasive scrubber, wipe clean and dry thoroughly. 

Dutch oven storage: Wipe interior of pots with a thin layer of oil. Store in a tote with the lid under the Dutch oven. Or if lid is left on top, place a towel between lid and pot so the air can circulate.

Recipes: Start with simple ones and practice in your backyard. Kate adds, “It's a creative way of cooking, not an exacting science. Don't be afraid to experiment.” She does recommend the highly rated free phone app — Dutch Oven Coal Calculator. 


Mushroom Croustades

This is a cocktail party favorite that I used to make for Kirby House catering. These mushroom morsels are packed with flavor and can be made ahead, too. Recently made them for an engagement party that we helped host.
Croustades in wooden bowl below the "tree" stand. 
Mushroom Croustades     About 40 croustades
4 tablespoons butter
3 tablespoons green onions, finely chopped
1/2 pound button mushrooms, finely chopped
2 Tablespoon flour
1 cup heavy cream
1 tablespoon parsley, chopped
1/2 teaspoon lemon juice
1/2 teaspoon salt
1/8 teaspoon cayenne pepper
2 tablespoons Parmesan cheese, grated
Croustade Shells - recipe follows
  1. In heavy skillet (moderate heat) melt butter, add onions and cook for 4 minutes, stirring constantly.  
  2. Add mushrooms and cook for 10 to 15 minutes.  

  3. Remove from heat and sprinkle flour over mixture, stirring to blend.   
  4. Return to heat.  Pour in heavy cream; stir and heat to boiling.  
  5. When thickened, simmer and cook 1 minute.
     
  6. Remove from heat and add parsley, lemon juice, salt, cayene pepper & Parmesan cheese. 
  7. Fill croustades shells. 
  8. Bake at 350° for 10 minutes or until heated.  Let cool for 5 minutes before serving.
MAKE AHEAD options: Mixture may be refrigerated and then prepared shells can be filled just before baking. Or fill shells with mixture and frees; bake frozen shells for 20 minutes.
.
Croustades Shells
40 slices sandwich style thin bread
  1. Spray mini muffin tins lightly with pan spray
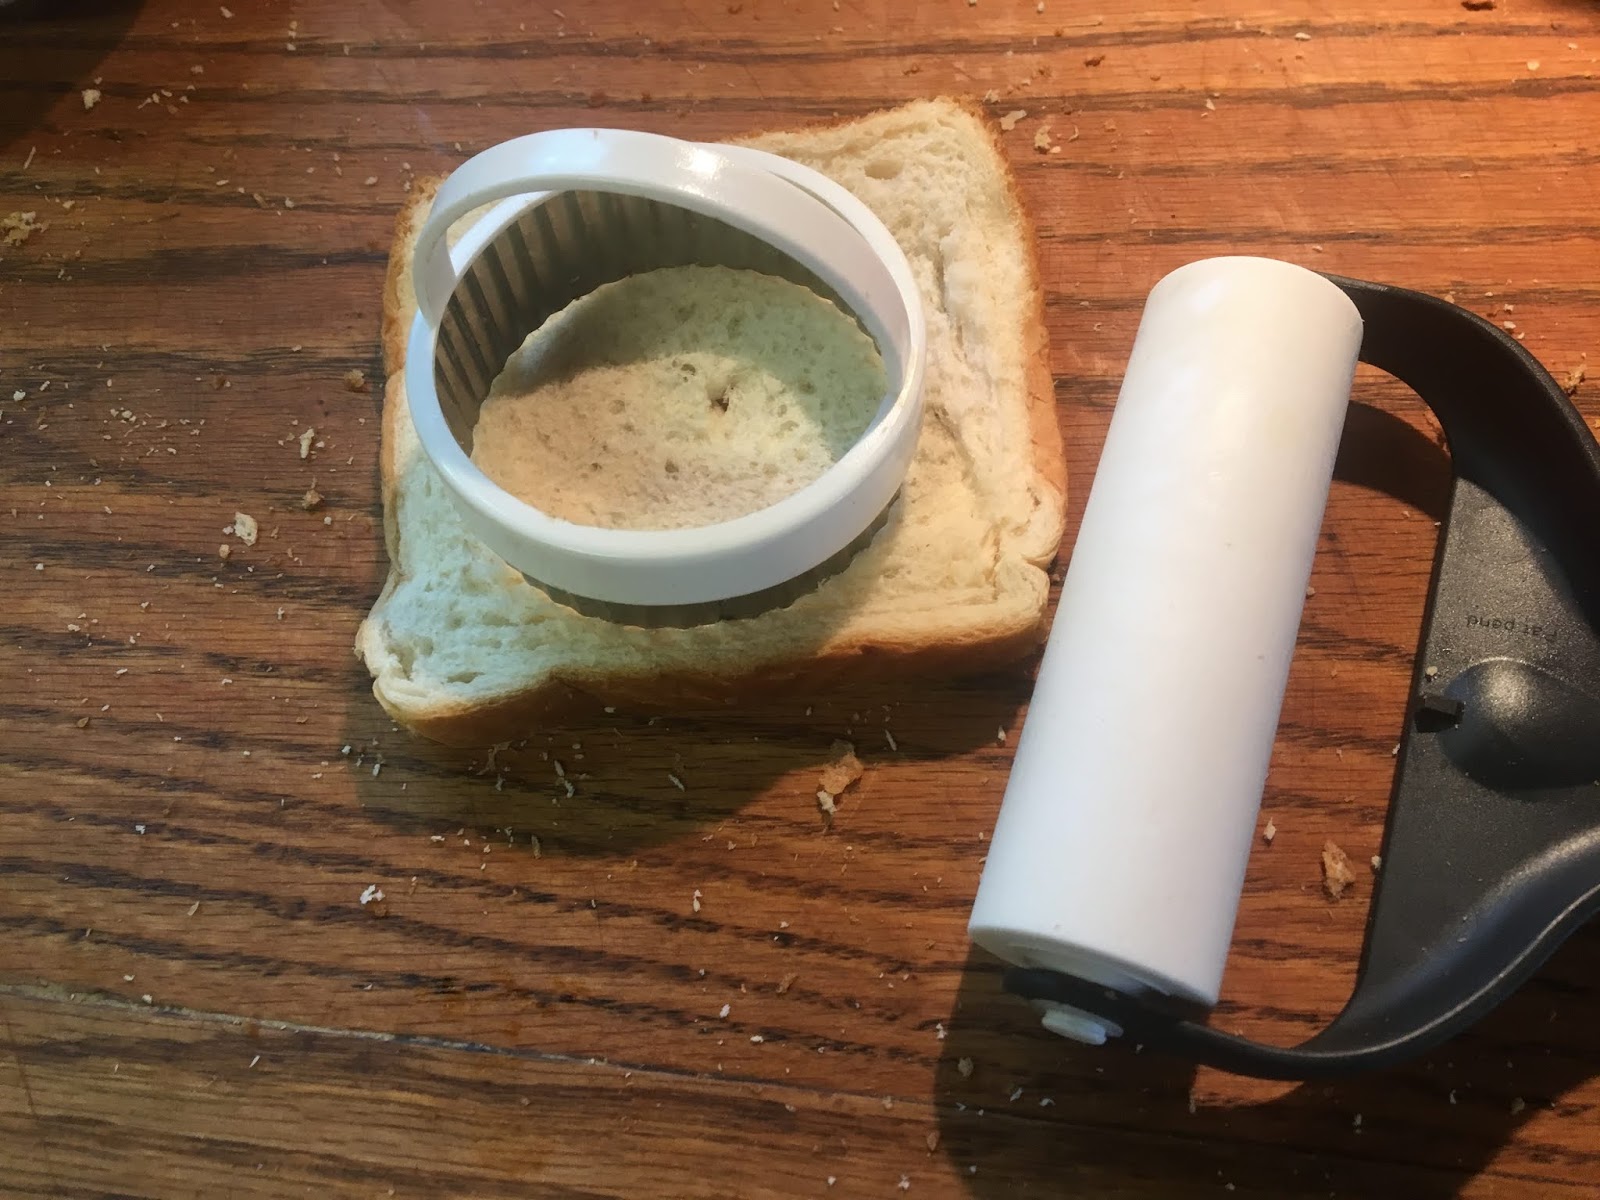
  2. Using a rolling pin, flatten bread slices.
  3. Using a  2 1/2” round cutter, cut a round from each slice of bread. 
  4. Ease bread round into muffin tin holes, shaping so bread conforms to sides of the tin.
  5. Bake in preheated 400° until lightly browned, 8 to 10 minutes (watch closely as they burn easily). 
  6. Store in refrigerator or freeze. 
Recipe without photos . . .
Mushroom Croustades     About 40 croustades
4 tablespoons butter
3 tablespoons green onions, finely chopped
1/2 pound button mushrooms, finely chopped
2 Tablespoon flour
1 cup heavy cream
1 tablespoon parsley, chopped
1/2 teaspoon lemon juice
1/2 teaspoon salt
1/8 teaspoon cayenne pepper
2 tablespoons Parmesan cheese, grated
Croustade Shells - recipe follows
  1. In heavy skillet (moderate heat) melt butter, add onions and cook for 4 minutes, stirring constantly.  
  2. Add mushrooms and cook for 10 to 15 minutes.  
  3. Remove from heat and sprinkle flour over mixture, stirring to blend.   
  4. Return to heat.  Pour in heavy cream; stir and heat to boiling.  
  5. When thickened, simmer and cook 1 minute. 
  6. Remove from heat and add parsley, lemon juice, salt, cayene pepper & Parmesan cheese. 
  7. Fill croustades shells. 
  8. Bake at 350° for 10 minutes or until heated.  Let cool for 5 minutes before serving.
MAKE AHEAD options: Mixture may be refrigerated and then prepared shells can be filled just before baking. Or fill shells with mixture and frees; bake frozen shells for 20 minutes.
.
Croustades Shells
40 slices sandwich style thin bread
  1. Spray mini muffin tins lightly with pan spray
  2. Using a rolling pin, flatten bread slices.
  3. Using a  2 1/2” round cutter, cut a round from each slice of bread. 
  4. Ease bread round into muffin tin holes, shaping so bread conforms to sides of the tin.
  5. Bake in preheated 400° until lightly browned, 8 to 10 minutes (watch closely as they burn easily). 
  6. Store in refrigerator or freeze. 

Chocolate Angel Food Cake

After watching Valerie Bertineli make this on the Food Network, I assembled my ingredients to try a chocolate version of one of my favorite cakes. So light, airy and perfect with springtime berries.

If you prefer the traditional version, try Fred Jarvis’1930’s era Angel Food Cake. I also make a yummy Whole Wheat Angel Food Cake but have not got around to posting that recipe.

Angel Food Cakes are not really difficult to make if you understand the principles of egg foam . . .
EGG WHITE FOAM – You’ll need to separate the whites from the yolks and this is easiest to do when eggs are cold. However, to achieve the maximum amount of egg foam, the eggs should be at room temperature. Hence, separate the eggs and then let them set for a while.
Also egg whites will not whip if there is any fat present —SO —make sure you don’t allow any yolks to mix in with the whites. Use a clean bowl with no traces of fat; stainless, glass or ceramic bowls are ideal. Also make sure your beaters are fat free (i.e. don’t whip cream and then add the beaters to egg whites). 

Chocolate Angel Food Cake with Berries and Cream
1 cup cake flour (No cake flour? Measure out 1 c. all-purpose & remove 2 tablespoons; replace the removed flour with 2 tablespoons of cornstarch)
I used the NutriBullet to
grate the bittersweet chocolate.
1/4 cup cocoa powder (I used dark cocoa powder)
1 teaspoon baking soda 
1 teaspoon instant espresso powder (a great addition that enhances the chocolate flavor)
1/2 teaspoon salt 
1 1/2 cups granulated sugar – divided 
1 ounce bittersweet chocolate, finely grated
12 large egg whites, at room temperature 
1 teaspoon cream of tartar 
1 teaspoon vanilla extract 
-----
Powdered sugar for dusting cake if desired
2 cups mixed fresh berries, for serving 
1 cup whipped cream, for serving 
Chocolate sauce if desired 

Special equipment: 10-inch tube pan with a removable bottom
  1. Preheat the oven to 350° F.
  2. Sift the flour, cocoa powder, baking soda, espresso powder, salt and 3/4 cup sugar into large bowl. Whisk in the chocolate and set aside.

  3. Add the egg whites and cream of tartar to the bowl of a stand mixer fitted with the whisk attachment. Whip the whites on medium-high speed until foamy, about 30 seconds. Slowly pour in the remaining 3/4 cup sugar and whip on high speed until the whites are glossy and can hold a stiff peak. Add the vanilla and beat to combine. Remove the bowl from the mixer.


  4. Gradually add the flour mixture, gently folding it into the egg white mixture, until fully combined. 

  5. Spoon the batter into an ungreased 10-inch tube pan.
  6. Bake in preheated oven until the cake springs back when pressed with a finger, 30 to 35 minutes. Do not open the oven during this time.
  7.  Let cool, inverted, for 1 hour before removing the cake from the pan.
  8. Dust cake with a little powdered sugar. Serve with the berries, a dollop of whipped cream and a drizzle of chocolate sauce. 

             Since angel food cake contains NO yolks, I used them to make my Mom’s Egg Noodles

Recipe without photos . . .
Chocolate Angel Food Cake with Berries and Cream
1 cup cake flour (No cake flour? Measure out 1 c. all-purpose & remove 2 tablespoons; replace the removed flour with 2 tablespoons of cornstarch)
1/4 cup cocoa powder (I used dark cocoa powder)
1 teaspoon baking soda 
1 teaspoon instant espresso powder (a great addition that enhances the chocolate flavor)
1/2 teaspoon salt 
1 1/2 cups granulated sugar – divided 
1 ounce bittersweet chocolate, finely grated
12 large egg whites, at room temperature 
1 teaspoon cream of tartar 
1 teaspoon vanilla extract 
-----
Powdered sugar for dusting cake if desired
2 cups mixed fresh berries, for serving 
1 cup whipped cream, for serving 
Chocolate sauce if desired

Special equipment: 10-inch tube pan with a removable bottom
  1. Preheat the oven to 350° F.
  2. Sift the flour, cocoa powder, baking soda, espresso powder, salt and 3/4 cup sugar into large bowl. Whisk in the chocolate and set aside.
  3. Add the egg whites and cream of tartar to the bowl of a stand mixer fitted with the whisk attachment. Whip the whites on medium-high speed until foamy, about 30 seconds. Slowly pour in the remaining 3/4 cup sugar and whip on high speed until the whites are glossy and can hold a stiff peak. Add the vanilla and beat to combine. Remove the bowl from the mixer.
  4. Gradually add the flour mixture, gently folding it into the egg white mixture, until fully combined. 
  5. Spoon the batter into an ungreased 10-inch tube pan.
  6.  Bake in preheated oven until the cake springs back when pressed with a finger, 30 to 35 minutes. Do not open the oven during this time.
  7.  Let cool, inverted, for 1 hour before removing the cake from the pan.
  8. Dust cake with a little powdered sugar. Serve with the berries, a dollop of whipped cream and a drizzle of chocolate sauce.  

Hildebrand Dairy details & recipe

The summer 2019 issue of KANSAS! magazine arrived in the mail and includes the story I wrote about Hildebrand Daily, “Milking innovation and Tradition,” (pp. 30-33) It’s a story about a Kansas family dairy faming tradition that dates back to 1930. 

Typically, I submit more than can be included, allowing the editor a chance to pick and choose what best fits in the space. I did submit a couple of side bar ideas that didn’t make it into the Taste of Kansas section so I’m including them below.
Photo of Hildebrand Dairy products in their icon bottles.
Photo from Hildebrand Dairy,
HILDEBRAND DAIRY TIDBITS & TRIVIA 
·     According to the Kansas Livestock Association, Hildebrand Farms Dairy (HFD) is one of more than 290 dairy farms in Kansas. 
·     One hundred and fifty cows are milked twice a day in the Hildebrand’s milking parlor; milk out time takes just seven to eight minutes with eight cows milked at a time.
·     The dairy processes about 800-1000 gallons of milk daily.
·     It takes nine gallons of milk to produce one gallon of cream.  
·     Heifers are 2 years old when they are artificially inseminated and begin the dairy cow cycle; cows join the milk herd for one year after giving birth and continue this cycle up to eight times.
·     Peak calf season is April through June and October through November;up to 75 calves can be housed in the well-ventilated barn where they start off being bottle-fed.
·     Customers pay a deposit for a glass bottle and then return it when they make their next purchase; 75 to 80% of bottles are returned and recycled.
·     The bottles that set Hildebrand milk apart have evolved over time. The 10th anniversary bottle was issued in October 2018.
·     Root beer milk, one of Hildebrand’s most unusual flavors, was the suggestion of an employee, and now has a “cult” following. Think root beer float in a bottle!
·     Several Kansas coffee shops use Hildebrand dairy products to create their milk-based drinks including mochas and lattes.
·     Lawrence is the top-selling market for Hildebrand milk in Kansas.

DETAILS ABOUT HILDEBRAND’S BOTTLING PLANT 
four-person team works in the bottling plant beginning at 6:00 a.m. and ending about 2:00 p.m. Monday through Friday. Hildebrand-Reed describesit as an “old-school” operation that uses smaller scale, creamery-sized equipment. The pasteurizer is new but she refers to other pieces of essential equipment as “antiques.”
Milk movement follows this typical sequence:
    ·     SEPARATOR—Milk moves from the barn holding tank to a 1970s era separator that is worth $55,000 in today’s market; equipment for small dairies is hard to come by and expensive.
    ·     PASTEURIZER—Raw milk goes to the pasteurizer where it reaches a temperature of 161 degrees Fahrenheit and is then cooled to 40 degrees Fahrenheit, all within a 15 second time span. 
    ·     HOMOGENIZER— The majority of the milk passes through a homogenizer where the fat molecules are broken down and integrated into the milk. Cream and cream-topped milk bypass this step.
    ·     HOLDING TANKS—Milk goes to one of four holding tanks. 
    ·     BOTTLE FILLER Milk is piped into the filler and added to the dairy’s signature glass bottles. 
    ·     DATER—Bottles are then fed into an automated dater where the shelf life is listed as indicated by federal and state regulations.
    ·     COOLER—Bottles are moved into a cooler located near the loading dock. Refrigerated HFD trucks back up to the dock to load the milk that is then delivered to 125 commercial outlets in Kansas.
To check out additional details about Hildebrand Dairy, go to their website 
@  https://www.hildebrandfarmsdairy.com

And, of course, I always include a recipe. This is the one that was part of the article: 
Hildebrand Mac & Cheese    Yield: one 9 x 13-inch casserole
Melissa Hildebrand-Reed describes this as her go-to mac and cheese recipe, one her family eats year round. She always makes it with whole milk and often uses a variety of cheeses in order to vary the flavor. However she clarifies, “I always use block cheese, never bagged as it just doesn't melt as well.” Sometimes she even uses a half block (4 ounces) of cream cheese to make this comfort food even creamier.

INGREDIENTS
1 lb. elbow macaroni pasta
½ cup Hildebrand sweet cream butter
2 teaspoons minced garlic
½ cup all-purpose flour
1 ½ teaspoons kosher or sea salt
1 ½ teaspoons black pepper
4 cups Hildebrand milk 
1 tablespoon Dijon mustard
6 cups freshly shredded sharp or white cheddar 
2 tablespoons Hildebrand sweet cream butter
½ cup panko bread crumbs

DIRECTIONS
1.    Preheat oven to 325 degrees F. Butter or spray a 9 x 13-inch baking dish.
2.    Boil pasta in salted water according to package directions; drain.
3.    Melt ½ cup butter in large saucepan over medium heat. Add garlic and heat just until it becomes aromatic; watch carefully to avoid burning. 
4.    Sprinkle in flour and whisk; cook 2 to 3 minutes. Add salt and pepper.
5.    Slowly pour in milk and mustard whisking until smooth. Continue to cook on medium heat, whisking until sauce is thick and bubbly. Sauce should be thick enough to coat a spoon. 
6.    Lower heat and stir in cheese until well combined.
7.    Add hot pasta to prepared baking dish. Pour cheese mixture over the top and stir to combine.
8.    In a small skillet set on medium heat, melt 2 tablespoons butter. Add in panko bread crumbs, stirring constantly 3 to 5 minutes or until golden brown.
9.    Sprinkle breadcrumbs over mac and cheese.
10.  Bake in preheated oven for 12 to 15 minutes until bread crumbs crisp.
Summer 2019 KANSAS! magazine cover page