“Magic" Chicken – it’s so easy & fast that it’s like of like magic! (2 variations)


"Magic" Chicken is ready to go into the oven.

     Chicken tenders are so handy and quick cooking and this recipe, including prep and cooking time takes just about 20 to 25 minutes. We almost always pound chicken tenders (creating  “cutlets”) to insure that  they cook evenly and quickly + the portion size “seems” to increase as the poultry is flattened.
     Rather than the usual breading technique (involving dipping into wet and dry ingredients), I simple smear the “cutlet” with mayo and then cover with bread crumbs and bake. It doesn’t get much easier. And, the side dish, Calico Quinoa, is also an equally quick fix.

Since our original posting, we've added another recipe option -- both are good but we now prefer the revised recipe at the bottom of this post! 

"Magic" Chicken -- Original Recipe   Ingredients & instructions for 1 serving
1 chicken tender
1 scant tablespoon mayonnaise (regular, reduced fat or olive-oil based)
About 1 tablespoon dry bread crumbs with about ½ tsp. Italian seasoning mixed in
Thyme sprigs, optional

1.  Preheat oven to 425°.
2.  Line a baking sheet with foil. (You’ll be glad you did when it’s clean up time!)
3.  Pound the chicken tender a couple to times until it flattens and is of an even thickness.
We put the chicken tender in a plastic bag & then pound it with the bottom of a saucepan.
4.  Position tender on foil-lined baking sheet; spread with mayo and top with bread crumbs and thyme.

5.  Bake 10 to 15 minutes or until chicken in thoroughly cooked.
Dinner for Two—"Magic" Chicken, Calico Quinoa & Steamed Asparagus are all ready in less than 30 minutes.
          Check out some of our other menus by clicking on the MENUS tab at the top of this page.

Revised Recipe -- Basically the same, but in this version we used Panko and then bake the chicken on a rack which keeps the bottom of the chicken really crisp . . .
"Magic" Chicken - Revised Recipe    Ingredients & instructions for 1 serving
(The amounts below are for 1 chicken tender; when I’m doing this in quantity, I just dump a bunch of mayo in a pan, a bunch of Panko and oil – I really don’t measure!)
1 scant tablespoon mayonnaise
About 1 tablespoon Panko with enough olive oil drizzled in to make the crumbs slightly moist
1 chicken tender

1.  Preheat oven to 425°.
2.  Line a baking sheet with a cooling rack; spray rack with pan spray.
3.  Put mayonnaise in a low, flat container for dipping.
4.  Mix Panko with olive oil in a low, flat container for dipping.
5.  Immerse chicken tender in mayonnaise to coat, shaking off excess. Then dip in Panko, coating both sides.
6.  Arrange breaded chicken tenders on cooling rack. Ideally they should be refrigerated for at least a couple of hours (overnight is fine, too) as this helps coating stick as chicken bakes.
7.  Preheat oven to 425°
8. Bake 15 min.+, until bread crumbs are golden brown. (170° internal temp).

EXPERIMENTING WITH QUINOA – Cranberry Walnut Quinoa Salad

      Quinoa (KEEN-wa) has been referred to as . . . the whole grain super-food! It’s become quite popular and most grocery stores have added it to their shelves – check under the specialty grains or natural foods sections.
     I’ve been on the search for tasty recipes that incorporate this ancient grain. This one actually is a combination of several – using ingredients I had on hand and adding others that I thought would go well with those I started with. We happened to have lemon-infused balsamic vinegar (it is light in color) and olive oil on hand – they were a nice addition but regular balsamic and olive oil can be used (if you are using regular balsamic, it will darken the salad slightly). Since I liked the lemon flavor imposed by these specialty products, I would recommend adding a squeeze of fresh lemon (and maybe some grated rind) if using them in their usual form.
     And finally, for just two of us I cut the salad in half. It was good but I don’t want to eat it day after day!
     Check out other Healthy Alternatives using our tab at the top of the page.

Cranberry Walnut Quinoa Salad    6 side dish servings
1 cup quinoa 
2 cups water
1⁄2 teaspoon salt or to taste
1/2 cup dried cranberries
1⁄2 cup chopped toasted* walnuts
1⁄4 cup chopped chives or sliced green onion
1⁄4 cup balsamic vinegar (I used lemon balsamic vinegar from The Tasteful Olive)
2 to 3 tablespoons olive oil (I used lemon-infused olive oil from The Tasteful Olive)
Coarsely ground black pepper and Kosher salt

1.     Rinse the quinoa in several changes of water. Combine the 2 cups water and 1⁄2 teaspoon salt in a medium saucepan and bring to a boil over high heat. Reduce heat to simmer, cover, and continue cooking until all water is absorbed, about 20 minutes. Remove from the heat, uncover, and allow to cool for 15 minutes.


2.     In a medium bowl, combine the cooked quinoa, dried cranberries, walnuts, and chives or green onion until well mixed.
3.     In a small bowl, whisk the balsamic vinegar and olive oil until well blended. Pour over the quinoa mixture. Toss until well blended.
4.     Season with salt and pepper to taste. Chill in the refrigerator for at least 30 minutes before serving.

Nutritional Analysis per serving (235g): Calories 142, Fat 6.1g (Saturated fat 0.8g, Cholesterol 0 mg), Sodium 2 mg, Carbohydrate 18.1g, Fiber 2.2, Protein 3.8g, Calcium 1%, Vit C 2%, Iron 7%.

Other Ideas:  Add cooked chicken to make this a main dish salad. Think some crushed or chunked pineapple also might be a nice addition.

About Quinoa (KEEN-wa)
     Quinoa has delightful and unique characteristics that give it an appearance and texture all its own. The taste is a mild, delicate, slightly nutty flavor.
     It is an easy-to-prepare and an excellent alternative to white rice or couscous; it can also serve as a high-protein breakfast food mixed with honey, almonds, or berries.
     The quinoa seed is high in protein, calcium, and iron, and it is a relatively good source of vitamin E and several B vitamins. It contains a nearly perfect balance of all eight essential amino acids, making quinoa a complete protein food. Quinoa is 12% to 18% protein. Four ounces per day, or approximately 1/2 cup, is sufficient to meet a child’s daily protein needs.
     Before cooking, the seeds must be rinsed to remove the bitter resin-like coating, which is the phytochemical saponin. Although quinoa is rinsed before it is packaged and sold, it is advisable to place the seed in a strainer and rinse again at home before use to remove any remaining residue.

To Toast Nuts -- Click on . . . Toasting Nuts
For this salad, I toasted the nuts in our  Breville Smart Oven. It looks like a counter top toaster but bakes like real oven with convection features. Nice for something like toasting nuts as you don't have to heat up the entire oven to do a small job. We bake pizza, pies, chicken . . . . etc., etc. in the oven and love the results! 


Call it what you will . . . Muesli, Overnight Oats, No-cook Refrigerator Oatmeal


Pineapple Upside Up
Overnight Oats
    I first discovered this easy, make-ahead breakfast dish in the late 1970s via a Quaker Oats promotional cookbook. Back then, food companies often provided all kinds of free lesson plans and teaching materials to schools. The Quaker Oats Wholegrain Cookbook was a wonderful resource, full of interesting and somewhat different recipe – from breakfast dishes to sides and entrées to desserts.
     Their recipe was called Muesli (Swiss Oatmeal) and it served six. I would mix up a batch and eat it for breakfast for several days.
     I haven’t made it for awhile but now, all of a sudden, there is an explosion of Overnight or Refrigerator Oat recipes on blogs . . . and many of them end up on Pinterest. The latest recipes have lots of really creative add-ins including chia seeds (rich in omeage-3 fatty acids). But the most innovative take is that instead of making a large batch, bloggers are making individual jars of no-cook oats that you can even grab-and-go!
     So I decided to play around with my own versions and this is what I came up with . . .

Muesli (Overnight, No-cook Oats)– since I really prefer fresh Muesli (vs. two, three or more day-old), I just create the basic mix and then add the wet ingredients the night before it is to be eaten.
Note: Some recipes make larger portions, but it’s way to much for me . . . not that I’m a small eater, it’s just that enough is enough . . . of some foods. This being one!

Step 1: Dry Mix (Make day ahead if you like)
1/3 cup old-fashioned rolled oats (I often use part rolled barley that I obtain at a bulk store)
1 to 2 teaspoons chia seeds
To one individual container (pint canning jars work great), add the above ingredients. Make several ahead if you like and then add the wet ingredients the night before it is to be eaten.

Step 2: Wet Additions (Add the night before eating)
1/3 cup yogurt (I prefer plain Greek yogurt)
½ cup milk (I prefer Almond milk; orange juice was used as the liquid in early recipes)
Add wet ingredients to dry mix, cover and refrigerate overnight or for at least 8 hours.
Note: dried fruits could be added at this stage, if they need to be softened.
Jar on the left contains the dry mix while the one on the right has the wet ingredients added
Step 3: Add the FUN stuff right before eating – fruits, nuts, whatever
Now is your chance to be creative. Here are 3 of my additions + links to several other blogs that might inspire other additions . . . (vary the amounts as desired)
  1. PINEAPPLE UPSIDE UP OVERNIGHT OATS – add chunks of fresh pineapple, dried cherries (I added them in step 2), chopped pecans and just enough brown sugar to sweeten.
  2. HAWAIIAN- style OVERNIGHT OATS – add sliced strawberries, chunks of fresh pineapple, toasted unsweetened coconut, chopped macadamia nuts and just enough brown sugar or agave syrup to sweeten.
  3.  FRUIT & NUT OVERNIGHT OAT DELIGHT – add raisins &/or craisins (in step 2), chopped nuts of your choice, chopped dried plums (politically correct term for prunes), banana slices and sunflower seeds + enough brown sugar, honey or agave syrup to sweeten.

Fruit & Nut Overnight Oat Delight is packed with  craisins, nuts, dried plums,  banana slices & sunflower sneeds.
Or check out the additions that these bloggers came up with:
Overnight Oats      
Or, if you prefer to use steel cut oats, instead of rolled, check out the recipe @ Lets’ Talk Breakfast 

All of this talk about Muesli made me wonder about its HISTORY. Did a little digging and here’s a quick review of what I found . . .
  • Around 1900 a Swiss physician, Maximilian Bircher-Benner, introduced it to patients in his hospital; it was an addition to a diet already rich in fresh fruit and vegetables. A small bowl of Muesli was served before meals.
  •  Dr. Bircher-Benner was somewhat of a rebel – introducing raw foods during an era when cooked foods were deemed the healthiest.
  • The dish was inspired by a concoction he and his wife has been served on a hike in the Swiss Alps.
  • Traditional Muesli was eaten with orange juice and not milk.
  • Modern day Muesli became popular in western countries starting in the 1960s, during an era of  increased interest in health food and vegetarian diets.
  • For more details + Dr.Bircher-Benner’s original recipe, click on Muesli

What do salad dressings & glaze formulas have in common? Barry’s Creamy Lemony Vinaigrette


     Barry was known as the “sauce man” at the Kirby House Restaurant. Although he was not formally trained in the culinary arts, he has the ability to create wonderful sauces  (and other foods, too) . . . without a recipe.
     He does have a BS degree in art education and taught art in the public schools for 28 years. It seems that his creativity is also apparent in the kitchen as he can often just taste a dish and then work out the ingredient combinations. I remember eating a wonderful pasta dish in Emeril’s restaurant in New Orleans. We were there with Vangie and Steve Henry and we all urged him to re-create it once we returned to Abilene. He did. It was on the menu at the Kirby House for quite a while
     Actually Barry likens making sauces to mixing up glaze formulas for pottery. And, now it seems his skill has transcended to salad dressings. Using some fancy olive oil and balsamic vinegar from The Tasteful Olive in Overland Park, Ks., he produced a creamy, lemony dressing that is great over chef or side salads. He did admit that initially he wasn’t sure how it was going to turn out but . . . we were both pleased with the results so I grabbed a piece of paper and a pen and jotted down the ingredient list.

     TRUE CONFESSION: Barry and I both grew up in a very small town in an era when the only locally available brand of olive oil was WORSE than awful! Consequently we avoided the stuff like it was the plague for years. However, once we tried the really good stuff we were sold.  And, a trip to The Tasteful Olive is now a real treat. The last time we were there and sampling the wares, Barry said, “Twenty years ago I never imagined I would be anywhere standing around sampling olive oil and vinegar!”

     By the way, if you don’t have the lemon flavored oil and vinegar, just increase the lemon pepper . . . it won’t be the same but still should be good.
We put the salad dressing
in a squeeze bottle so it is
easy to apply. 

Barry’s Creamy Lemony Vinaigrette
Mayonnaise is added to the basic vinaigrette ingredients to create an easy-to-mix creamy dressing that doesn’t separate.
1/3 cup Lemon EVOO (extra virgin olive oil)
¼ cup Lemon Balsamic Vinegar (this is light in color & will not darken the dressing)
1 cup mayonnaise
3 tablespoons fresh lemon juice
Pinch of kosher and coarsely ground black pepper
1 teaspoon lemon pepper

1.     Combine all ingredients and whisk until thoroughly mixed.
2.     Store in refrigerator.

Another Idea — I added a little
more mayo to thicken the dressing
and turned it into a veggie dip. 

Cortney Does It Again with . . . Olive Crostini


Photo provided by Cortney
     These toast bites, a modified olive tapenade on French bread, are addictive! Cortney Schields brought them to USD 435’s Support Services April gathering. They were delicious and if you are a green olive fan, I highly recommend them . . .as did most everyone that was in attendance.
     She found the recipe on Perfecting the Pairing blog; it also has some other delicious pairing besides this one (click here –Olive Crostini- for the actual recipe and comments posted at that blog).
     Another memorable posting, provided by Courtney, is her aunt’s recipe for Panna Cotta.
Cortney Schields, RD, LD, Food Service Director,
for Abilene Public Schools, at her desk.
     In just a couple of months Cortney will be leaving Abilene where she has been the Food Service Director for Abilene Public Schools the last couple of years. She informed me that she will soon be Cortney Clark from Courtland, Kansas -- try saying that real fast several times!
     Abilene’s loss will definitely be Courtland’s gain. But, hopefully Cortney will stay in touch and continue to share her recipes via email. 

Olive Crostini
1 (4.25 oz.) jar green olives with pimiento, drained and chopped
2 cloves of garlic, chopped
3/4 cup freshly grated Parmesan, loosely packed
4 oz. (1 cup) pepper jack cheese, grated
1/4 cup fresh parsley, chopped
2 tablespoons butter, melted
1 baguette, sliced thin

1. In a medium bowl combine the first six ingredients. Stir until evenly distributed.
2. Top each baguette slice with about 2 tablespoons of the olive mixture.
3. Line up crostini on a cookie sheet.
4. Broil in the oven until the bread starts to brown and the cheese melts.

A Tropical Treat — Coconut Whipped Cream!

   When I saw this idea on Pinterest, I was intrigued! A goggle search lead me to a variety of recipes for this delicious dairy-free whipped cream.
     Remember when this island fruit got a bad rap just a few years back because so many fast food places used it’s oil (which is a source of saturated fat) for frying? Now it is being looked at in a new light and even though (like any fat) it has a lot of calories, the milk does have many healthy benefits. And, to clarify the difference between coconut milk and oil, check out an article titled, Is There a Difference between Coconut Milk and Oil?
     We don’t indulge in whipped cream too often . . . but the next time I need some to top a pie, crisp or crumble, I very well may turn to a can of coconut milk as a delicious alternative.

Whipped Coconut Cream  -- because I used a sweetened coconut milk, added sugar was not necessary; if unsweetened milk is used, a couple of tablespoons of powdered sugar may be needed
1 (15 oz.) can coconut milk (the label on the can I bought read ‑ Real Cream of Coconut milk and was sweetened), full fat – CHILLED at least overnight
1 teaspoon vanilla

1.  Open the can, drain off the clear liquid and transfer the cream to a mixing bowl (a chilled bowl is preferable but not mandatory), using a spoon or silicon spatula to “dig” all the cream out of the can. (Note: Add the leftover clear liquid to a smoothie or use to sweeten cereal, etc.)
This is what the coconut milk looks like -- it does solidify when it is chilled and
you literally have to "dig" it out of the can. There is not a whole lot of clear liquid in the can.
2.  Beat the thick coconut cream with a mixer until thick and fluffy.

3.  Serve immediately or transfer to a covered container and store in the refrigerator. The mixture with firm up as it cools.
Tropical Dessert -- Coconut Cream on homemade whole wheat angel food cake
with chocolate sauce, fresh pineapple and strawberries.
For flavored whipped coconut cream, add some cinnamon, instant coffee, or cocoa powder; replace the vanilla with almond or coconut extract or a liqueur.

AND, here's an interesting link -- 52 Uses for Coconut Oil - The Simple, The Strange, and The Downright Odd!

Celebrate Springtime with Asparagus! — Asparagus Soup


Asparagus Soup served as a
first course with Spicy Saltines.
        In need of a springtime soup, I asked Joann Hettenbach if she had any suggestions. Without batting a eye, she immediately responded, “Mary Rickley’s asparagus soup!” So I contacted Mary and she sent the recipe . . . along with this story. “I found the recipe some time ago on the internet when I helped June Nold, Betty Lewis and Joan prepare a meal.”  The meal was one they offered at an Arts Council auction to help fund that organization.
     After just one bite, I understood why Joann recommended the soup. It is delicious and full of springtime flavor!
     (P.S. I did search the internet trying to find the original source of the recipe to no avail.)

Asparagus Soup  
Shallots (pictured above) are members
of the onion family; they taste sweet,
with a slightly spicy kick.
3 tablespoons olive oil
3 strips bacon, cut in 1/2 " pieces
1 medium onion, chopped
1 large shallot, chopped
2 lb. fresh asparagus
8 oz. fresh spinach, washed & chopped (The spinach can be omitted but it makes the soup a nice green color. I actually used about 4 oz. instead of 8.) 
6 cups chicken or vegetable broth
1/2 to 3/4 cup heavy cream
Kosher salt
Freshly ground pepper 

1.     Heat the olive oil in a Dutch oven or large saucepan. Add bacon pieces and cook until crisp.  Remove bacon pieces and reserve, leaving bacon fat and oil in pot. 
Bacon is crisp and ready to remove from pot.
2.     Add chopped onion and shallot. Sauté until they turn slightly caramelized. 
Onions and the shallot are slightly caramelized and ready for step 3.
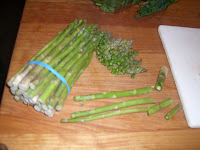
3.     While onions are cooking, prepare asparagus: Trim and discard woody ends, Cut the asparagus tips and set aside. Then, cut asparagus into 1" pieces. 
Bend the asparagus stalk and it will naturally break at the tender point; discard the woody stalk.
Notice that the heads of the asparagus spears have been cut off as they will later be steamed and used for garnish.
4.     Add the asparagus pieces and chopped spinach to the onions; sauté for one minute. 
I actually sautéed it until spinach began to wilt -- probably an extra 2 or 3 minutes.
5.     Pour in broth and let simmer for around 15 minutes. 
My test for doneness -- asparagus stalks  should be completely soft; time may vary
depending on the thickness of the stalks.
6.     While asparagus simmers (step 5), blanche asparagus tips in boiling water for 2 minutes. (I actually put mine in a micro-safe container, added about a tablespoons of water, covered them and microwaved for a couple of minutes).  Drain and immediately rinse with cold water and set aside.
7.     Blend to puree the soup until creamy. 
The blender is the tool for pureeing the soup! I tried an immersion blender but it did NOT
create the creamy consistency I was looking for. Hint -- if using a blender, cool the soup and make sure you don't add too much soup to the work bowl at one time.
8.     Then add cream to your taste and season with salt and pepper.
9.     Garnish soup with generous sprinkles of the asparagus tips and crisped bacon bits.

Make Ahead Notes: Here's what I did to make this soup ahead . . .
For immediate use: I followed the recipe steps 1-7 and put the soup base in the refrigerator. Right before serving I heated up the base, added cream and garnished the soup (steps 8-9).
To make and freeze: Follow steps 1-4, cool mixture and freeze. I also completed step #6 --freezing the asparagus tips. When ready to make soup, thaw asparagus and onion blend and also asparagus tips. Proceed with recipe according to specified directions. (I actually bought asparagus when on sale and made prepared multiple batches of this mixture for later use.)
Soup is served! In this case it was a first course offering, served in the china cups that go with our wedding china.
For information on asparagus purchase, nutrition and cooking, check out this article -- Asparagus: A Springtime Celebration.