Cider Cream Frosting

Creamy, fluffy and flavorful, this frosting adds a fall twist to cupcakes, cinnamon rolls, cakes and cookies. Apple cider reduction is the secret its power-packed flavor. The frosting can also be made 5 days in advance, covered, and stored in the refrigerator until ready to use. 

Cider Cream Frosting is the perfect topping for Sourdough Pumpkin Cinnamon Rolls.

Use Cider Cream Frosting on your favorite cupcakes,  cakes or cookies. 

Cider Cream Frosting   Enough to frost a layer cake, a large batch of cookies, cinnamon rolls, etc. 

Apple Cider Reduction:

1 cup apple cider (We prefer Louisburg Cider)

Cider Cream (Buttercream) Frosting:

2 sticks butter, softened 


1/2 cup  packed light brown sugar


2 1/2 cups powder (confectioners) sugar


1 teaspoon vanilla 


1/4 cup apple cider reduction


1/8 teaspoon salt


1 teaspoon ground cinnamon

  1. Apple Cider Reduction: Pour apple cider into a saucepan and place over medium heat. Bring to a simmer and let it cook, watching carefully, until the cider is reduced to 1/4 cup (about 20+ minutes). If it reduces too much, add enough cider to make1/4 cup. Let it cool for about 10 minutes before using. (This can also be done the day before—simply cover and refrigerate until ready to use the next day, but make sure it comes back to room temperature before using.
    .
  2. Cider Cream (Buttercream) Frosting:  Cream the butter and brown sugar until light and fluffy about 1 to 2 minutes.

  3. Add the powdered (confectioners sugar) one cup at a time. Mix on low speed until incorporated.
  4. Add salt, cinnamon, and vanilla, and mix on medium speed to incorporate. 
  5. Add in the apple cider reduction (make sure it's at room temperature) a tablespoon at a time, and mix on low to incorporate. Once it's all added, increase the speed to high for 8 minutes until light and creamy. Note: If the mixture should start to curdle, keep mixing until it becomes smooth again.

Recipe without photos . . . Cider Cream Frosting   Enough to frost a layer cake, a large batch of cookies, cinnamon rolls, etc. 

Apple Cider Reduction:

1 cup apple cider (We prefer Louisburg Cider)

Cider Cream (Buttercream) Frosting:

2 sticks butter, softened 


1/2 cup  packed light brown sugar


2 1/2 cups powder (confectioners) sugar


1 teaspoon vanilla 


1/4 cup apple cider reduction


1/8 teaspoon salt


1 teaspoon ground cinnamon

  1. Apple Cider Reduction: Pour apple cider into a saucepan and place over medium heat. Bring to a simmer and let it cook, watching carefully, until the cider is reduced to 1/4 cup (about 20+ minutes). If it reduces too much, add enough cider to make1/4 cup. Let it cool for about 10 minutes before using. (This can also be done the day before—simply cover and refrigerate until ready to use the next day, but make sure it comes back to room temperature before using..
  2. Cider Cream (Buttercream) Frosting:  Cream the butter and brown sugar until light and fluffy about 1 to 2 minutes.

  3. Add the powdered (confectioners sugar) one cup at a time. Mix on low speed until incorporated.
  4. Add salt, cinnamon, and vanilla, and mix on medium speed to incorporate. 
  5. Add in the apple cider reduction (make sure it's at room temperature) a tablespoon at a time, and mix on low to incorporate. Once it's all added, increase the speed to high for 8 minutes until light and creamy.Note: If the mixture should start to curdle, keep mixing until it becomes smooth again.

Sourdough Pumpkin Cinnamon Rolls . . . fall flavors update a classic recipe

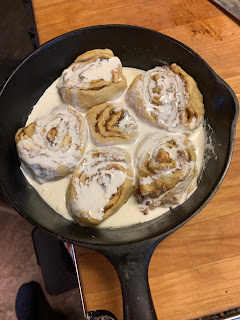
t’s a two-day process, but these Sourdough Pumpkin Cinnamon Rolls are definitely worth the effort! This fall inspired recipe incorporates pumpkin purée into the dough as well as being added to the classic filling which also uses pumpkin spice in addition to the  typical cinnamon. I found the recipe on Farmhouse on Boone blog and made it as is . . . other than baking rolls in two smaller sized cast iron skillets. I also used fluffy and flavorful Cider Cream Frosting instead of the topping  listed below — it was a nice compliment to the rolls and added another layer of fall flavor. 


Sourdough Pumpkin Cinnamon Rolls  Yield: 12 to 14  

Night before:

1/2 cup fed sourdough starter 

1/2 cup water 

4 1/4 cups unbleached all purpose flour 

1/2 cup melted coconut oil 

1/2 cup pumpkin purée (plain pumpkin, no spices or sugar added)

1 tablespoon pumpkin pie spice 

1/2 cup honey 

Next day:

Pumpkin Sugar Filling:

1/2 cup softened butter 

1 cup packed brown sugar 

1/4 cup pumpkin purée 

1 tablespoon cinnamon 

1 tablespoon pumpkin pie spice  

2/3 to 1 cup chopped walnuts to sprinkle over filling, if desired

Cinnamon Roll Dough (continued):

2 eggs 

1 teaspoon baking soda 

1 teaspoon baking powder 

1/2 teaspoon salt 

Top with before baking:

1/2 cup heavy whipping cream 

Cream Cheese Topping . . . or use Cider Cream Frosting 

6 ounces cream cheese 

1/2 cup heavy cream 

1/2 cup maple syrup or honey 

2 teaspoons vanilla 

  1. Night before: In a bowl, combine fed sourdough starter, flour, honey, puréed pumpkin, water, pumpkin pie spice, and melted coconut oil. 
  2. Mix together and form into a ball. 
  3. Place the dough in a greased bowl and cover the dough with beeswax wrap or plastic wrap, allowing it to rest in a warm place overnight for 8 to 24 hours.
  4. Next Day: Preheat oven to 375°.
  5. Pumpkin Sugar Filling: In a bowl, combine softened butter, brown sugar, pumpkin purée, cinnamon and pumpkin pie spice. Stir until smooth. 
  6. Cinnamon Roll Dough (continued):Place the fermented dough from the night before into a stand mixer and add eggs, baking soda, baking powder, and salt. Mix until combined.
  7. Lightly dust the counter with flour, and roll out the dough to about 1/4-inch thickness. 
  8. Spread pumpkin sugar mixture all over the rolled out dough, and top with walnuts. 
  9. Roll the dough up as tightly as possible. When you get to the end, pull it up as tightly as you can and pinch the ends into the main roll.
  10. Slice to make 12 to 14 sourdough cinnamon rolls.
  11. Place the rolls into a seasoned 14″ cast iron skillet or a baking dish. (I used 2 smaller cast iron skillets.)
  12. Pour heavy cream over top of the rolls.
  13. Place in the oven and bake for 20 to 25 minutes or until the rolls are lightly browned and the dough is cooked through. Allow them to cool a bit.
  14. Cream Cheese Topping: (I spread the top of the rolls with Cider Cream Frosting rather than the one provided below.)
  15. In a stand mixer, add softened cream cheese, heavy cream, maple syrup or honey, and 2 teaspoons of vanilla. Stir until combined. 
  16. Pour over cinnamon rolls.  
Recipe without photos . . . Sourdough Pumpkin Cinnamon Rolls  Yield: 12 to 14  

Night before:

1/2 cup fed sourdough starter 

1/2 cup water 

4 1/4 cups unbleached all purpose flour 

1/2 cup melted coconut oil 

1/2 cup pumpkin purée (plain pumpkin, no spices or sugar added)

1 tablespoon pumpkin pie spice 

1/2 cup honey 

Next day:

Pumpkin Sugar Filling:

1/2 cup softened butter 

1 cup packed brown sugar 

1/4 cup pumpkin purée 

1 tablespoon cinnamon 

1 tablespoon  pumpkin pie spice 

2/3 to 1 cup chopped walnuts to sprinkle over filling, if desired

Cinnamon Roll Dough (continued):

2 eggs 

1 teaspoon baking soda 

1 teaspoon baking powder 

1/2 teaspoon salt 

Top with before baking:

1/2 cup heavy whipping cream 

Cream Cheese Topping . . . or use Cider Cream Frosting 

6 ounces cream cheese 

1/2 cup heavy cream 

1/2 cup maple syrup or honey 

2 teaspoons vanilla 

  1. Night before: In a bowl, combine fed sourdough starter, flour, honey, puréed pumpkin, water, pumpkin pie spice, and melted coconut oil. 
  2. Mix together and form into a ball. 
  3. Place the dough in a greased bowl and cover the dough with beeswax wrap or plastic wrap, allowing it to rest in a warm place overnight for 8 to 24 hours.
  4. Next Day: Preheat oven to 375°.
  5. Pumpkin Sugar Filling: In a bowl, combine softened butter, brown sugar, pumpkin purée, cinnamon and pumpkin pie spice. Stir until smooth. 
  6. Cinnamon Roll Dough (continued):Place the fermented dough from the night before into a stand mixer and add eggs, baking soda, baking powder, and salt. Mix until combined.
  7. Lightly dust the counter with flour, and roll out the dough to about 1/4-inch thickness. 
  8. Spread pumpkin sugar mixture all over the rolled out dough, and top with  walnuts. 
  9. Roll the dough up as tightly as possible. When you get to the end, pull it up as tightly as you can and pinch the ends into the main roll.
  10. Slice to make 12 to 14 sourdough cinnamon rolls.
  11. Place the rolls into a seasoned 14″ cast iron skillet or a baking dish. (I used 2 smaller cast iron skillets.)
  12. Pour heavy cream over top of the rolls.
  13. Place in the oven to bake for 20 to 25 minutes or until the rolls are lightly browned and the dough is cooked through. Allow them to cool a bit.
  14. Cream Cheese Topping: (I spread the top of the rolls with Cider Cream Frosting rather than the one provided below.)
  15. In a stand mixer, add softened cream cheese, heavy cream, maple syrup or honey, and 2 teaspoons of vanilla. Stir until combined. 
  16. Pour over cinnamon rolls. 

Autumn Apple Cake with Brown Sugar Butter Sauce

Autumn Apple Cake fit in quite nicely with our German-inspired meal for a 90th birthday celebration. Moist and flavorful, this call is chock-full of  apple chunks and walnuts and finished with a brown sugar butter sauce.  


Autumn Apple Cake with Brown Sugar Butter Sauce  Yield: One bundt cake

Cake:

1 1/2 cups granulated sugar

1 cup vegetable oil

1/2 cup (1 stick) butter, softened

3 large eggs

1/2 teaspoon vanilla 

3 cups all-purpose flour

1 teaspoon baking soda

1/2 teaspoon salt

2 cups peeled & diced apples

1 cup chopped walnuts

Brown Sugar Butter Sauce:

1 cup brown sugar

1/2 cup (1 stick) butter

1/4 cup milk

  1. Preheat the oven to 325°F (165 degrees C). Grease and flour a standard-sized bundt pan or a 10-inch tube pan.
  2. Cake: Combine sugar, oil, and softened butter in a large mixing bowl; beat with an electric mixer until smooth and creamy. 
  3. Mix in eggs, one at a time, then mix in vanilla. 
  4. Gradually mix in flour, baking soda, and salt until well combined. 
  5. Stir in apples and walnuts. 
  6. Pour batter into the prepared pan.
  7. Bake in the preheated oven until a cake tester inserted in the center comes out clean, about 90 minutes. 
  8. Remove from the oven and let cool from the pan for a few minutes. Run a table knife around the edges to loosen. Invert carefully onto a serving plate or cooling rack.
  9. Brown Sugar Butter Sauce: While the cake is cooling, make the glaze: Combine brown sugar, butter, and milk in a small saucepan; bring to a boil. Once boiling, stir for 1 minute to combine.
  10. Let cool til just slightly thickened. Pour about half the sauce over the cake and save the other half to drizzle over slices of the cake. 

Recipe without photos . . . 
Autumn Apple Cake  Yield: One bundt cake

Cake:

1 1/2 cups granulated sugar

1 cup vegetable oil

1/2 cup (1 stick) butter, softened

3 large eggs

1/2 teaspoon vanilla 

3 cups all-purpose flour

1 teaspoon baking soda

1/2 teaspoon salt

2 cups peeled & diced apples

1 cup chopped walnuts

Brown Sugar Butter Sauce:

1 cup brown sugar

1/2 cup (1 stick) butter

1/4 cup milk

  1. Preheat the oven to 325°F (165 degrees C). Grease and flour a standard-sized bundt pan or a 10-inch tube pan.
  2. Cake: Combine sugar, oil, and softened butter in a large mixing bowl; beat with an electric mixer until smooth and creamy. 
  3. Mix in eggs, one at a time, then mix in vanilla. 
  4. Gradually mix in flour, baking soda, and salt until well combined. 
  5. Stir in apples and walnuts. 
  6. Pour batter into the prepared pan.
  7. Bake in the preheated oven until a cake tester inserted in the center comes out clean, about 90 minutes. 
  8. Remove from the oven and let cool from the pan for a few minutes. Run a table knife around the edges to loosen. Invert carefully onto a serving plate or cooling rack.
  9. Brown Sugar Butter Sauce: While the cake is cooling, make the glaze: Combine brown sugar, butter, and milk in a small saucepan; bring to a boil. Once boiling, stir for 1 minute to combine.
  10. Let cool til just slightly thickened. Pour about half the sauce over the cake and save the other half to drizzle over slices of the cake.  

Chicken Parmesan Zucchini Boats

Oh my gourd! That was the name of the Food Network episode where Katie Lee Biegel prepared this dish that is simply delicious. Here's Katie's dishes with a few adjustments included the fact that I cut ingredients down using 2 zucchini instead of the 4 she called for in her recipe. 

Chicken Parmesan Zucchini Boats     4 servings allowing 1 boat per person

2 medium zucchini

1 tablespoon  olive oil

Kosher salt and freshly ground black pepper

1/2  pound ground chicken 

1 teaspoon dried Italian seasoning 

2 cloves garlic, minced 

About 1 cup marinara 

2 tablespoons grated Parmesan 

About 1/2 cup shredded mozzarella 

Fresh parsley leaves for garnish, optional.  

  1. Preheat the oven to 400° F.
  2. Slice off the ends of the zucchini and cut in half lengthwise. Use a spoon to remove the flesh of the zucchini, then chop the flesh and set aside. Place the zucchini boats on a baking sheet and drizzle with 1 teaspoon of the olive oil. Season lightly with salt and pepper. Bake for 20 minutes (or about 10 minutes for smaller sized squash boats).
  3. Meanwhile, heat the remaining 1 tablespoon olive oil in a medium skillet over medium-high heat. Add the ground chicken and cook, using a wooden spoon to break up the chicken, until browned, 8 to 10 minutes. Add the Italian seasoning, garlic, zucchini flesh, 3/4 teaspoon salt and 1/4 teaspoon pepper. Cook an additional 2 to 3 minutes. Add marinara, Parmesan cheese and mix well.
  4. Spoon some of the chicken mixture into each zucchini boat. Top each with mozzarella  Bake until the cheese is bubbly and golden brown, an additional 15 to 20 minutes.
  5. Garnish with fresh parsley leaves if desired. 

Recipe without photos . . . Chicken Parmesan Zucchini Boats     4 servings allowing 1 boat per person

4 medium zucchini

1 tablespoon plus 1 teaspoon olive oil

Kosher salt and freshly ground black pepper

1 pound ground chicken 

1 teaspoon dried Italian seasoning 

2 cloves garlic, minced 

1 1/2 cups marinara 

1/2 cup shredded mozzarella 

2 tablespoons grated Parmesan 

Fresh parsley leaves for garnish, optional.  

  1. Preheat the oven to 400° F.
  2. Slice off the ends of the zucchini and cut in half lengthwise. Use a spoon to remove the flesh of the zucchini, then chop the flesh and set aside. Place the zucchini boats on a baking sheet and drizzle with 1 teaspoon of the olive oil. Season lightly with salt and pepper. Bake for 20 minutes (or about 10 minutes for smaller sized squash boats).
  3. Meanwhile, heat the remaining 1 tablespoon olive oil in a medium skillet over medium-high heat. Add the ground chicken and cook, using a wooden spoon to break up the chicken, until browned, 8 to 10 minutes. Add the Italian seasoning, garlic, zucchini flesh, 3/4 teaspoon salt and 1/4 teaspoon pepper. Cook an additional 2 to 3 minutes. Add marinara, Parmesan cheese and mix well.
  4. Spoon some of the chicken mixture into each zucchini boat. Top each with mozzarella  Bake until the cheese is bubbly and golden brown, an additional 15 to 20 minutes.
  5. Garnish with fresh parsley leaves if desired. 

Pumpkin-Shaped Cheeseball

It’s the technique that makes this cheesball unique! I used a favorite cheesy combo for the ball but your favorite recipe could be used instead! Perfect snack for a fall gathering including Halloween and Thanksgiving. 


Pumpkin-Shaped Cheeseball  Yields a smaller sized cheesball for about 6 to 8; double for larger groups

8 ounce block cream cheese (softened to room temperature)

1 to 1 1/2 tablespoons ranch dressing mix 

3 to 4 tablespoons sour cream

1 1/2 cups shredded sharp Cheddar cheese or use a Mexican-blend cheese 

1/2 cups FINELY grated sharp Cheddar cheese for coating 

To Finish: Pepper stem or pretzel stick + sage leaves

  1. Using a mixer, combine cream cheese and minimum amount of ranch dressing mix. 
  2. Add 1 1/2 cups Cheddar cheese and enough sour cream to make a moist and pliable ball. Taste and add more rand dressing mix if desired. 
  3. Spread out a large sheet of plastic wrap.
  4. Gather cheese mixture into a ball and place in the center of the plastic wrap. 
  5. Use the finely shredded Cheddar cheese to coat sides and top of the cheese ball, distributing it as evenly as possible. (Finely shredded Cheddar will easily blend into the ball and create the orange color.)
  6. Gather the plastic wrap around the ball; add a 2nd layer of plastic wrap for added strength.  Ball needs to be well-wrapped and wrapped tightly. 
  7. Cut 4 pieces strings of kitchen twine and arrange in an overlapping spider web arrangement (see photo below); set the wrapped cheeseball in the center of the "web". 
  8. Draw up one string, tighten the sting to create a pumpkin-type ridge;  tie a knot. Continue with the remaining strings, smoothing edges with your fingers. Make a slight indentation at the top to create a slope for the stem. 

  9. Place cheese ball into the fridge for a minimum of two hours (overnight is best.) Not only do the flavors get better as it sits, but as the mixture cools, it will help it to form that pumpkin shape.
  10. When ready, cut off the strings and carefully remove the cling wrap.
  11. Gently push a pepper stem or pretzel stick into the top of the “pumpkin” and add a couple of sage leaves. 
  12. Serve with your favorite crackers or a combo or crackers and fresh veggies, etc.
Recipe without photos . . . Pumpkin-Shaped Cheeseball  Yields a smaller sized cheesball for about 6 to 8; double for larger groups

8 ounce block cream cheese (softened to room temperature)

1 to 1 1/2 tablespoons ranch dressing mix 

1 1/2 cups shredded sharp Cheddar cheese or use a Mexican-blend cheese 

1/2 cups FINELY grated sharp Cheddar cheese for coating 

To Finish: Pepper stem or pretzel stick + sage leaves

  1. Using a mixer, combine cream cheese and minimum amount of ranch dressing mix. 
  2. Add 1 1/2 cups Cheddar cheese and enough sour cream to make a moist and pliable ball. Taste and add more rand dressing mix if desired. 
  3. Spread out a large sheet of plastic wrap.
  4. Gather cheese mixture into a ball and place in the center of the plastic wrap. t
  5. Use the finely shredded Cheddar cheese to coat sides and top of the cheese ball, distributing it as evenly as possible. (Finely shredded Cheddar will easily blend into the ball and create the orange color.)
  6. Gather the plastic wrap around the ball; add a 2nd layer of plastic wrap for added strength.  Ball needs to be well-wrapped and wrapped tightly. 
  7. Cut 4 pieces strings of kitchen twine and arrange in an overlapping spider web arrangement (see photo below); set the wrapped cheeseball in the center of the "web". 
  8. Draw up one string, tighten the sting to create a pumpkin-type ridge;  tie a knot. Continue with the remaining strings, smoothing edges with your fingers. Make a slight indentation at the top to create a slope for the stem. 
  9. Place cheese ball into the fridge for a minimum of two hours (overnight is best.) Not only do the flavors get better as it sits, but as the mixture cools, it will help it to form that pumpkin shape.
  10. When ready, cut off the strings and carefully remove the cling wrap.
  11. Gently push a pepper stem or pretzel stick into the top of the “pumpkin” and add a couple of sage leaves. 
  12. Serve with your favorite crackers or a combo or crackers and fresh veggies, etc. 

Chunky Apple Cake

Fall is here and this chunky apple cake captures the season with  warm spices and walnut additions. I served it for a special occasion brunch topped with whipped cream and pie cut outs, but it would make a yummy anytime dessert.

Chunky Apple Cake      Yield: one 9-inch springform cake

Cake batter

1 1/2 cups all-purpose flour sifted

1 teaspoon baking powder

½ teaspoon baking soda

¼ teaspoon salt

1 cup granulated sugar

¼ cup vegetable oil

½ cup Greek yogurt or sour cream

1 teaspoon vanilla 

2 eggs

Additions:

4 apples peeled, cored, and chopped into small square chunks

1 teaspoon cinnamon

¼ teaspoon nutmeg

¼ cup brown sugar

3/4 cup chopped walnuts (or pecans)

  1. Preheat oven to 350°F with rack in middle.

  2. Use a 9x3-inch springform pan or a 9-inch round cake pan (at least 2 inches tall).

  3. Grease the side and the bottom of the springform pan with butter or cooking spray. Line the bottom of a 9x3-inch springform pan (or 9-inch round cake pan) with parchment paper. Grease the parchment paper too.

  4. In a  medium mixing bowl, combine together flour, baking powder, baking soda, and salt.

  5. In another, large bowl, whisk together 1 cup of white sugar, vegetable oil, yogurt, and vanilla until very smooth. Add eggs and whisk until smooth.

  6. Add dry ingredients (flour mixture) into wet ingredients and mix until just combined. Do not overmix.

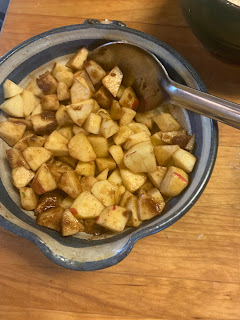
  7. Core, peel, and slice apples into chunks. In a medium bowl, toss apple chunks with cinnamon, nutmeg, and brown sugar.

  8. Pour half of the batter into the greased pan, top with two-thirds of the apple chunks, then pour the remaining half of the batter on top of the apple layer; sprinkle with chopped walnuts.
  9. Bake the cake until set in the middle - 1 to 1 1/2 hours. Halfway through baking (about 30 to 45 minutes after purring in the oven) remove the cake from the oven and top it with the remaining one-third of the apple chunks. 
  10. Return the cake to the oven and continue baking until the cake is done —when the toothpick inserted in the center comes out clean).


Recipe without photos . . . Chunky Apple Cake      Yield: one 9-inch springform cake

Cake batter

1 1/2 cups all-purpose flour sifted

1 teaspoon baking powder

½ teaspoon baking soda

¼ teaspoon salt

1 cup granulated sugar

¼ cup vegetable oil

½ cup Greek yogurt or sour cream

1 teaspoon vanilla 

2 eggs

Additions:

4 apples peeled, cored, and chopped into small square chunks

1 teaspoon cinnamon

¼ teaspoon nutmeg

¼ cup brown sugar

3/4 cup chopped walnuts (or pecans)

  1. Preheat oven to 350°F with rack in middle.
Use a 9x3-inch springform pan or a 9-inch round cake pan (at least 2 inches tall).

  2. Grease the side and the bottom of the springform pan with butter or cooking spray. Line the bottom of a 9x3-inch springform pan (or 9-inch round cake pan) with parchment paper. Grease the parchment paper too.

  3. In a  medium mixing bowl, combine together flour, baking powder, baking soda, and salt.

  4. In another, large bowl, whisk together 1 cup of white sugar, vegetable oil, yogurt, and vanilla until very smooth. Add eggs and whisk until smooth.

  5. Add dry ingredients (flour mixture) into wet ingredients and mix until just combined. Do not overmix.

  6. Core, peel, and slice apples into chunks. In a medium bowl, toss apple chunks with cinnamon, nutmeg, and brown sugar.

  7. Pour half of the batter into the greased pan, top with two-thirds of the apple chunks, then pour the remaining half of the batter on top of the apple layer.

  8. Bake the cake until set in the middle - 1 to 1 1/2 hours. Halfway through baking (about 30 to 45 minutes after purring in the oven) remove the cake from the oven and top it with the remaining one-third of the apple chunks; sprinkle with chopped walnuts 
  9. Return the cake to the oven and continue baking until the cake is done —when the toothpick inserted in the center comes out clean).


Apple Cider Mimosas – a fun & frightful Halloween brew

Sparkling wine (champagne or prosecco) and apple cider turn classic mimosas into a sparkling fall cocktail or a frightful Halloween brew! (Of course, seasonal glasses add to the fun.)


Apple Cider Mimosas     

Sugar-cinnamon mixture (use twice as much sugar a cinnamon, such as 2 Tbsp. sugar to 1 Tbsp. cinnamon)

Apple slices

Apple cider (we like Louisburg Cider)

Sparkling wine such as champagne or prosecco

  1. Dip the top of each champagne glass into water, then dip in the cinnamon-sugar mixture to coat the rim.
  2. Make a cut or notch near the top of a thin apple slice. Attach to the glass for a garnish. 
  3. Fill each champagne glass 1/2 to 3/4 full with apple cider (depending on how strong you want your mimosas to be).
  4. Top each glass with sparkling wine.


Spiced Butternut Squash Soup - small batch

I try my best to make smaller portions of soup yet sometimes I just get carried away. A new 2-quart cast iron mini Dutch Oven to the rescue! Just enough for about four servings, this recipe allows for a reasonable amount of leftovers for just two people. I even used the recipe in the user manual. 


I topped the soup with thyme leaves and homemade croutons and served it with a garden salad for a light meal. It would also make a nice first course dish for a multi-course meal. 


Spiced Butternut Squash Soup - small batch   4 servings

1 tablespoon coconut oil

1 carrot, peeled & chopped

3 cups butternut squash, peeled & chopped

2 teaspoons fresh thyme leaves, optional 

1 onion, chopped

3 cloves garlic, minced

1/4 teaspoon nutmeg

2 to 3 teaspoons cumin

1 teaspoon ground ginger

1/4 teaspoon cayenne pepper or less if preferred

Pinch ground cinnamon

1 teaspoon paprika

2 to 2 1/2 cups chicken broth (I used 2 cups and then finished it with heavy cream, added after blending the soup)

Kosher salt and black pepper to taste

  1. In a 2-quart Dutch oven, heat coconut oil over medium-low heat. Add carrots,  butternut squash and thyme leaves; sauté for 10 minutes.
  2. Add onions, garlic and seasoning and continue cooking for 5 minutes. Season with salt and pepper.
  3. Add broth and bring to boil. Reduce heat to low and continue to cook for 10 minutes or until squash mixture is fork tender. 
  4. Blend until desired consistency in reached. Taste and adjust seasonings as needed.
  5. I returned the soup to the pot to reheat and added 1/2 heavy cream for added richness (dollops or sour cream could also be added in place of the cream.   
Recipe without photos . . . Spiced Butternut Squash Soup - small batch   4 servings

1 tablespoon coconut oil

1 carrot, peeled & chopped

3 cups butternut squash, peeled & chopped

2 teaspoons fresh thyme leaves, optional 

1 onion, chopped

3 cloves garlic, minced

1/4 teaspoon nutmeg

2 to 3 teaspoons cumin

1 teaspoon ground ginger

1/4 teaspoon cayenne pepper or less if preferred

Pinch ground cinnamon

1 teaspoon paprika

2 to 2 1/2 cups chicken broth (I used 2 cups and then finished it with heavy cream, added after blending the soup)

Kosher salt and black pepper to taste

  1. In a 2-quart Dutch oven, heat coconut oil over medium-low heat. Add carrots, butternut squash and thyme leaves; sauté for 10 minutes
  2. Add onions, garlic and seasoning and continue cooking for 5 minutes. Season with salt and pepper.
  3. Add broth and bring to boil. Reduce heat to low and continue to cook for 10 minutes or until squash mixture is fork tender. 
  4. Blend until desired consistency in reached. Taste and adjust seasonings as needed.
  5. I returned the soup to the pot to reheat and added 1/2 heavy cream for added richness (dollops or sour cream could also be added in place of the cream.