Showing posts with label Worcestershire Sauce. Show all posts

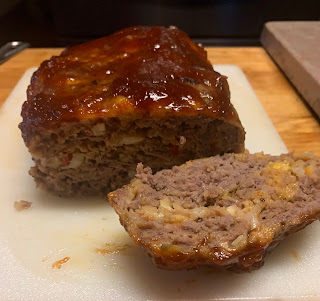
Ritzy (Cracker) Meatloaf . . . including convenience assemble ahead instructions.

Ritz (butter) crackers, along with ground beef form the basis for this tasty meatloaf. While we love meatloaf as an entrée, we certainly look forward to tomorrow’s meatloaf sandwiches! 


Meatloaf Sandwich on a 40-Minute Everything Bagel Bun 

MAKE AHEAD INSTRUCTIONS — The other thing I really like about meatloaf . . . is that it can be made ahead. I assembled the sauce and meatloaf (steps 2-4) and placed them in the refrigerator. When ready to bake, I pulled them out and followed steps 5-7. 


Ritzy (Cracker) Meatloaf    6+ servings

Meatloaf Glaze

1/2 cup ketchup

1/4 to 1/3 cup brown sugar 

1 tablespoon yellow mustard

1 teaspoon Worcestershire sauce  

Meatloaf

1 lb. ground beef (lean 85%)

1/2 cup yellow onion, finely diced

1/4 cup red, yellow, orange or green peppers, finely dice

 2 eggs

 4 oz. (1 cup) sharp Cheddar cheese

1/4 cup whole milk

32 (1 sleeve) Ritz crackers (or any brand of butter cracke), finely crushed  

1 teaspoon each: salt, pepper & Italian seasoning

1/2 teaspoon garlic powder  

  1. Preheat oven to 350°F. (Do this later if following the make ahead instructions explained above.)
  2. In a small bowl combine the glaze ingredients, whisk untils mooth. Set aside for later.
  3. In a large mixing bowl add the ground beef, onion, green pepper, eggs, cheese, milk, crushed Ritz crackers, salt, and pepper. Using clean hands, thoroughly combine all ingredients but avoid overmixing.

  4. Place meatloaf mixture onto a baking pan lined with  parchment paper (that has been spritzed  with non-stick spray) and form it into a loaf shape.
  5. Bake at 350°F for 30 minutes, remove from the oven and apply the glaze over the top of the meatloaf.
  6. Return meatloaf to the oven and continue baking for 30 minutes or until the meatloaf is 160°F when the temperature is checked in the center of the loaf.
  7. Remove from oven and allow to rest for 10 minutes. 


Recipe without photos . . . Ritzy (Cracker) Meatloaf    6+ servings

Meatloaf Glaze

1/2 cup ketchup

1/4 to 1/3 cup brown sugar 

1 tablespoon yellow mustard

1 teaspoon Worcestershire sauce  

Meatloaf

1 lb. ground beef (lean 85%)

1/2 cup yellow onion, finely diced

1/4 cup red, yellow, orange or green peppers, finely dice

 2 eggs

 4 oz. (1 cup) sharp Cheddar cheese

1/4 cup whole milk

32 (1 sleeve) Ritz crackers (or any brand of butter cracke), finely crushed  

1 teaspoon each: salt, pepper & Italian seasoning

1/2 teaspoon garlic powder  

  1. Preheat oven to 350°F. (Do this later if following the make ahead instructions explained above.)
  2. In a small bowl combine the glaze ingredients, whisk untils mooth. Set aside for later.
  3. In a large mixing bowl add the ground beef, onion, green pepper, eggs, cheese, milk, crushed Ritz crackers, salt, and pepper. Using clean hands, thoroughly combine all ingredients but avoid overmixing.
  4. Place meatloaf mixture onto a baking pan lined with  parchment paper (that has been spritzed  with non-stick spray) and form it into a loaf shape.
  5. Bake at 350°F for 30 minutes, remove from the oven and apply the glaze over the top of the meatloaf.
  6. Return meatloaf to the oven and continue baking for 30 minutes or until the meatloaf is 160°F when the temperature is checked in the center of the loaf.
  7. Remove from oven and allow to rest for 10 minutes. 

Pimento Cheese Spread -- so versatile

Pimento Cheese Spread is so versatile. Spread the creamy, flavor-packed mixture on bread — trim the edges and cut them into smaller pieces for fancy tea sandwiches,  or leave them whole for casual lunches. Use it to fill or “stuff” celery. Serve with crackers for an appetizer or snack. 


Pimento Cheese Spread  Yield: About 3 cups 

4 oz. cream cheese, softened

1 cup shredded sharp Cheddar cheese

1 cup shredded Monterey Jack cheese

3 tablespoons finely chopped pimentos, drained

1/2 cup mayonnaise

1 to 2 teaspoons Ranch dressing mix

Dash of kosher salt

Dash of cayenne pepper

Dash of Worcestershire sauce

Dash of hot sauce 

  1. Mix together cream cheese, mayonnaise, Ranch dressing mix (start with 1 teaspoon and add more later if desired) salt, cayenne pepper, Worcestershire sauce, and hot sauce.
  2. Add cheddar cheese, Monterey Jack cheese, and pimentos. Stir until well combined. Add a touch more mayonnaise if the mixture seems too stiff. Taste and adjust seasonings as desired. 
  3. Refrigerate over night to let the flavors meld together.


Tiered tray (center) holds tea sandwiches served for a  teatime luncheon.

Eck Roast — “Not Your Grandma’s Pot Roast” as featured in KANSAS! magazine

 An article about Eck Agriculture appears in the lastest (2024, vol. 80, issue 3) of KANSAS! magazine — A Reimagined Roast, Straight from the Ranch (pp. 26-29).

This assemble-and-forget recipe, an Eck family favorite, goes in the slow cooker early in the morning and is ready to eat in the evening. Instead of serving pot roast with potatoes and carrots, the way Grandma used to do it, they use it for roast beef sandwiches, burritos, quesadillas, Shepard's Pie and beef and noodles. 

Many of the flavor additions help tenderize the roast that is considered a less-tender cut of beef. Slow cooking also helps in the tenderization process, helping to create flavor-packed morsels of beef. 

Darrin thinks the only thing that would make this roast any better is if they could package the rub and bottle the sauce so he could quickly throw the recipe together early in the morning. 

Barry and I first tasted this roast at a farm expo where Darrin and Beth offered samples. It was a great marketing technique as we bought a roast and have been making Beth Covington’s recipe every since.


Enjoying an Eco roast beef dinner with the Brown family. 

Eck Roast — “Not Your Grandma’s Pot Roast”    Yield:  Bone-in beef chuck pot roasts will yield 2 to 2-1/2 three-ounce servings of cooked, trimmed beef per pound


INGREDIENTS
3 to 3 ½  pounds Eck Beef Roast (Pike’s Peak or heel of the round, chuck, rump, etc.)

2 teaspoons kosher salt (approx..)

1 teaspoon (approx.) black pepper

2 tablespoons (approx..) seasoning of choice as needed to liberally rub roast (Trager’s Beef Rub, Kinder’s Steak Blend, or Daddy Hinkle’s)

2 to 3 tablespoons olive oil, or enough to coat the bottom of pan

1 medium sweet onion, sliced into wedges

1 tablespoon minced garlic 

1 1/2 cups boiling water 

1 tablespoon Better Than Bouillon’s Roasted Beef Bouillon

1/4 cup soy sauce (low sodium)

1/4 cup Worcestershire sauce

1/4 cup Hoisin sauce

1 tablespoon cornstarch + 1 tablespoon cold water


DIRECTIONS

1.   Liberally cover both sides of roast with salt, pepper, and your favorite seasonings.

2.   Heat olive oil in a skillet on medium high heat. Add roast and sear until browned on all sides, approximately 2 to 3 minutes per side. This adds a nice bark to your roast and really imparts a rich flavor into the meat.

3.   Place roast in slow cooker. Add one medium sweet onion, sliced into wedges, and 1 tablespoon of minced garlic.

4.   Mix boiling water, beef base, soy sauceWorcestershire saucehoisin sauce. Pour over the roast. 

5.   Cook on low for 6- 8 hours.

6.   Remove meat from crockpot, trim fat, and shred. Reserve cooking liquid. 

7.   Make thickening sauce: Combine 1 T cornstarch into 1 T cold water. Mix into 1 cup of reserved cooking liquid (For thicker sauce, use 2 tablespoon corn starch) Add any desired additional seasonings.

8.   Return shredded meat and sauce to crockpot. Let sauce thicken (use low or warm setting) for 30 to 45 minutes.

 Article appears in the 2024, vol. 80, issue 3 of KANSAS! magazine — A Reimagined Roast, Straight from the Ranch (pp. 26-29)
Original Eck recipe provided at the Farm Expo.

Recipe without photos . . . Eck Roast — “Not Your Grandma’s Pot Roast”    Yield:  Bone-in beef chuck pot roasts will yield 2 to 2-1/2 three-ounce servings of cooked, trimmed beef per pound

INGREDIENTS
3 to 3 ½  pounds Eck Beef Roast (Pike’s Peak or heel of the round, chuck, rump, etc.)

2 teaspoons kosher salt (approx..)

1 teaspoon (approx.) black pepper

2 tablespoons (approx..) seasoning of choice as needed to liberally rub roast (Trager’s Beef Rub, Kinder’s Steak Blend, or Daddy Hinkle’s)

2 to 3 tablespoons olive oil, or enough to coat the bottom of pan

1 medium sweet onion, sliced into wedges

1 tablespoon minced garlic 

1 1/2 cups boiling water 

1 tablespoon Better Than Bouillon’s Roasted Beef Bouillon

1/4 cup soy sauce (low sodium)

1/4 cup Worcestershire sauce

1/4 cup Hoisin sauce

1 tabespoon cornstarch + 1 tablespoon cold water


DIRECTIONS

1.   Liberally cover both sides of roast with salt, pepper, and your favorite seasonings.

2.   Heat olive oil in a skillet on medium high heat. Add roast and sear until browned on all sides, approximately 2 to 3 minutes per side. This adds a nice bark to your roast and really imparts a rich flavor into the meat.

3.   Place roast in slow cooker. Add one medium sweet onion, sliced into wedges, and 1 tablespoon of minced garlic.

4.   Mix boiling water, beef base, soy sauceWorcestershire saucehoisin sauce. Pour over the roast. 

5.   Cook on low for 6- 8 hours.

6.   Remove meat from crockpot, trim fat, and shred. Reserve cooking liquid. 

7.   Make thickening sauce: Combine 1 T cornstarch into 1 T cold water. Mix into 1 cup of reserved cooking liquid (For thicker sauce, use 2 tablespoon corn starch) Add any desired additional seasonings.

8.   Return shredded meat and sauce to crockpot. Let sauce thicken (use low or warm setting) for 30 to 45 minutes.

Ranch-style Cheez-It Chex Mix


Barry is usually not a fan of Chex Mix but I love it so thought I’d try a version that might appeal to him . . . and this recipe that features cheese crackers and ranch dressing mix dud the trick.. The recipe at Delightful Made blog was my inspiration. The recipe can be made in the slow cooker or in the oven. 


Ranch-style Cheeez-It Chex Mix 

4 cups Cheez-It original crackers (a generic brand works)

2 cups Rice Chex or Crispix

2 cups Corn Chex or Crispix

1 to 2 cups small pretzels

1 1/2 cups mixed nuts, heavy on cashews, almonds, etc.

6 Tbsp. butter, melted

3 tablespoons Worcestershire sauce

2 Tbsp. dry ranch seasoning mix

Sprinkling of  grated Parmesan cheese (the kind in the can)

  1. Slow Cooker Version: In a large slow cooker, combine the crackers, pretzels, cereal and nuts..
  2. In a small bowl, whisk together the melted butter, Worcestershire and ranch seasoning. Gradually pour over the snack mix, and stir well to coat the mix.
  3. Turn the slow cooker on low heat and roast for 2 hours, stirring the mix every 30 minutes. Note: At first the mixture is wet but it will dry out; I did wipe the condesnsation off the lid every 30 minutes. 
  4. When mix is done roasting, spread the mix out evenly on a flat surface lined with waxed paper to cool completely. Sprinkle lightly with the Parmesan cheese.
  5. Cool completely before storing in an airtight container. Cooling will allow the mix to crisp up and dry completely, letting out any heat or steam from the roasting process.


Oven Directions: Place coated mix on baking sheets, and roast at 250° for 1 hour, 15 minutes. Stir the mix every 15 minutes so it toasts evenly. Cool as directed above. Add the Parmesan cheese once mix has cooled. 

Instant Pot Boneless Pork Chops

We often find that boneless pork chops (often slices from the pork loin) can be quite chewy. Since we prefer tender, I tried this recipe that I found Sunday Supper Movement blog.  Packed with flavor, the chops/pork loin slices were done, start to finish, in less than 30 minutes and they were oh-so tender. I halved the recipe and serve the pork with Potato-Turnip Mash and a garden salad.  


Instant Pot Boneless Pork Chops     Yield: 4 servings 

4 boneless pork loin chops/slices 

4 tablespoon butter or a combination of butter & olive oil

1 cup chicken broth

1 tablespoon Worcestershire sauce

1 tablespoon+ cornstarch

2 tablespoon water


Pork Chop Seasoning—mix together the following: 

3 tablespoons paprika

2 tablespoons onion powder

2 tablespoons garlic powder

3 tablespoons sea salt

2 tablespoons crushed red pepper flakes

1 tablespoons black pepper

1/4 cup lightly packed brown sugar

  1. Pat pork chops dry and season generously with pork chop seasoning on all sides.
  2. Set Instant Pot to saute mode. Once hot, add in butter/olive oil and allow to melt. Once butter is melted, add in pork chops and brown on both sides, approximately 2 minutes on each side.
  3. Add chicken broth to your pot, and using a wooden spoon deglaze the bits of pork from the bottom of the pot. (You can remove chops but I just pushed them aside, added the broth and deglazed the pan.)
  4. Add in Worcestershire sauce and mix well.
  5. If you removed chops, replace them and secure Instant Pot lid;  turn to the pressure cook mode. Pressure cook for 7 minutes.
  6. When 7 minutes is up, allow pressure to naturally release on its own, about 10 minutes. 
  7. Remove chops to a plate. 
  8. In a small bowl combine cornstarch (I added a bit more than called for) and water and mix well. Add slurry into the remaining liquid inside your Instant Pot. Give a good mixing, and let thicken for about 5 minutes. 
  9. Serve gravy over pork chops and enjoy

A good book and a recipe — Mrs. Santa’s Crunchy Cheese Cracker found in “Forget What You Know”

It’s always fun for me to discover a recipe at the end of a good book. As I read Christina Dodd’s “Forget What You Know,” crunchy cheese crackers repeatedly were mentioned so I was thrilled to discover a link to the recipe at the end of the book. Despite already having several recipes for really good cheese crackers, I was intrigued by the addition of corn flakes to the usual cheese cracker ingredients, the addition that adds the crunch. Another positive about these cheesy delights is the fact that they are slice and bake crackers so can be made ahead (unbaked logs can even be frozen) and then bakeds on an as needed basis. 

Dodd’s description preceding the recipe includes: In the small town of Gothic, California, Mrs. Santa’s tearoom is decorated (or over-decorated) in Christmas décor: “walls covered with framed Christmas prints, Christmas-themed ceramics, English porcelain Christmas-painted plates on decorative hangers. Santas decorated the light switches. Painted evergreen branches climbed the table legs and Christmas tree bulbs dotted the wallpaper.” Mrs. Santa serves the usual tearoom fare: delicate sandwiches with no crusts, curried chicken salad, scones with clotted cream and lemon curd and, of course, steaming hot tea served in Santa teapots. Her pièce de résistance is a Santa plate filled with her famous cheese wafers. They have a special crunch."


The recipe appears exactly as printed on Dodd’s website. Check out her other recipes, too. 


Mrs. Santa’s Crunchy Cheese Cracker

1 ½ cups shredded extra sharp cheddar cheese (1/3 lb.)

½ cup unsalted butter, softened—Mrs. Santa uses Kerrygold

1 cup all purpose flour

½ teaspoon salt

½ teaspoon dried mustard

½ teaspoon cayenne (less or more depends on your taste)

1 teaspoon Worcestershire sauce

1 ½ cups corn flakes cereal, crushed

Ice water 

  1. Process cheese and butter in food processor until blended. 
  2. Add flour, salt, dried mustard and cayenne. Pulse until blended. 
  3. Add cereal, process until blended. Add Worcestershire sauce.
  4. Here’s the tricky part. Add ice water, one tablespoon at a time, and toss lightly. How much?Depends on where you live and the time of year. Humidity makes a huge difference. What you’re looking for is the mixture to cling together when you press it between your palms. If you make your own pie dough, think of that. 

  5. I divided the dough into 2 logs. 
    Once you get that consistency, roll it into a one inch diameter log, wrap it in plastic wrap and refrigerator for at least four hours.
  6. When you’re ready to bake, heat oven to 350 ° F. 
  7. Cut log with a serrated knife into wafers. 
  8. Bake on a sheet 12 to 14 minutes until lightly browned. Cool on wire rack. Store in airtight container (they are fragile!) and serve them on a Santa plate to your best friends.
  9. When you’re ready to bake, heat oven to 350 degrees Fahrenheit. Cut log with a serrated knife into wafers. Bake on a sheet 12-14 minutes until lightly browned. Cool on wire rack. Store in airtight container (they are fragile!) and serve them on a Santa plate to your best friends.Mrs. Santa’s crackers freeze well, make delightful gifts. 
Recipe without photos . . . Mrs. Santa’s Crunchy Cheese Cracker

1 ½ cups shredded extra sharp cheddar cheese (1/3 lb.)

½ cup unsalted butter, softened—Mrs. Santa uses Kerrygold

1 cup all purpose flour

½ teaspoon salt

½ teaspoon dried mustard

½ teaspoon cayenne (less or more depends on your taste)

1 teaspoon Worcestershire sauce

1 ½ cups corn flakes cereal, crushed

Ice water 

  1. Process cheese and butter in food processor until blended. 
  2. Add flour, salt, dried mustard and cayenne. Pulse until blended. 
  3. Add cereal, process until blended. Add Worcestershire sauce.
  4. Here’s the tricky part. Add ice water, one tablespoon at a time, and toss lightly. How much?Depends on where you live and the time of year. Humidity makes a huge difference. What you’re looking for is the mixture to cling together when you press it between your palms. If you make your own pie dough, think of that. 
  5. Once you get that consistency, roll it into a one inch diameter log, wrap it in plastic wrap and refrigerator for at least four hours.
  6. When you’re ready to bake, heat oven to 350 ° F.t. 
  7. Cut log with a serrated knife into wafers. 
  8. Bake on a sheet 12 to 14 minutes until lightly browned. Cool on wire rack. Store in airtight container (they are fragile!) and serve them on a Santa plate to your best friends.
  9. When you’re ready to bake, heat oven to 350 degrees Fahrenheit. Cut log with a serrated knife into wafers. Bake on a sheet 12-14 minutes until lightly browned. Cool on wire rack. Store in airtight container (they are fragile!) and serve them on a Santa plate to your best friends.Mrs. Santa’s crackers freeze well, make delightful gifts. 

BBQ Ham & Swiss Sliders

 There are SO many variations of these sliders . . . mine is not much different than the usual except that I use homemade BBQ Mayo as the spread. 

BBQ Ham & Swiss Sliders

BBQ Ham & Swiss Sliders     Makes 12 sandwiches

12 potato dinner rolls or Hawaiian buns , separated into tops and bottoms

12 slices ham

14 slices Swiss cheese (dinner roll size each, so you can probably just use 12 slices that have been cut in half)

1/4 to 1/3 cup BBQ More than Mayo Sauce

Basting Sauce:

6 tablespoons butter, melted

1 1/2 tablespoons Dijon mustard

1 teaspoon garlic powder

1/2 teaspoon Worcestershire sauce

3 tablespoons brown sugar

1 tablespoon poppy of sesame seeds, optional 

  1. Preheat oven to 375°.
  2. Place bottom halves of rolls in a foil-lined baking dish. 
  3. Top each with cheese, then ham, then another slice of cheese. 
  4. Spread a little BBQ Mayo on each top half roll and place on top of ham and cheese.  
  5. Combine butter, mustard, garlic powder, Worcestershire sauce, brown suga & seeds in a small bowl. Mix until combined. Pour evenly over rolls. Cover with foil and refrigerate until ready to bake (or bake right away).
  6. Bake covered for 10 minutes, then remove foil and bake for another 5 to 10 minutes or until tops are browned and cheese is melted.
    Make a batch of 12 or just a few for two to four. 


Individual Breakfast Casserole

Ideal for a “grab-and-go” breakfast or convenient for an everyday protein and veggie-packed breakfast or even lunch. This recipe make 12 to 18 individual breakfast casserole that can eaten immediately, stored in the refrigerator for 5 days or frozen and re-heated.

Individual Breakfast Casseroles    Yield: 12 to 18 depending on the depth of your muffin tins

About 1 to 2 tablespoons olive oil 

About 1 cup of mixed veggies (I used finely chopped onions, yellow & red peppers, button mushroom and spinach)

1 to 1 1/2 cups shredded cheese (I used Monterey Jack but will try Cheddar later)

12 eggs

1/2 cup half and half or  whole milk

A dash of Tabasco sauce & Worcestershire sauce 

  1. Preheat oven to 375˚F. Note: Use silicon muffin “tins” for easy release of the casseroles; if using regular muffin tins, brush with oil. 
  2. Heat oil in a skillet and sauté the vegetables just until softened. Cool veggies.
  3. In a mixing bowl, whisk together eggs, half and half and seasonings.
  4. Stir in cheese.
  5. Ladle mixture evenly among muffin tins. 
  6. Bake at 375˚F for 15 to 22 or 23 minutes (depending on depth of muffin tins) or until puffed and lightly browned and a toothpick inserted in the center comes out fairly clean. Cool a few minutes in the pan then serve. The casseroles may be stored in the refrigerator for 5 days; reheat in the microwave. Or, to freeze— cool individual casseroles completely, then wrap in plastic film, place in a freezer-safe bag for up to 3 months.

Recipe without photos . . . Individual Breakfast Casseroles    Yield: 12 to 16 depending on the depth of your muffin tins

About 1 to 2 tablespoons olive oil 

About 1 cup of mixed veggies (I used finely chopped onions, yellow & red peppers, button mushroom and spinach)

1 to 1 1/2 cups shredded cheese (I used Monterey Jack but will try Cheddar later)

12 eggs

1/2 cup half and half or use whole milk

A dash of Tabasco sauce & Worcestershire sauce 

  1. Preheat oven to 375˚F. Note: Use silicon muffin “tins” for easy release of the casseroles; if using regular muffin tins, brush with oil. 
  2. Heat oil in a skillet and sauté the vegetables just until softened. Cool veggies.
  3. In a mixing bowl, whisk together eggs, half and half and seasonings.
  4. Stir in cheese.
  5. Ladle mixture evenly among muffin tins. 
  6. Bake at 375˚F for 15 to 22 or 23 minutes (depending on depth of muffin tins) or until puffed and lightly browned and a toothpick inserted in the center comes out fairly clean. Cool a few minutes in the pan then serve. The casseroles may be stored in the refrigerator for 5 days; reheat in the microwave. Or, to freeze— cool individual casseroles completely, then wrap in plastic film, place in a freezer-safe bag for up to 3 months.

4 Easy Pecan Holiday Treats as featured in KANSAS! Magazine

Check out the latest KANSAS! Magazine (2023 / vol 79 / issue 1 / pp. 26-31) for information about fresh, Kansas grown pecan! Kenny Felt’s pecan  photographs are amazing.

                 The magazine is full of ideas for holiday shopping and family excursions. 

Below are their recipes—perfect for the holidays, and easy, too! I’ve also included contact info for each pecan grower that was included in my article on pecans . . . so you’ll have easy ordering access. 


EASY PRETZEL TURTLES   Yield: 30 candies


A kid-friendly candy that Lila Carter makes with 

her grandchildren using Jake Creek Pecans.

INGREDIENTS

30 Rolo® chocolate covered caramel candies, unwrapped

30 square-shaped waffle pretzels 

30 pecan halves, toasted*


INSTRUCTIONS

1.  Preheat oven to 350 degrees F. Line a baking sheet with parchment paper or foil for easy clean up. 

2.  Place the pretzels on baking sheet and top each one with a candy.

3.  Bake in oven for 3 to 5 minutes, until the chocolate just begins to melt. The candy should be soft but not completely melted.

4.  Remove from oven, place on cooling rack and immediately squish the chocolate with a pecan half. 

* To Toast Pecans: Bake in a 350 degree F. oven for 5 to 10 minutes. Stir or shake the pan occasionally so the nuts brown evenly without burning. Watch closely as the oil in the nuts can cause them to burn. Toasting adds another layer of flavor to pecans. 


Note: Due to their high oil content, raw and toasted pecans stay freshest if stored in the refrigerator or freezer in sealed containers.

Jake Creek Pecans Orchard

Owners: Brad and Lila Carter

Address11469 W 335th St., Paola, KS 66071

Phone: 913.406.2501

On-line store: jake-creek-pecans.square.site

WebpageJakecreekpecans.com

Facebook & InstagramJake Creek Pecans 

----------

SUGAR COATED PECANS    Yield: 1 pound 

Slina 

Prothe uses Prothe Pecans to create these crunchy, sweet holiday treats.

INGREDIENTS

1 egg white

1 tablespoon water

1 cup granulated (white) sugar

3/4 teaspoon salt

1/2 teaspoon ground cinnamon

1 pound pecan halves


INSTRUCTIONS

1.  Preheat oven to 250 degrees F. Grease or spray one standard-sized baking sheet.

2.  In a mixing bowl, whip together the egg white and water until frothy. 

3.  In a separate bowl, mix together the sugar, salt, and cinnamon.

4.  Add pecans to egg whites; stir to evenly coat the nuts. 

5.  Remove and add them to the sugar mixture; toss them in the mixture until coated.

6.  Spread nuts in a flat layer on prepared baking sheet.

7.  Bake for 1 hour, stirring every 15 minutes.

8.  Cool and store in an airtight container. 


TOASTED, SALTED PECANS    Yield: 1 pound 

Recipe from Slina Prothe, Prothe Pecans. 

INGREDIENTS

2 tablespoons vegetable or pecan oil

2 tablespoons butter

1 pound pecan halves

Salt to taste


INSTRUCTIONS

1.  Place oil and butter on a standard-sized baking sheet with sides; place in a preheated 250 degree F. just until butter melts. 

2.  Mix pecans and salt with the oil and butter. Spread nuts in a flat layer on prepared baking sheet.

3.  Bake for 1 hour, stirring every 15 minutes.  

4.  Cool and store in an airtight container. 


Prothes Pecans

OwnersLeland and Slina Prothe

Address33850 Victory Rd PaolaKS 66071

Phone: 913.849.3358  

Webpageprothespecans.com 

Facebook: Prothes Pecans

----------

SPICY HOT PECANS

Kendall Grier’s family adds Bentley Farm pecans to saucy and spicy ingredients to create a savory holiday treat. 

INGREDIENTS

2 tablespoons butter, melted

1 tablespoon Worcestershire sauce 

1/4 teaspoon ground red pepper 

1/4 teaspoon salt

1/4 teaspoon garlic powder

2 cups pecan halves

1 tablespoon chili powder, or cayenne pepper for hotter mix. 


INSTRUCTIONS

1.   Preheat oven to 300 degrees F.

2.   Mix ingredients in a resealable plastic bag and shake.

3.   Spread coated pecans on a medium-sized baking sheet, and bake 30 minutes in the preheated oven, stirring approximately every 10 minutes.


Bentley Pecan Farm

Owner: Kendall Grier 

Address: 1216 Chestnut, Halstead, KS 67056 

Phone: 316.209.4588

Facebook: Bentley Pecan Farm


----------

Circle's Pecans & Country Store

Owners: Tom and Barbara Circle

Address2499 US HWY 400 McCune, KS 66753

Phone: 620.632.4382 

Webpagekansaspecans.com

Facebook: Circle’s Pecans & Country Store


----------

Osage Ridge Farm 

OwnersTravis and Rhea Wilson

Address18090 Xavier Rd, Oswego, KS 67356

Phone: 620.238.2965

Emailosageridgefarm@gmail.com

FacebookOsage Ridge Farm