
Edible Indian Corn “in the husk” is on our
Halloween menu but it would be a fun treat for any fall gathering. I noticed
this creative take on classic popcorn balls on a Facebook post from Emily
Johnson DeSanto. Intrigued, I followed the link to a Martha Stewart generated video.
However, I must warn you — the chef in
charge of this project makes it look mess free. Well, the reality (at least in
my kitchen) was that popcorn drifted out of the bowl. Counters, even my hands ended
up coated in ooey, sticky marshmallow goo. It was definitely a mess!
Of course, I made a few adjustments
to the recipe. For one thing I made smaller sized Indian corn shapes simply because
the original seemed like an oversized portion. I figured if one wasn’t enough,
there would be plenty available for seconds. Second, I could not find natural
(brown) parchment paper so I opted for brown wrapping paper (the stuff you wrap
things in for shipping). In terms of ingredients, I had a 16 oz. bag of mini
marshmallows instead of a 10 oz. bag so just adjusted the recipe proportionally
(figured that the leftover 6 ounces would just set in the pantry until I
discovered it in a petrified form a couple of months later). And, finally I actually
considered using rice cereal instead of popcorn (a rice krispie treat in a
husk) but finally opted out for a combination of both the cereal and popcorn.
Candy Indian Corn
6 tablespoons butter
¼ cup + 2 tablespoons packed brown sugar
16 oz. bag mini marshmallows
18 cups popcorn (sounds like a lot but it was basically a
Whirley® popcorn popper full of popped corn)
3 to 4 cups+ rice cereal – enough to absorb all of the
butter-marshallow goo
⅓ to ½ cup candy-coated sunflower seeds (I think Emily used
M&M’s)
- In a saucepan over medium heat, melt butter and brown sugar;
add marshmallows and continue to heat until mixture is smooth.


- Pour hot mixture over popped corn and mix, add enough rice
cereal to create a cohesive mixture that is not overly sticky.

- Stir in candy-coated sunflower seeds.

- With buttered or sprayed hands, portion mixture and form into smaller-sized corn-on-the-cob shapes. I ended up with 17 portions. Note: If desired, add a few more candy-coated sunflower seeds to the surface of each corn shape.
- Place popcorn shapes on wax paper and allow to firm up,
about 15 minutes.

- Wrap each in plastic wrap. (This was another step I added).
- Wrap in a paper husk and arrange in a serving dish.
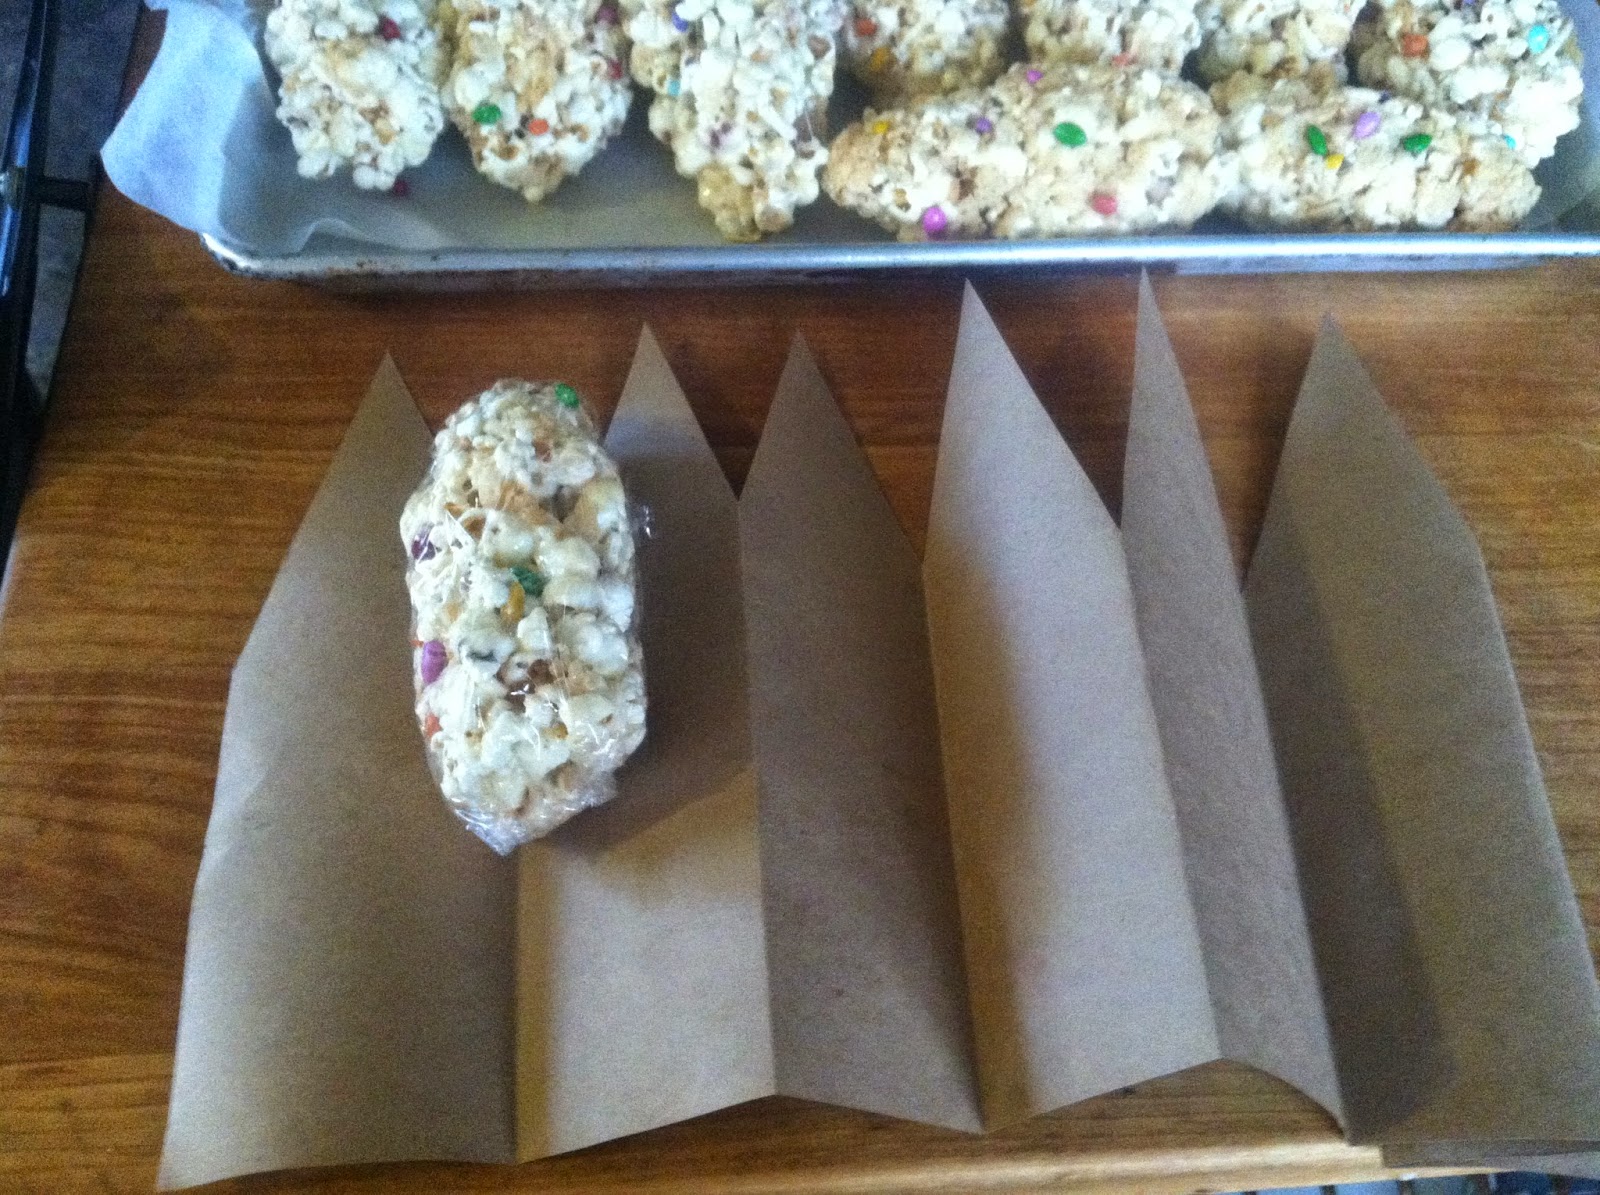
Paper Husks
This is just a guide that can be adjusted according to the
size of your corn. I just played around until I liked the end results.
Basically, this is what I did . . . hope it makes sense — maybe the photos will
help . . .
- Cut brown wrapping paper into lengths – about 10” high and
20” wide.

- Fold the paper, accordion style (I used about a 2 to 2 ½” wide fold), back and forth, starting with the short side of the paper.
- Using scissors, begin cutting the folded strip two-thirds of
the way from the top, angling to the center of the strip. Repeat on the other
side. Open it up and it should resemble a picket fence.

- Now, lay the Candy Indian Corn at one end of the “fence,”
pointed top of the corn almost even with the pointed top of the “fence,” and
roll.
- Twist the excess paper at the bottom to create a handle for your candy corn.
- Carefully pull down the points to expose Candy Indian Corn.


Recipe & instructions without photos . . .
Candy Indian Corn
6 tablespoons butter
¼ cup + 2 tablespoons packed brown sugar
16 oz. bag mini marshmallows
18 cups popcorn (sounds like a lot but it was basically a Whirley® popcorn popper full of popped corn)
3 to 4 cups+ rice cereal – enough to absorb all of the butter-marshallow goo
⅓ to ½ cup candy-coated sunflower seeds (I think Emily used M&M’s)
- In a saucepan over medium heat, melt butter and brown sugar; add marshmallows and continue to heat until mixture is smooth.
- Pour hot mixture over popped corn and mix, add enough rice cereal to create a cohesive mixture that is not overly sticky.
- Stir in candy-coated sunflower seeds.
- With buttered or sprayed hands, portion mixture and form into smaller-sized corn-on-the-cob shapes. I ended up with 17 portions. Note: If desired, add a few more candy-coated sunflower seeds to the surface of each corn shape.
- Place popcorn shapes on wax paper and allow to firm up, about 15 minutes.
- Wrap each in plastic wrap. (This was another step I added).
- Wrap in a paper husk and arrange in a serving dish.
Paper Husks
This is just a guide that can be adjusted according to the size of your corn. I just played around until I liked the end results. Basically, this is what I did . . . hope it makes sense — maybe the photos will help . . .
- Cut brown wrapping paper into lengths – about 10” high and 20” wide.
- Fold the paper, accordion style (I used about a 2 to 2 ½” wide fold), back and forth, starting with the short side of the paper.
- Using scissors, begin cutting the folded strip two-thirds of the way from the top, angling to the center of the strip. Repeat on the other side. Open it up and it should resemble a picket fence.
- Now, lay the Candy Indian Corn at one end of the “fence,” pointed top of the corn almost even with the pointed top of the “fence,” and roll.
- Twist the excess paper at the bottom to create a handle for your candy corn.
- Carefully pull down the points to expose Candy Indian Corn.


