Showing posts with label Cayenne Pepper. Show all posts

Sweet and Spicy Almonds

Sweet and spicy, these addictive almonds are the perfect snack or serve a variety of nuts (including Rosemary Cashews, &/or a selection of pecan treats. Great for gift giving, too. 


Sweet and Spicy Almonds   Yield: 2 1/2 cups almonds

1/4 cup granulated sugar

1 1/2 teaspoons kosher salt

1 teaspoon cayenne pepper, or less if preferred

2 1/2 cups whole almonds

1 teaspoon water

1 tablespoon honey

1 teaspoon olive oil

  1. Preheat an oven to 350° F.
  2. Spread the almonds onto a baking sheet, and toast until the nuts start to turn golden brown and become fragrant, about 10 minutes. Watch the nuts carefully as they bake: they burn quickly. 

  3. Stir together the sugar, salt, and cayenne pepper in a mixing bowl; set aside. 

  4. Stir together the water, honey, and olive oil in a large skillet over medium heat. Once the mixture begins to bubble, stir in the toasted almonds until evenly moistened. 
  5. Pour the almonds into the sugar and spice mixture, and toss until evenly coated. 
  6. Spread onto baking sheets in a single layer, and cool to room temperature. 
Recipe without photos . . .

Sweet and Spicy Almonds   Yield: 2 1/2 cups almonds

1/4 cup granulated sugar

1 1/2 teaspoons kosher salt

1 teaspoon cayenne pepper, or less if preferred

2 1/2 cups whole almonds

1 teaspoon water

1 tablespoon honey

1 teaspoon olive oil

  1. Preheat an oven to 350° F.
  2. Spread the almonds onto a baking sheet, and toast until the nuts start to turn golden brown and become fragrant, about 10 minutes. Watch the nuts carefully as they bake: they burn quickly. 

  3. Stir together the sugar, salt, and cayenne pepper in a mixing bowl; set aside. 

  4. Stir together the water, honey, and olive oil in a large skillet over medium heat. Once the mixture begins to bubble, stir in the toasted almonds until evenly moistened. 
  5. Pour the almonds into the sugar and spice mixture, and toss until evenly coated. 
  6. Spread onto baking sheets in a single layer, and cool to room temperature.


Pimento Cheese Spread -- so versatile

Pimento Cheese Spread is so versatile. Spread the creamy, flavor-packed mixture on bread — trim the edges and cut them into smaller pieces for fancy tea sandwiches,  or leave them whole for casual lunches. Use it to fill or “stuff” celery. Serve with crackers for an appetizer or snack. 


Pimento Cheese Spread  Yield: About 3 cups 

4 oz. cream cheese, softened

1 cup shredded sharp Cheddar cheese

1 cup shredded Monterey Jack cheese

3 tablespoons finely chopped pimentos, drained

1/2 cup mayonnaise

1 to 2 teaspoons Ranch dressing mix

Dash of kosher salt

Dash of cayenne pepper

Dash of Worcestershire sauce

Dash of hot sauce 

  1. Mix together cream cheese, mayonnaise, Ranch dressing mix (start with 1 teaspoon and add more later if desired) salt, cayenne pepper, Worcestershire sauce, and hot sauce.
  2. Add cheddar cheese, Monterey Jack cheese, and pimentos. Stir until well combined. Add a touch more mayonnaise if the mixture seems too stiff. Taste and adjust seasonings as desired. 
  3. Refrigerate over night to let the flavors meld together.


Tiered tray (center) holds tea sandwiches served for a  teatime luncheon.

Slow Cooker WHITE CHICKEN CHILI as featured in KANSAS! Magazine, vol 80, 2024

The latest issue of KANSAS! (2024 / vol 80 / issue 2  ) has been released;  the Taste section focuses on food policies during the Eisenhower years. Cited in the article is Jennifer Ifft, an agricultural economist at Kansas State University, who was a presenter at one of the the monthly Eisenhower Foundation’s Lunch & Learn series. Titled, “Freedom from Hunger,” the article reveals how the president from Kansas helped sustain a farm and food policy legacy that contines today with the SNAP program. K-State Research and Extension provided an EZ Does IT Recipe, just one in a collection of recipe as their website. 

Scan of the magazine photo; photographer Brian Goodman

EZ Does IT Recipe — Designed as a part of SNAP-Ed by K-State Research and Extension, these recipes are great for anyone looking for nutrition-inspired dishes that are easy-to-make and budget friendly. Their “Cook” page offers up this advice,You will become more skilled, relaxed, versatile and organized the more you cook. Cooking is a healthy habit that’s worth forming.” Recipes include instructions for proper food handling including “Remember to wash your hands with soap and warm water before and after cooking.” 


Note: I tend to "do my own thing" with recipes and this is how I changed this one up ... I sautéed the onions with the chicken and then used the vinegar to deglaze the pan. I did not drain the beans so I cut back on the other liquids called for in the recipe. Also used full fat sour cream and cheese. In addition, I browned the chicken and onions in the Insta-Pot and then used the slow cooking setting to cook the soup, making it a one-pot dish. We deemed the recipe to be absolutely delicious. I made half a batch . . . and wished I'd made the full recipe! 


Slow Cooker WHITE CHICKEN CHILI   Servings: 8 

INGREDIENTS: 

2 tablespoons olive oil
4 chicken breasts, cubed
1 cup fat free sour cream
1 1/2 cups low-sodium chicken broth
1 cup whole milk
1 teaspoon white vinegar
1 large onion, chopped
2 (4 oz.) cans green chilies, chopped
2 (15 oz.) cans low-sodium navy beans
1 teaspoon ground cumin
1 1⁄2 teaspoons chili powder
Salt and cayenne pepper, to taste
Toppings: 1 cup reduced fat Colby Jack cheese, shredded 1⁄4 cup green onions, sliced 


DIRECTIONS: 

  1. In a skillet over medium heat, cook chicken in oil until warmed through, about 10 minutes. 
  2. In a mixing bowl, stir together sour cream, chicken broth, milk and vinegar. 
  3. Transfer chicken to slow cooker. 
  4. Pour sour cream mixture over chicken in slower cooker. Add onion, green chilies, navy beans, and spices. 
  5. Cover and cook on low heat for 6-8 hours, or high heat for 3-4 hours. 
  6. Top each serving with shredded cheese and green onions, if desired. 

Nutrition Facts: Each one cup serving provides 300 Calories, 9g Total Fat, 3g Saturated Fat, 390mg Sodium, 25g Total Carbohydrate, 6g Dietary Fiber, 26g Protein 


Recipe without photos . . .

Slow Cooker WHITE CHICKEN CHILI   Servings: 8 

INGREDIENTS: 

2 tablespoons olive oil
4 chicken breasts, cubed
1 cup fat free sour cream
1 1⁄2 cups low-sodium chicken broth
1 cup whole milk
1 teaspoon white vinegar
1 large onion, chopped
2 (4 oz.) cans green chilies, chopped
2 (15 oz.) cans low-sodium navy beans
1 teaspoon ground cumin
1 1⁄2 teaspoons chili powder
Salt and cayenne pepper, to taste
Toppings: 1 cup reduced fat Colby Jack cheese, shredded 1⁄4 cup green onions, sliced 


DIRECTIONS: 

  1. In a skillet over medium heat, cook chicken in oil until warmed through, about 10 minutes. 
  2. In a mixing bowl, stir together sour cream, chicken broth, milk and vinegar.
  3. Transfer chicken to slow cooker. 
  4. Pour sour cream mixture over chicken in slower cooker. Add onion, green chilies, navy beans, and spices. 
  5. Cover and cook on low heat for 6-8 hours, or high heat for 3-4 hours. 
  6. Top each serving with shredded cheese and green onions, if desired. 

Nutrition Facts: Each one cup serving provides 300 Calories, 9g Total Fat, 3g Saturated Fat, 390mg Sodium, 25g Total Carbohydrate, 6g Dietary Fiber, 26g Protein 


Spiced Butternut Squash Soup - small batch

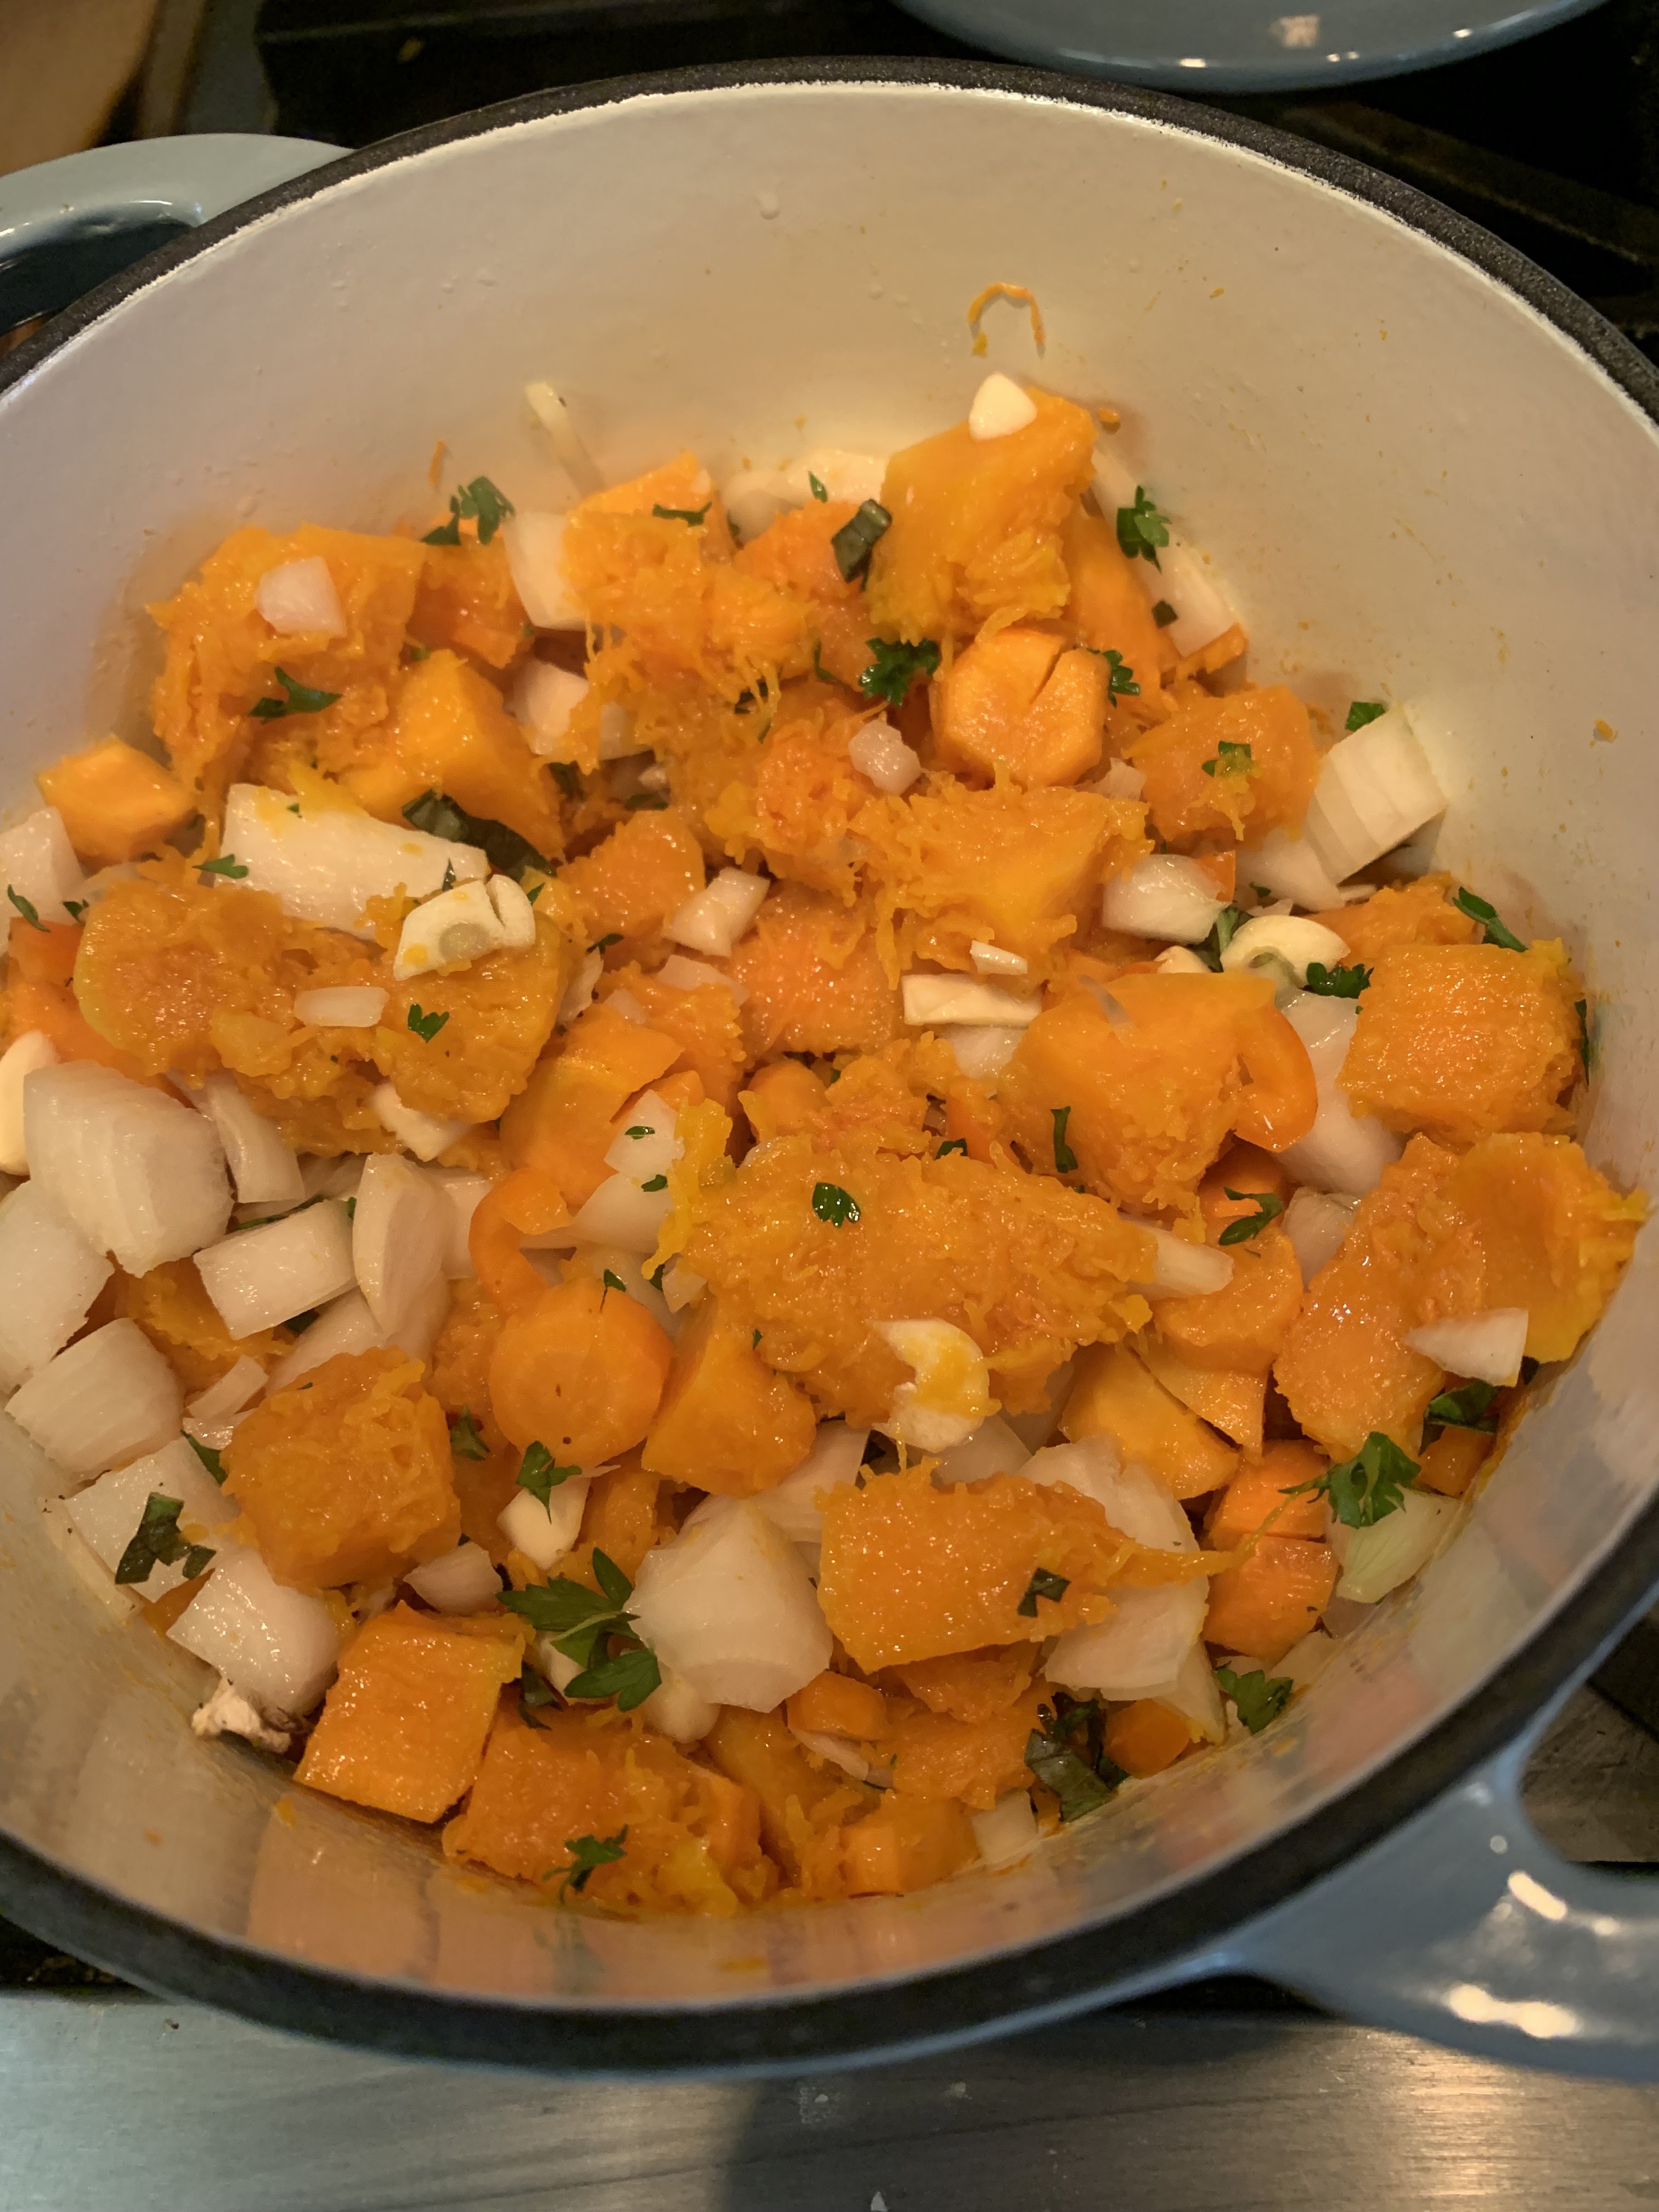
I try my best to make smaller portions of soup yet sometimes I just get carried away. A new 2-quart cast iron mini Dutch Oven to the rescue! Just enough for about four servings, this recipe allows for a reasonable amount of leftovers for just two people. I even used the recipe in the user manual. 


I topped the soup with thyme leaves and homemade croutons and served it with a garden salad for a light meal. It would also make a nice first course dish for a multi-course meal. 


Spiced Butternut Squash Soup - small batch   4 servings

1 tablespoon coconut oil

1 carrot, peeled & chopped

3 cups butternut squash, peeled & chopped

2 teaspoons fresh thyme leaves, optional 

1 onion, chopped

3 cloves garlic, minced

1/4 teaspoon nutmeg

2 to 3 teaspoons cumin

1 teaspoon ground ginger

1/4 teaspoon cayenne pepper or less if preferred

Pinch ground cinnamon

1 teaspoon paprika

2 to 2 1/2 cups chicken broth (I used 2 cups and then finished it with heavy cream, added after blending the soup)

Kosher salt and black pepper to taste

  1. In a 2-quart Dutch oven, heat coconut oil over medium-low heat. Add carrots,  butternut squash and thyme leaves; sauté for 10 minutes.
  2. Add onions, garlic and seasoning and continue cooking for 5 minutes. Season with salt and pepper.
  3. Add broth and bring to boil. Reduce heat to low and continue to cook for 10 minutes or until squash mixture is fork tender. 
  4. Blend until desired consistency in reached. Taste and adjust seasonings as needed.
  5. I returned the soup to the pot to reheat and added 1/2 heavy cream for added richness (dollops or sour cream could also be added in place of the cream.   
Recipe without photos . . . Spiced Butternut Squash Soup - small batch   4 servings

1 tablespoon coconut oil

1 carrot, peeled & chopped

3 cups butternut squash, peeled & chopped

2 teaspoons fresh thyme leaves, optional 

1 onion, chopped

3 cloves garlic, minced

1/4 teaspoon nutmeg

2 to 3 teaspoons cumin

1 teaspoon ground ginger

1/4 teaspoon cayenne pepper or less if preferred

Pinch ground cinnamon

1 teaspoon paprika

2 to 2 1/2 cups chicken broth (I used 2 cups and then finished it with heavy cream, added after blending the soup)

Kosher salt and black pepper to taste

  1. In a 2-quart Dutch oven, heat coconut oil over medium-low heat. Add carrots, butternut squash and thyme leaves; sauté for 10 minutes
  2. Add onions, garlic and seasoning and continue cooking for 5 minutes. Season with salt and pepper.
  3. Add broth and bring to boil. Reduce heat to low and continue to cook for 10 minutes or until squash mixture is fork tender. 
  4. Blend until desired consistency in reached. Taste and adjust seasonings as needed.
  5. I returned the soup to the pot to reheat and added 1/2 heavy cream for added richness (dollops or sour cream could also be added in place of the cream.  

Summer Squash Casserole

An abundance of summer squash has me looking for new recipes. This casserole is a combination of several recipes I discovered. It combines the best of the best in a delicious side dish—tender-crisp squash topped with crunchy, buttery crackers.. As usual, I downsized the recipe that follows and I tend to eye-ball the sour cream and cheese . . . adding what I think looks like just the right amount without overdoing. 


Summer Squash Casserole    About 8-12 servings 

2 tablespoons olive oil

About 2 to 2 1/2 lbs. summer squash, cut  into 1/4" slices – half and cut out seeds if squash is larger (I used a combo of yellow crookneck and zucchini squash)

1 medium onion chopped (yellow, white or red)

Kosher salt & pepper to taste

1/4 teaspoon cayenne pepper, optional

1 tablespoons fresh oregano, chopped

1 cup shredded Cheddar cheese (or use 1/2 c. Cheddar & 1/2 cup Pepper Jack cheese)

8 ounces sour cream

Topping:

1/2 cup Parmesan cheese

1 sleeve buttery crackers such as Ritz 

2 tablespoons melted butter

  1. Pre-heat oven to 350°F. Lightly spray a 12-inch cast iron skillet or a 9"x9" casserole dish with cooking spray.
  2. In a large skillet, heat the oil over medium-high heat. Add the sliced squash and onion and cook, stirring occasionally, until the vegetables have slightly softened but are still tender-crisp, about 6 to 7 minutes. 
  3. In a large mixing bowl, stir together the sour cream, salt, pepper, cayenne and oregano. Fold in Cheddar cheese, and sour cream.
  4. Fold in the cooked squash mixture. 
  5. Transfer to the prepared baking vessel and sprinkle Parmesan over the top of casserole.
  6. In a separate medium bowl, use a fork to stir together the crushed crackers with the melted butter. Sprinkle the mixture evenly over the top of the casserole.
  7. Bake about 25 minutes, uncovered, until bubbly and topping is starting to brown slightly

Recipe without photos . . . Summer Squash Casserole    About 8-12 servings 

2 tablespoons olive oil

About 2 to 2 1/2 lbs. summer squash, cut  into 1/4" slices – half and cut out seeds if squash is larger (I used a combo of yellow crookneck and zucchini squash)

1 medium onion chopped (yellow, white or red)

Kosher salt & pepper to taste

1/4 teaspoon ccayenne pepper, optional

1 tablespoons fresh oregano, chopped

1 cup shredded Cheddar cheese (or use 1/2 c. Cheddar & 1/2 cup Pepper Jack cheese)

8 ounces sour cream

Topping:

1/2 cup Parmesan cheese

1 sleeve buttery crackers, such as Ritz 

2 tablespoons melted butter

  1. Pre-heat oven to 350°F. Lightly spray a 12-inch cast iron skillet or a 9"x9" casserole dish with cooking spray.
  2. In a large skillet, heat the oil over medium-high heat. Add the sliced squash and onion and cook, stirring occasionally, until the vegetables have slightly softened but are still tender-crisp, about 6 to 7 minutes. 
  3. In a large mixing bowl, stir together the sour cream, salt, pepper, cayenne and oregano. Fold in Cheddar cheese, and sour cream.
  4. Fold in the cooked squash mixture. 
  5. Transfer to the prepared baking vessel and sprinkle Parmesan over the top of casserole.
  6. In a separate medium bowl, use a fork to stir together the crushed crackers with the melted butter. Sprinkle the mixture evenly over the top of the casserole.
  7. Bake about 25 minutes, uncovered, until bubbly and topping is starting to brown slightly.

A good book and a recipe — Mrs. Santa’s Crunchy Cheese Cracker found in “Forget What You Know”

It’s always fun for me to discover a recipe at the end of a good book. As I read Christina Dodd’s “Forget What You Know,” crunchy cheese crackers repeatedly were mentioned so I was thrilled to discover a link to the recipe at the end of the book. Despite already having several recipes for really good cheese crackers, I was intrigued by the addition of corn flakes to the usual cheese cracker ingredients, the addition that adds the crunch. Another positive about these cheesy delights is the fact that they are slice and bake crackers so can be made ahead (unbaked logs can even be frozen) and then bakeds on an as needed basis. 

Dodd’s description preceding the recipe includes: In the small town of Gothic, California, Mrs. Santa’s tearoom is decorated (or over-decorated) in Christmas décor: “walls covered with framed Christmas prints, Christmas-themed ceramics, English porcelain Christmas-painted plates on decorative hangers. Santas decorated the light switches. Painted evergreen branches climbed the table legs and Christmas tree bulbs dotted the wallpaper.” Mrs. Santa serves the usual tearoom fare: delicate sandwiches with no crusts, curried chicken salad, scones with clotted cream and lemon curd and, of course, steaming hot tea served in Santa teapots. Her pièce de résistance is a Santa plate filled with her famous cheese wafers. They have a special crunch."


The recipe appears exactly as printed on Dodd’s website. Check out her other recipes, too. 


Mrs. Santa’s Crunchy Cheese Cracker

1 ½ cups shredded extra sharp cheddar cheese (1/3 lb.)

½ cup unsalted butter, softened—Mrs. Santa uses Kerrygold

1 cup all purpose flour

½ teaspoon salt

½ teaspoon dried mustard

½ teaspoon cayenne (less or more depends on your taste)

1 teaspoon Worcestershire sauce

1 ½ cups corn flakes cereal, crushed

Ice water 

  1. Process cheese and butter in food processor until blended. 
  2. Add flour, salt, dried mustard and cayenne. Pulse until blended. 
  3. Add cereal, process until blended. Add Worcestershire sauce.
  4. Here’s the tricky part. Add ice water, one tablespoon at a time, and toss lightly. How much?Depends on where you live and the time of year. Humidity makes a huge difference. What you’re looking for is the mixture to cling together when you press it between your palms. If you make your own pie dough, think of that. 

  5. I divided the dough into 2 logs. 
    Once you get that consistency, roll it into a one inch diameter log, wrap it in plastic wrap and refrigerator for at least four hours.
  6. When you’re ready to bake, heat oven to 350 ° F. 
  7. Cut log with a serrated knife into wafers. 
  8. Bake on a sheet 12 to 14 minutes until lightly browned. Cool on wire rack. Store in airtight container (they are fragile!) and serve them on a Santa plate to your best friends.
  9. When you’re ready to bake, heat oven to 350 degrees Fahrenheit. Cut log with a serrated knife into wafers. Bake on a sheet 12-14 minutes until lightly browned. Cool on wire rack. Store in airtight container (they are fragile!) and serve them on a Santa plate to your best friends.Mrs. Santa’s crackers freeze well, make delightful gifts. 
Recipe without photos . . . Mrs. Santa’s Crunchy Cheese Cracker

1 ½ cups shredded extra sharp cheddar cheese (1/3 lb.)

½ cup unsalted butter, softened—Mrs. Santa uses Kerrygold

1 cup all purpose flour

½ teaspoon salt

½ teaspoon dried mustard

½ teaspoon cayenne (less or more depends on your taste)

1 teaspoon Worcestershire sauce

1 ½ cups corn flakes cereal, crushed

Ice water 

  1. Process cheese and butter in food processor until blended. 
  2. Add flour, salt, dried mustard and cayenne. Pulse until blended. 
  3. Add cereal, process until blended. Add Worcestershire sauce.
  4. Here’s the tricky part. Add ice water, one tablespoon at a time, and toss lightly. How much?Depends on where you live and the time of year. Humidity makes a huge difference. What you’re looking for is the mixture to cling together when you press it between your palms. If you make your own pie dough, think of that. 
  5. Once you get that consistency, roll it into a one inch diameter log, wrap it in plastic wrap and refrigerator for at least four hours.
  6. When you’re ready to bake, heat oven to 350 ° F.t. 
  7. Cut log with a serrated knife into wafers. 
  8. Bake on a sheet 12 to 14 minutes until lightly browned. Cool on wire rack. Store in airtight container (they are fragile!) and serve them on a Santa plate to your best friends.
  9. When you’re ready to bake, heat oven to 350 degrees Fahrenheit. Cut log with a serrated knife into wafers. Bake on a sheet 12-14 minutes until lightly browned. Cool on wire rack. Store in airtight container (they are fragile!) and serve them on a Santa plate to your best friends.Mrs. Santa’s crackers freeze well, make delightful gifts. 

Grilled Chicken Skewers with Tzatziki and Veggies

A light and refreshing meal that is healthy and delicious!   


Grilled Chicken Skewers with Tzatziki and Veggies  4 servings

Chicken:

27.3 oz. raw boneless, skinless chicken breast cut into 2” pieces

4 teaspoons avocado or olive  oil 

1 teaspoon each dried oregano and thyme 

1 /2 teaspoon cayenne oeooer, or to taste

Salt & pepper to taste, about 1/4 tsp. each 

Veggie Suggestions:

Cremini mushrooms, whole or halves, optional  

Sliced cucumber (we prefer the mini Persian cukes)

Cherry tomatoes

Tzatziki:

12 oz. plain low-fat Greek yogurt 

1/2 cup grated cucumber 

3 tablespoon chopped fresh dill about 1 tablespoon+  dried dill

2 tablespoons fresh lemon juice 

3 garlic cloves, minced 

Salt & pepper to taste, about 1/4 tsp. each 

  1. Chicken: If using wooden skewers, soak in water at least 20 minutes to prevent from burning. Preheat grill to medium-high.
  2. In a bowl, add chicken pieces and sprinkle with dry herbs/salt & pepper. Drizzle with oil and toss to coat.
  3. Thread chicken onto skewers and arrange on grill with some space in between each skewer.
  4. Cook about 7 min. until chicken is cooked through, flipping a couple times during cook time. If using an indoor grill, chicken can be covered with a lid for part of the cooking time. Cook to an internal temperature of 165° F. 
  5. Mushrooms: If desired, thread mushroom on additional skewers, or simply cut in half, brush with oil and grill alongside the chicken. Cook until tender. 
  6. Serve skewers with Tzatziki dip, lemon wedges, and your favorite chopped fresh veggies! 
  7. Tzatziki:  Combine all ingredients and refrigerate until ready to use. 

Asian Pickled Cucumber Sticks . . . fast and easy

We love mini Persian cucumbers . . . so crisp, crunchy and refreshing. The thing we don't like is that they don't have a very long refrigerator life. Even though I remove them from their plastic package and keep them in a mesh bag, they tend to start becoming slimy way too fast. So, I found several recipes for pickled cucumber sticks and opted for one with an Asian flair, making a few adjustments to suit our taste. Pickling extends the refrigerator-life of the cucumbers, and creates a tasty snack food, or a salad alternative. 

I allowed the cucumber sticks to marinate in a vintage
refrigerator dish that also doubles as a serving container. 

Asian Pickled Cucumber Sticks   We allow at least one mini cucumber per person for a serving

5 to 6 mini Persian cucumbers

2 teaspoons sesame oil

2 teaspoon low-sodium soy sauce

2 teaspoon rice vinegar

1/2 lemon, juiced

1 teaspoon garlic powder

1 1/2 teaspoons dried dill weed or use fresh is available

1 1/2 teaspoon sesame seeds

Kosher salt to taste (about 1/2 to 1 teaspoon)

Dash or two (or three) of cayenne pepper or a sprinkling of dried red peppers

  1. Slice each cucumber longwise; then cut each half in half again longwise, creating 4 sticks. Place sticks in a shallow bowl.
  2. Add remaining ingredients and use tongs to toss and coat the cucumbers in the juices and seasonings.
  3. Let stand at least 5 minutes before serving. Or, add to a covered refrigerate dish and refrigerate. Use within 3 to 4 days. 
    Cucumber sticks with added ingredients, ready to toss. 

4 Easy Pecan Holiday Treats as featured in KANSAS! Magazine

Check out the latest KANSAS! Magazine (2023 / vol 79 / issue 1 / pp. 26-31) for information about fresh, Kansas grown pecan! Kenny Felt’s pecan  photographs are amazing.

                 The magazine is full of ideas for holiday shopping and family excursions. 

Below are their recipes—perfect for the holidays, and easy, too! I’ve also included contact info for each pecan grower that was included in my article on pecans . . . so you’ll have easy ordering access. 


EASY PRETZEL TURTLES   Yield: 30 candies


A kid-friendly candy that Lila Carter makes with 

her grandchildren using Jake Creek Pecans.

INGREDIENTS

30 Rolo® chocolate covered caramel candies, unwrapped

30 square-shaped waffle pretzels 

30 pecan halves, toasted*


INSTRUCTIONS

1.  Preheat oven to 350 degrees F. Line a baking sheet with parchment paper or foil for easy clean up. 

2.  Place the pretzels on baking sheet and top each one with a candy.

3.  Bake in oven for 3 to 5 minutes, until the chocolate just begins to melt. The candy should be soft but not completely melted.

4.  Remove from oven, place on cooling rack and immediately squish the chocolate with a pecan half. 

* To Toast Pecans: Bake in a 350 degree F. oven for 5 to 10 minutes. Stir or shake the pan occasionally so the nuts brown evenly without burning. Watch closely as the oil in the nuts can cause them to burn. Toasting adds another layer of flavor to pecans. 


Note: Due to their high oil content, raw and toasted pecans stay freshest if stored in the refrigerator or freezer in sealed containers.

Jake Creek Pecans Orchard

Owners: Brad and Lila Carter

Address11469 W 335th St., Paola, KS 66071

Phone: 913.406.2501

On-line store: jake-creek-pecans.square.site

WebpageJakecreekpecans.com

Facebook & InstagramJake Creek Pecans 

----------

SUGAR COATED PECANS    Yield: 1 pound 

Slina 

Prothe uses Prothe Pecans to create these crunchy, sweet holiday treats.

INGREDIENTS

1 egg white

1 tablespoon water

1 cup granulated (white) sugar

3/4 teaspoon salt

1/2 teaspoon ground cinnamon

1 pound pecan halves


INSTRUCTIONS

1.  Preheat oven to 250 degrees F. Grease or spray one standard-sized baking sheet.

2.  In a mixing bowl, whip together the egg white and water until frothy. 

3.  In a separate bowl, mix together the sugar, salt, and cinnamon.

4.  Add pecans to egg whites; stir to evenly coat the nuts. 

5.  Remove and add them to the sugar mixture; toss them in the mixture until coated.

6.  Spread nuts in a flat layer on prepared baking sheet.

7.  Bake for 1 hour, stirring every 15 minutes.

8.  Cool and store in an airtight container. 


TOASTED, SALTED PECANS    Yield: 1 pound 

Recipe from Slina Prothe, Prothe Pecans. 

INGREDIENTS

2 tablespoons vegetable or pecan oil

2 tablespoons butter

1 pound pecan halves

Salt to taste


INSTRUCTIONS

1.  Place oil and butter on a standard-sized baking sheet with sides; place in a preheated 250 degree F. just until butter melts. 

2.  Mix pecans and salt with the oil and butter. Spread nuts in a flat layer on prepared baking sheet.

3.  Bake for 1 hour, stirring every 15 minutes.  

4.  Cool and store in an airtight container. 


Prothes Pecans

OwnersLeland and Slina Prothe

Address33850 Victory Rd PaolaKS 66071

Phone: 913.849.3358  

Webpageprothespecans.com 

Facebook: Prothes Pecans

----------

SPICY HOT PECANS

Kendall Grier’s family adds Bentley Farm pecans to saucy and spicy ingredients to create a savory holiday treat. 

INGREDIENTS

2 tablespoons butter, melted

1 tablespoon Worcestershire sauce 

1/4 teaspoon ground red pepper 

1/4 teaspoon salt

1/4 teaspoon garlic powder

2 cups pecan halves

1 tablespoon chili powder, or cayenne pepper for hotter mix. 


INSTRUCTIONS

1.   Preheat oven to 300 degrees F.

2.   Mix ingredients in a resealable plastic bag and shake.

3.   Spread coated pecans on a medium-sized baking sheet, and bake 30 minutes in the preheated oven, stirring approximately every 10 minutes.


Bentley Pecan Farm

Owner: Kendall Grier 

Address: 1216 Chestnut, Halstead, KS 67056 

Phone: 316.209.4588

Facebook: Bentley Pecan Farm


----------

Circle's Pecans & Country Store

Owners: Tom and Barbara Circle

Address2499 US HWY 400 McCune, KS 66753

Phone: 620.632.4382 

Webpagekansaspecans.com

Facebook: Circle’s Pecans & Country Store


----------

Osage Ridge Farm 

OwnersTravis and Rhea Wilson

Address18090 Xavier Rd, Oswego, KS 67356

Phone: 620.238.2965

Emailosageridgefarm@gmail.com

FacebookOsage Ridge Farm