Showing posts with label Yogurt. Show all posts

Muesli . . . a favorite on our Viking British Isles cruise

I’ve made Muesli off and on over the years but Barry has never been much interested. Attributed to a Swiss doctor, it is a mixture of rolled oats, nuts, seeds, and fresh or dried fruit that have been soaked in milk, yogurt, or juice.  On our recent British Isles cruise, he tried it and liked it. Since then I have been making a version similar to the one on the ship. 

Above: A bowl of ready-to-eat Muesli topped with fresh fruits, sunflower and pumpkin seeds.
Below: Prepare Muesli, ready to be refrigerated overnight. 

Muesli 
1
 cup rolled oats 

1/3 cup chopped pecans (or other nuts of choice)

1/3 cup craisins, raisins or dried cherries

1/3 cup  flaked coconut

3 tablespoons ground flaxseed

1/2 teaspoon ground cinnamon 

Pinch of kosher salt

1 apple, cored & grated

Milk – begin with 1/2 cup and add more to created a creamy mixture (about 1 ½ cups+) - I used whole

1/2 cup plain Greek yogurt

1 teaspoon lemon or orange juice

1 teaspoon vanilla 

Toppings: Seeds, additional nuts, granola, dried or fresh fruits, etc; additional milk if desired

  1. Stir together the oats, pecans, dried fruit, coconut, flax, cinnamon and a pinch of salt. 
  2. Stir in the grated apple. 
  3. In a smaller bowl or measuring cup, whisk together the milk, yogurt, juice and vanilla. Stir the wet ingredients into the dry ingredients. Add additional milk to create a creamy texture. (I like it creamy so add lots of extra milk as it absorbs the liquid as it sets.) Cover and place in the fridge overnight. (It keeps several days.)
  4. In the morning, stir and top with your desired toppings. 

Chunky Apple Cake

Fall is here and this chunky apple cake captures the season with  warm spices and walnut additions. I served it for a special occasion brunch topped with whipped cream and pie cut outs, but it would make a yummy anytime dessert.

Chunky Apple Cake      Yield: one 9-inch springform cake

Cake batter

1 1/2 cups all-purpose flour sifted

1 teaspoon baking powder

½ teaspoon baking soda

¼ teaspoon salt

1 cup granulated sugar

¼ cup vegetable oil

½ cup Greek yogurt or sour cream

1 teaspoon vanilla 

2 eggs

Additions:

4 apples peeled, cored, and chopped into small square chunks

1 teaspoon cinnamon

¼ teaspoon nutmeg

¼ cup brown sugar

3/4 cup chopped walnuts (or pecans)

  1. Preheat oven to 350°F with rack in middle.

  2. Use a 9x3-inch springform pan or a 9-inch round cake pan (at least 2 inches tall).

  3. Grease the side and the bottom of the springform pan with butter or cooking spray. Line the bottom of a 9x3-inch springform pan (or 9-inch round cake pan) with parchment paper. Grease the parchment paper too.

  4. In a  medium mixing bowl, combine together flour, baking powder, baking soda, and salt.

  5. In another, large bowl, whisk together 1 cup of white sugar, vegetable oil, yogurt, and vanilla until very smooth. Add eggs and whisk until smooth.

  6. Add dry ingredients (flour mixture) into wet ingredients and mix until just combined. Do not overmix.

  7. Core, peel, and slice apples into chunks. In a medium bowl, toss apple chunks with cinnamon, nutmeg, and brown sugar.

  8. Pour half of the batter into the greased pan, top with two-thirds of the apple chunks, then pour the remaining half of the batter on top of the apple layer; sprinkle with chopped walnuts.
  9. Bake the cake until set in the middle - 1 to 1 1/2 hours. Halfway through baking (about 30 to 45 minutes after purring in the oven) remove the cake from the oven and top it with the remaining one-third of the apple chunks. 
  10. Return the cake to the oven and continue baking until the cake is done —when the toothpick inserted in the center comes out clean).


Recipe without photos . . . Chunky Apple Cake      Yield: one 9-inch springform cake

Cake batter

1 1/2 cups all-purpose flour sifted

1 teaspoon baking powder

½ teaspoon baking soda

¼ teaspoon salt

1 cup granulated sugar

¼ cup vegetable oil

½ cup Greek yogurt or sour cream

1 teaspoon vanilla 

2 eggs

Additions:

4 apples peeled, cored, and chopped into small square chunks

1 teaspoon cinnamon

¼ teaspoon nutmeg

¼ cup brown sugar

3/4 cup chopped walnuts (or pecans)

  1. Preheat oven to 350°F with rack in middle.
Use a 9x3-inch springform pan or a 9-inch round cake pan (at least 2 inches tall).

  2. Grease the side and the bottom of the springform pan with butter or cooking spray. Line the bottom of a 9x3-inch springform pan (or 9-inch round cake pan) with parchment paper. Grease the parchment paper too.

  3. In a  medium mixing bowl, combine together flour, baking powder, baking soda, and salt.

  4. In another, large bowl, whisk together 1 cup of white sugar, vegetable oil, yogurt, and vanilla until very smooth. Add eggs and whisk until smooth.

  5. Add dry ingredients (flour mixture) into wet ingredients and mix until just combined. Do not overmix.

  6. Core, peel, and slice apples into chunks. In a medium bowl, toss apple chunks with cinnamon, nutmeg, and brown sugar.

  7. Pour half of the batter into the greased pan, top with two-thirds of the apple chunks, then pour the remaining half of the batter on top of the apple layer.

  8. Bake the cake until set in the middle - 1 to 1 1/2 hours. Halfway through baking (about 30 to 45 minutes after purring in the oven) remove the cake from the oven and top it with the remaining one-third of the apple chunks; sprinkle with chopped walnuts 
  9. Return the cake to the oven and continue baking until the cake is done —when the toothpick inserted in the center comes out clean).


3-Ingredient Yogurt Cake

3-Ingredient (sometimes 4) yogurt cakes are trending on the internet so I had to give the recipe a try. I’ve made it twice so YES, it does work despite being super easy. It contains no flour or oil and is reminiscent of a light and creamy cheesecake. Since I am often leery of some trendy recipes, I cut this one in half and put it in a small (3-inch) springform pan that I bought for either small desserts or appetizer cheesecakes. It was the perfect size for the two of us. I baked it about an hour. 

For this version I flavored  homemade yogurt with a thin layer of lemon curd and then spread a thin layer on top for serving + added fresh fruit and mint leaves. 


3-Ingredient Yogurt Cake   About 4 (possibly 6) servings 


1 2/3 cups sweetened Greek yogurt  (I used full fat homemade Greek yogurt; the first time I sweetened it to taste with honey; the 2nd time I used homemade lemon curd)

4 large eggs

4 tablespoons cornstarch     


  1. Preheat oven to 350°F. Spray the interior of a 6-inch round springform or regular cake pan with cooking spray and then line the interior with a single large sheet of parchment paper so that it completely covers the interior of the cake pan and comes up slightly above the pan. Press and crease the parchment paper as needed so that it sticks to the interior of the pan. It is okay that the parchment paper will be wrinkled and uneven around the edges; this will create a rustic-looking cake that is not perfectly round. 
  2. Add yogurt and eggs to a large mixing bowl. Whisk until eggs are thoroughly combined. If adding sugar, mix it in now. Add in the cornstarch and whisk until batter is smooth. Pour batter into the prepared baking pan. 

  3. Bake for about 70-75 minutes or until cake is puffed up, the batter is no longer jiggly and the cake has a caramelized surface. When the cake comes out of the oven it will begin to deflate and may wrinkle. 

  4. Let cake cool at room temperature for about 30 minutes and then place it into fridge for at least 2 hours to develop flavor. 
  5. Remove cake from the refrigerator about 15 to 30 minutes before serving.
  6. If desired, drizzle with honey or other sweetener when serving and top with fruit. 
3-ingredient cake ready to go into the oven. 

Grilled Chicken Skewers with Tzatziki and Veggies

A light and refreshing meal that is healthy and delicious!   


Grilled Chicken Skewers with Tzatziki and Veggies  4 servings

Chicken:

27.3 oz. raw boneless, skinless chicken breast cut into 2” pieces

4 teaspoons avocado or olive  oil 

1 teaspoon each dried oregano and thyme 

1 /2 teaspoon cayenne oeooer, or to taste

Salt & pepper to taste, about 1/4 tsp. each 

Veggie Suggestions:

Cremini mushrooms, whole or halves, optional  

Sliced cucumber (we prefer the mini Persian cukes)

Cherry tomatoes

Tzatziki:

12 oz. plain low-fat Greek yogurt 

1/2 cup grated cucumber 

3 tablespoon chopped fresh dill about 1 tablespoon+  dried dill

2 tablespoons fresh lemon juice 

3 garlic cloves, minced 

Salt & pepper to taste, about 1/4 tsp. each 

  1. Chicken: If using wooden skewers, soak in water at least 20 minutes to prevent from burning. Preheat grill to medium-high.
  2. In a bowl, add chicken pieces and sprinkle with dry herbs/salt & pepper. Drizzle with oil and toss to coat.
  3. Thread chicken onto skewers and arrange on grill with some space in between each skewer.
  4. Cook about 7 min. until chicken is cooked through, flipping a couple times during cook time. If using an indoor grill, chicken can be covered with a lid for part of the cooking time. Cook to an internal temperature of 165° F. 
  5. Mushrooms: If desired, thread mushroom on additional skewers, or simply cut in half, brush with oil and grill alongside the chicken. Cook until tender. 
  6. Serve skewers with Tzatziki dip, lemon wedges, and your favorite chopped fresh veggies! 
  7. Tzatziki:  Combine all ingredients and refrigerate until ready to use. 

Honeyed Baked Pears with Walnuts

An easy, healthy dessert for the holidays . . . or anytime! 


Honeyed Baked Pears with Walnuts 

For each serving:

1 ripe pear (I used Bartlett)

1 tablespoon honey

Ground cinnamon, allspice & nutmeg

2 tablespoons roughly chopped walnuts

A pat of butter (cut into small cubes) 

Our Toppings of Choice: honeyed yogurt and pomegranate seeds 

  1. Cut pear in half. Use a melon baller to remove seed center + remove stem.
  2. Add pear halves to a single serving dish that has been sprayed with pan release. 
  3. Drizzle with honey and sprinkle lightly with cinnamon, allspice and nutmeg.
  4. Top with walnuts and dot with butter.
  5. Bake in preheated 375° oven for about 20 minutes or until pears can be easily pieces with a sharp knife.
  6. Serve warm or chill and serve cold. Top with honeyed yogurt and pomegranate seeds or other toppings of your choice. 
    Ready to go into the oven! 

Healthy Fall Applesauce Parfait

Attempting to reduce our reliance on refined sugars, I’ve been making natural applesauce. This is a fanciful version that was pleasing to both the eyes and the palate. 


Healthy Fall Applesauce Parfait

Apples, cored & cut into chunks with the skins left on

A small amount of water, apple juice or apple cider (just a couple of tablespoons for 4 to 6 apples; the apples release their own natural juices as they cook)


Optional Flavorings:

Spices: add a cinnamon stick (or part of one) to apples at the beginning of the cooking period or add ground cinnamon and possibly some nutmeg as apples are blended

Honey: use only if needed for added sweetness


Optional Toppings:

Yogurt flavored with honey

Pomegranate seeds

Coarsely chopped walnuts 

  1. Add prepared apples and a little water or juice to a saucepan or slow cooker (add cinnamon stick if using). If using saucepan, cover and cook on low until apples are tender. If using slow cooker, add ingredients to ceramic bowl and cook on high for a couple of hours or on low for about four hours. Test apples to make sure they are tender.

  2. Cool and then add to the work bowl of a blender, blend until smooth. (Very small chunks of skin may remain.)
  3. Taste and flavor with spices and honey if desired.
  4. To create a parfait — add chilled applesauce to a parfait or juice glass. Top with honeyed yogurt, pomegranate seeds and walnuts. Or, add other toppings of your choice.  
Recipe without photos . . . Healthy Fall Applesauce Parfait

Apples, cored & cut into chunks with the skins left on

A small amount of water, apple juice or apple cider (just a couple of tablespoons for 4 to 6 apples; the apples release their own natural juices as they cook)


Optional Flavorings:

Spices: add a cinnamon stick (or part of one) to apples at the beginning of the cooking period or add ground cinnamon and possibly some nutmeg as apples are blended

Honey: use only if needed for added sweetness


Optional Toppings:

Yogurt flavored with honey

Pomegranate seeds

Coarsely chopped walnuts 

  1. Add prepared apples and a little water or juice to a saucepan or slow cooker (add cinnamon stick if using). If using saucepan, cover and cook on low until apples are tender. If using slow cooker, add ingredients to ceramic bowl and cook on high for a couple of hours or on low for about four hours. Test apples to make sure they are tender.
  2. Cool and then add to the work bowl of a blender, blend until smooth. (Very small chunks of skin may remain.)
  3. Taste and flavor with spices and honey if desired.
  4. To create a parfait — add chilled applesauce to a parfait or juice glass. Top with honeyed yogurt, pomegranate seeds and walnuts. Or, add other toppings of your choice.  

Creamy Apple Pie Salad

Dessert or a honey-infused side salad? Either way, this is a yummy variation of a Waldorf salad, made with a cream cheese and yogurt-based dressing. Make a family sized portion or use the dressing on just one apple for a salad for just two! 

Creamy Apple Pie Salad 

Dressing

4 oz. lower fat cream cheese, softened

1 1/2 tablespoons brown sugar

2 tablespoons honey

1/2 to 1 teaspoon ground cinnamon (start with less & add to taste)

Pinch ground nutmeg

Pinch kosher salt

1/4 cup Greek yogurt

1/2 teaspoon vanilla 

Salad

About 5 or 6 apples such as Jonathon, Pink Lady, Gala, Honeycrisp, Granny Smith or a combination of varieties, skin on, cored and chopped 

1/3 cup chopped walnuts 

1/3 cup dried cranberries (raisins) or raisins

Fresh mint, chopped + leaves for garnishing

  1. In a mixing bowl using an electric mixer, beat the cream cheese, brown sugar, honey, cinnamon, nutmeg and salt until light and fluffy; fold in the sour cream and vanilla, gently stirring by hand until smooth. Chill the dressing until you are ready to serve the salad.
  2. Place the chopped apples into a large serving bowl along with half of the walnuts and cranberries. Top with the prepared cream cheese dressing, tossing to coat all the ingredients evenly. NOTE: For us, I cut up one apple at a time, added dressing and nuts to finish off a salad for just two! 
  3. Sprinkle the remaining walnuts and cranberries over the top; chill the salad. Add chopped mint and then garnish with mint leaves when ready to serve. Salad is best served within 3 to 4 hours for best results. 


Kamila Dandue's Roasted Eggplant in Spicy Yogurt as featured in KANSAS! Magazine, Spring 2022

Here’s the other recipe that Kamila Dandue had featured in the Taste section of the latest KANSAS! Magazine (2022, Vol. 78, Issue 3). An amazing gardener, cook and photographer (the photos in the post were taken by her), she turns her backyard space into an oasis, full of both everyday and exotic vegetables and flowers. And, then turns the vegetables into amazing dishes such as this one, and her recently posted recipe for Spicy Basil Pesto

Kamila occasionally make Eggplant Parmesan and dips, seasoning them with a spice blend prefers. In addition to roasting the eggplant, she often grills it and says this particular recipe can be adapted to the grill, too. 


Roasted Eggplant in Spicy Yogurt 

Yield: About 4 side servings 

INGREDIENTS:

Eggplant

3 to 4 long eggplants or 1 large, cut into 1/4-inch slices

Olive oil

1/4 teaspoon turmeric powder

1/2 to 1 teaspoon chili powder

1/2 to 1 teaspoon coriander powder

1/4 teaspoon black pepper

Salt to taste


Yogurt Sauce

1 cup plain yogurt

1/3 cup buttermilk or water

1/4 to 1/2 teaspoon each: chili powder, paprika, cumin powder & coriander powder

Salt to taste

2 tablespoons fresh coriander leaves, chopped, if available


INSTRUCTIONS: 

1.     Preheat oven to 425 degrees F. 

2.     Place foil or parchment paper on baking sheet for easy clean up.

3.     Place eggplant slices on baking sheet, spray or brush with olive oil.

4.     Mix all eggplant spices together in a small bowl. Sprinkle over eggplant slices; turn and repeat. 

5.     Bake/roast about 25 to 30 minutes or until golden brown. Remove from oven and allow to cool.

6.     Yogurt Sauce: Mix all sauce ingredient together in a bowl. Spread some yogurt sauce on serving plate/platter. Place eggplant slices on top of yogurt sauce and drizzle with additional sauce. Sprinkle with coriander leaves.


Typically Kamilla’s garden includes more than a half dozen varieties of eggplant and a mix of other exotic and usual vegetables. She makes the occasional Eggplant Parmesan 

Chicken & Grape Pasta Salad

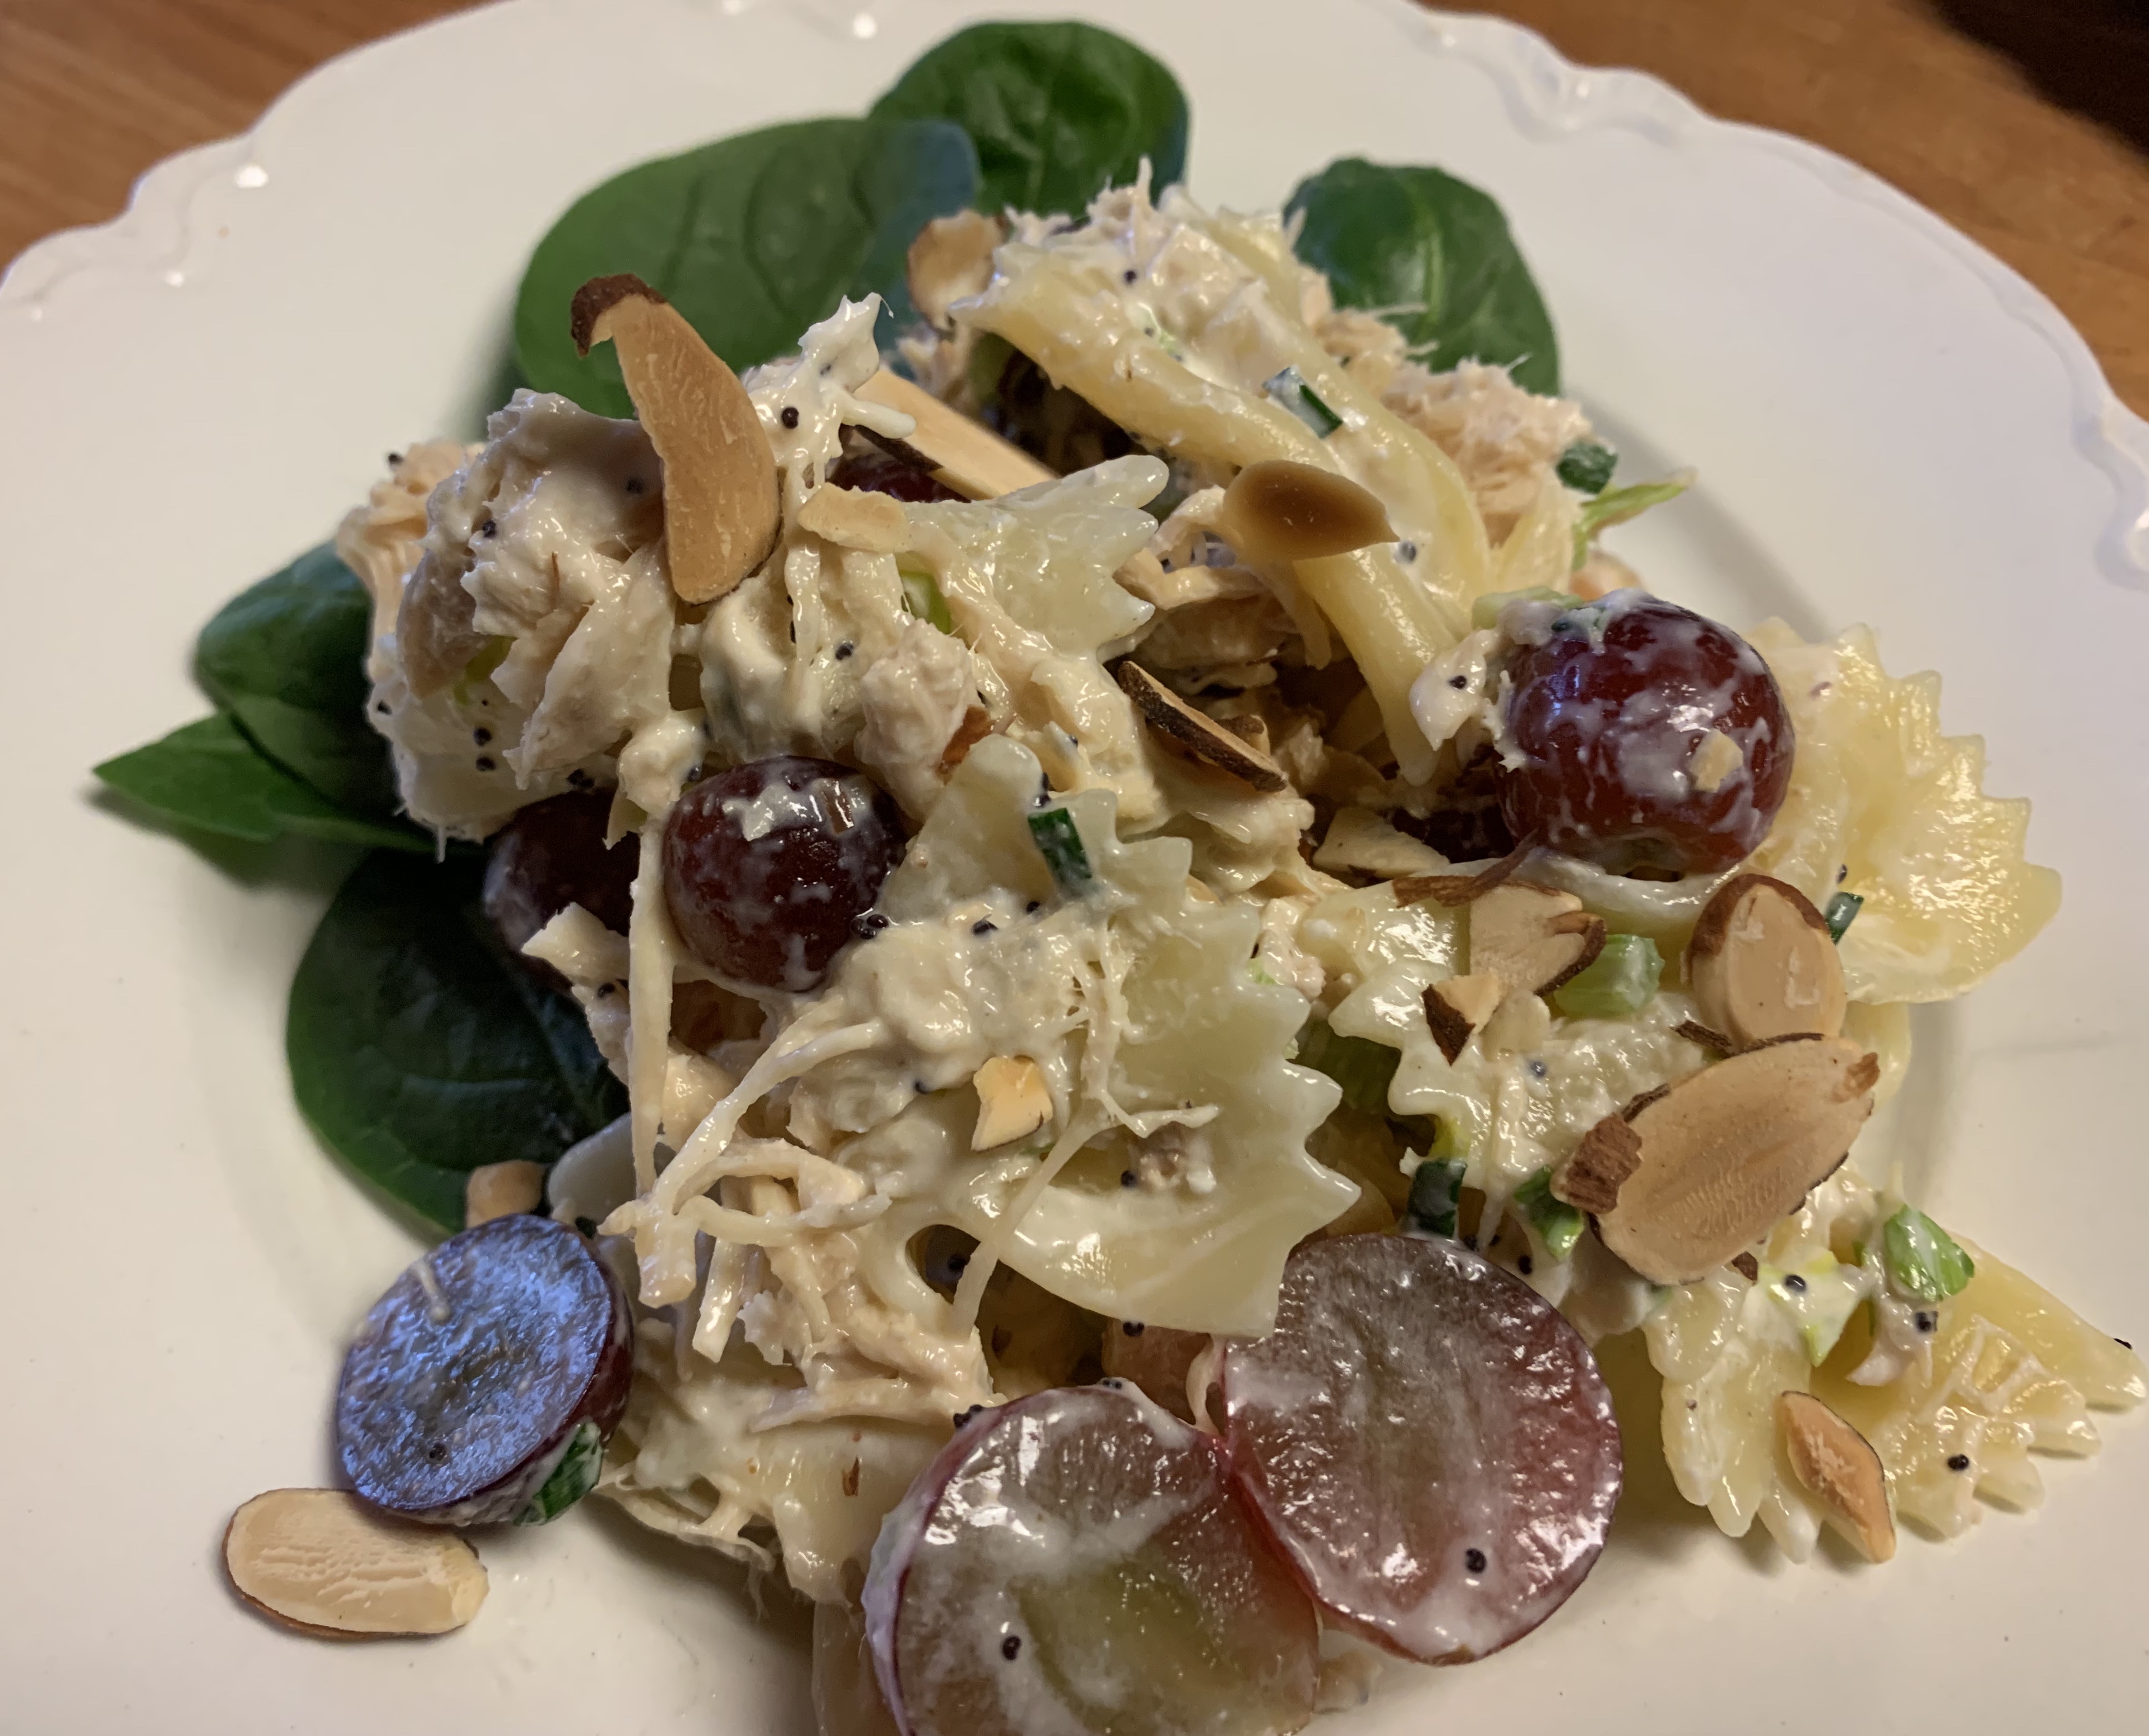
Make ahead main dish salads are easy along with being cool and refreshing. Perfect for a springtime lunch, or a light supper. This one is full of interesting flavors and textures— tender bowtie pasta, chunks of chicken of chicken, sweet grapes, crisp and crunchy celery and almonds, all coated with a creamy poppy seed dressing.

Chicken & Grape Pasta Salad     About 8 main dish servings

8 to 10 ounces bow tie pasta (about 3 to 4 cups cooked pasta)

2 cups cooked and cooled, diced or shredded chicken breasts 

12 oz. red grapes halved (about 2 cups)

3/4 to 1 cup diced celery

1/2 cup sliced almonds, toasted (put in 350° oven for about 4 to 5 minutes)

1/2 cup sliced green onions 


Dressing:

1/2 cup plain Greek Yogurt

1/2 cup mayonnaise

3 tablespoons white wine vinegar or apple cider vinegar

3 to 4 tablespoons honey

1 1/2 tablespoons poppy seeds

1/2 teaspoon salt, or to taste

  1. Cook pasta to al dente in salted boiling water according to directions on package. Drain then rinse with cold water and let drain completely. Set aside and let cool.
  2. In a mixing bowl whisk together Greek yogurt, mayonnaise, vinegar, honey, poppy seeds and salt.
  3. Add drained pasta to a salad bowl along with chicken, grapes, celery, almonds, and green onions. 
  4. Pour dressing over top and toss to evenly coat. Taste and adjust seasonings as needed. 
  5. Chill at least 30 minutes (and up to 1 day) before serving (this allows some time for the pasta to absorb the dressing and time for the flavors to meld). Serve chilled.
Recipe without photos . . . Chicken & Grape Pasta Salad     About 8 main dish servings

8 to 10 ounces bow tie pasta (about 3 to 4 cups cooked pasta)

2 cups cooked and cooled, diced or shredded chicken breasts 

12 oz. red grapes halved (about 2 cups)

3/4 to 1 cup diced celery

1/2 cup sliced almonds, toasted (put in 350° oven for about 4 to 5 minutes)

1/2 cup sliced green onions 


Dressing:

1/2 cup plain Greek Yogurt

1/2 cup mayonnaise

3 tablespoons white wine vinegar or apple cider vinegar

3 to 4 tablespoons honey

1 1/2 tablespoons poppy seeds

1/2 teaspoon salt, or to taste

  1. Cook pasta to al dente in salted boiling water according to directions on package. Drain then rinse with cold water and let drain completely. Set aside and let cool.
  2. In a mixing bowl whisk together Greek yogurt, mayonnaise, vinegar, honey, poppy seeds and salt.
  3. Add drained pasta to a salad bowl along with chicken, grapes, celery, almonds, and green onions 
  4. Pour dressing over top and toss to evenly coat. Taste and adjust seasonings as needed. 
  5. Chill at least 30 minutes (and up to 1 day) before serving (this allows some time for the pasta to absorb the dressing and time for the flavors to meld). Serve chilled.


Easy Black Bean Vegetarian Chili with Spiced Yogurt

This is yet another recipe my sister, Marla Payne, found, tested and then shared. Skinny Taste blog was the source and I definitely concur with their assessment of this recipe: Easy Black Bean Vegetarian Chili topped with Spiced Yogurt takes about 20 minutes to cook but tastes like it simmered for hours.https://www.skinnytaste.com/black-bean-vegetarian-chili/#recipeThe source Easy Black Bean Vegetarian Chili topped with Spiced Yogurt.

Easy Black Bean Vegetarian Chili with Spiced Yogurt   6 servings

Spice Mix:

1 1/4 tablespoon cumin

1 1/4 tablespoon chili powder

1/4 teaspoon garlic powder

1/4 teaspoon onion powder

1/2 teaspoon smoked paprika

1 teaspoon kosher salt

Chili:

3/4 cup whole milk plain yogurt (I used homemade yogurt)

2 (15 oz.) cans black beans (or use Instant Pot Seasoned Black Beans)

1 tablespoon olive oil

1 medium onion, chopped

1 red bell pepper, chopped

1 diced jalapeno, plus more for garnish

1 (10 oz.) can Rotel tomatoes with green chilies

8 ounces frozen corn

1(8 oz.) can tomato sauce

3/4 cup less-sodium vegetable broth

Optional Toppings: chopped jalapenos shredded cheddar, diced red onions, cilantro, diced avocado

  1. Mix the spices in a small bowl. Mix1 1/2 teaspoons with the yogurt and set aside.

  2. Place 1 can of beans, not drained in the blender with 1/2 cup of water and puree. Drain the second can.
  3. Add oil to a large pot over medium heat, add the onions, bell pepper and jalapeno and cook 3 to 4 minutes.
  4. Add tomatoes, corn, beans, pureed beans, tomato sauce, vegetable broth and remaining spices.
  5. Serve topped with spiced yogurt plus your favorite optional toppings.

Note: Refrigerate chili for up to 4 days or freeze for up to 3 months.


Recipe without photos . . . Easy Black Bean Vegetarian Chili with Spiced Yogurt   6 servings

Spice Mix:

1 1/4 tablespoon cumin

1 1/4 tablespoon chili powder

1/4 teaspoon garlic powder

1/4 teaspoon onion powder

1/2 teaspoon smoked paprika

1 teaspoon kosher salt

Chili:

3/4 cup whole milk plain yogurt (I used homemade yogurt)

2 (15 oz.) cans black beans (or use Instant Pot Seasoned Black Beans)

1 tablespoon olive oil

1 medium onion, chopped

1 red bell pepper, chopped

1 diced jalapeno, plus more for garnish

1 (10 oz.) can Rotel tomatoes with green chilies

8 ozs. frozen corn

1(8 oz.) can tomato sauce

3/4 cup less-sodium vegetable broth

Optional Toppings: chopped jalapenos shredded cheddar, diced red onions, cilantro, diced avocado

  1. Mix the spices in a small bowl. Mix1 1/2 teaspoons with the yogurt and set aside.
  2. Place 1 can of beans, not drained in the blender with 1/2 cup of water and puree. Drain the second can.
  3. Add oil to a large pot over medium heat, add the onions, bell pepper and jalapeno and cook 3 to 4 minutes.
  4. Add tomatoes, corn, beans, pureed beans, tomato sauce, vegetable broth and remaining spices.
  5. Serve topped with spiced yogurt plus your favorite optional toppings.

YOGURT for just 2— COOKING for two in a 3-quart Instant Pot

What do two people do with a half-gallon of yogurt? That's why I've been on the look out for a 3-quart Instant Pot. Had a heck of a time but I finally found one, seems they think it is a seasonal item (go figure).  The smaller size was hard to find but just right for the two of us . . . for both yogurt making and other recipes, too. Now I am chronicling how to adjust/adapt recipes to the smaller size . . . instructions that will guide me in the future. Also, it allows me to condense the other blog references I used that often include lots and lots and lots of ads and stories!

Plain yogurt with a swirl of Lemon Curd.

A couple of notes  . . . 

  • Minimum fill on a 3-quart Instant Pot is 1 cup
  • Ratio of milk to yogurt: 1 quart milk to 1 (heaping) tablespoon yogurt
  • If you have used the Instant Pot for savory dishes, the inner pot needs to be sanitized using boiling, soapy water, then wipe the sealing ring with a vinegar solution . . . otherwise those savory flavors may infiltrate the yogurt. 

YOGURT for 2   Yield: 1 quart  (main info condensed from A Mind Full Mom blog

·    1 quart milk (I use whole milk from Hildebrand Dairy)

·    1 heaping tablespoon plain yogurt with live & active cultures (The label on the yogurt will say Lactobacillus bulgaricus or Streptococcus thermophiles) 

Step 1: Heating the milk in the Instant Pot to 180’: 

a)   Pour 1 quart milk into the inner pot of the Instant, add lid. Vent can be sealed or not sealed in this function. Hit Yogurt button and then adjust button until it says Boil. You may need to hit the Yogurt button a couple of time. 

b)  When the Instant Pot beeps, this part of the process is finished so remove the lid and test the temperature to be sure the milk has reached 180°. Let inner pot remain in Instant Pot about 5 minutes and then remove to a counter. (Note: If milk did not reach 180° after the Boil cycle, turn to SautĆ© function for a few minutes, watching VERY closely until it reaches the 180° mark.)

Step 2: Cool the milk to approximately 105-115°: Remove the inner pot of milk to cool on a counter top for about 45 minutes or until it reaches a temperature of approximately105-115° Or, speed the process by placing the inner pot into a large mixing bowl filled with ice water—this shorten cooling time to about 15-20 minutes.

Step 3: Remove the “skin” from the milk. Once milk has reached 105-115°, gently skim off “skin” that has formed on top of the milk. This helps insure creamy yogurt.

Step 4: Whisk in the yogurt.

Step 5: Allow the yogurt to incubate in the Instant Pot: 

a)   Place the inner pot back (be sure to dry it off if an ice bath was used for cooling) into the Instant Pot and add lid. Again, it doesn’t matter which way the valve is set.

b)  Hit Yogurt button again. Adjust until it read 8:00 or 8 hours. The pressure should also read normal—if it reads less, hit adjust again until normal is lit up. (If you would like tangier yogurt, set an incubation period to 10 hours instead of 8 hours.) Yogurt was a nice consistency at this point and then firmed up a little more as it cooled.

c)  Once yogurt beeps that it is complete, remove the inner pot from the inner pot and cover with plastic wrap. Refrigerate for 8 hours before transfering to individual containers.

Step 6: Add yogurt to jars and refrigerate. Transfer to glass jars and refrigerate. It will generally last 10 to 14 days in the refrigerator. 

Plain yogurt mixed with a splash of vanilla, drizzled with honey
and sprinkled with Add-A-Sweet Crunch Topping.

And DON’T FORGET: Be sure to save a tablespoon of this prepared yogurt for the next batch. Or FREEZE several tablespoons of yogurt (in sectioned areas of an ice cube tray or other small containers) immediately after fresh yogurt is made. Then just thaw the yogurt cubes in the refrigerator and they are ready to add to a new batch of Instant Pot Yogurt.

To turn your yogurt into Greek Yogurt

·     Place prepared yogurt (from above recipe) into a cheesecloth lined colander that has been place over a large mixing bowl.

·      Allow the yogurt to drain overnight.

·      Scoop out the thick yogurt into containers to store and discard the cheesecloth.

·      Note: You can either discard the whey (the drained liquid) or you can use it in smoothies, oatmeal, protein shakes, etc. It will be filled with protein and probiotics.

To sweeten a batch of yogurt, wait until after the it has set up in the fridge for at least 8 hours, or after straining if making Greek Yogurt.  


Instructions without photos . . .YOGURT for 2   Yield: 1 quart 

·    1 quart milk (I use whole milk from Hildebrand Dairy)

·    1 heaping tablespoon plain yogurt with live & active cultures (The label on the yogurt will say Lactobacillus bulgaricus or Streptococcus thermophiles)  

Step 1: Heating the milk in the Instant Pot to 180’: 

a)   Pour 1 quart milk into the inner pot of the Instant, add lid. Vent can be sealed or not sealed in this function. Hit Yogurt button and then adjust button until it says Boil. You may need to hit the Yogurt button a couple of time. 

b)  When the Instant Pot beeps, this part of the process is finished so remove the lid and test the temperature to be sure the milk has reached 180°. Let inner pot remain in Instant Pot about 5 minutes and then removing to a counter. (Note: If milk did not reach 180° after the Boil cycle, turn to SautĆ© function for a few minutes, watching VERY closely until it reaches the 180° mark.)

Step 2: Cool the milk to approximately 105-115°: Remove the inner pot of milk to cool on a counter top for about 45 minutes or until it reaches a temperature of approximately105-115° Or, speed the process by placing the inner pot into a large mixing bowl filled with ice water—this shorten cooling time to about 15-20 minutes.

Step 3: Remove the “skin” from the milk. Once milk has reached 105-115°, gently skim off “skin” that has formed on top of the milk. This helps insure creamy yogurt.

Step 4: Whisk in the yogurt

Step 5: Allow the yogurt to incubate in the Instant Pot: 

a)   Place the inner pot back (be sure to dry it off if an ice bath was used for cooling) into the Instant Pot and add lid. Again, it doesn’t matter which way the valve is set.

b)  Hit Yogurt button again. Adjust until it read 8:00 or 8 hours. The pressure should also read normal—if it reads less, hit adjust again until normal is lit up. (If you would like tangier yogurt, set an incubation period to 10 hours instead of 8 hours.) ogurt was a nice consistency at this point and then firmed up a little more as it cooled.

c)  Once yogurt beeps that it is complete, remove the inner pot from the inner pot and cover with plastic wrap. Refrigerate for 8 hours before transfering to individual containers.

Step 6: Add yogurt to jars and refrigerate. Transfer to glass jars and refrigerate. It will generally last 10 to 14 days in the refrigerator. 

And DON’T FORGET: Be sure to save a tablespoon of this prepared yogurt for the next batch. Or FREEZE several tablespoons of yogurt (in sectioned areas of an ice cube tray or other small containers) immediately after fresh yogurt is made. Then just thaw the yogurt cubes in the refrigerator and they are ready to add to a new batch of Instant Pot Yogurt.