Showing posts with label Pepper-white. Show all posts

Roasted Butternut Squash Soup

Roasting butternut squash creates caramelization that imparts an additional depth of flavor in the squash and creates this tasty soup. 
Steps 1 to 4 outlines the roasting process which yields creamy squash that could very well be scooped out, mashed, seasoned and then served as a side dish. Use the same technique for acorn or even spaghetti squash.
The Cider Cream is optional but does add to the flavor and creaminess.

Roasted Butternut Soup with Cider Cream   Makes 7 to 8 cups
Roasted Squash Ingredients
  3 to 4 medium butternut squash (4 cups cooked squash needed for soup recipe)
  Olive oil
  Kosher salt 
  About 1/4 cup water
Cider Cream 
  1/2 cup apple cider
   2/3 cup sour cream
Soup Ingredients
  2 to 3 tablespoons+ olive oil
  1 small onion finely chopped
  1 clove garlic finely chopped
  1/2 teaspoon kosher salt
  1/4 teaspoon white pepper 
  1/8 teaspoon ground cardamom
  1/8 teaspoon ground nutmeg
  2 sprigs fresh thyme
  3 cups+ chicken broth
  1/2 cup heavy cream
Garnish
  Fresh thyme

1.   Roasting Squash: Preheat the oven to 375°F. For easy cutting: Using a knife, make several cuts into butternut squash, then microwave for up to 2 1/2 minutes (1 minute for smaller sized). Cool slightly, then cut the butternut squash in half and scoop out the seeds with a spoon; discard. (This technique also makes the squash a lot easier to peel if a recipe calls for a peeled squash.)
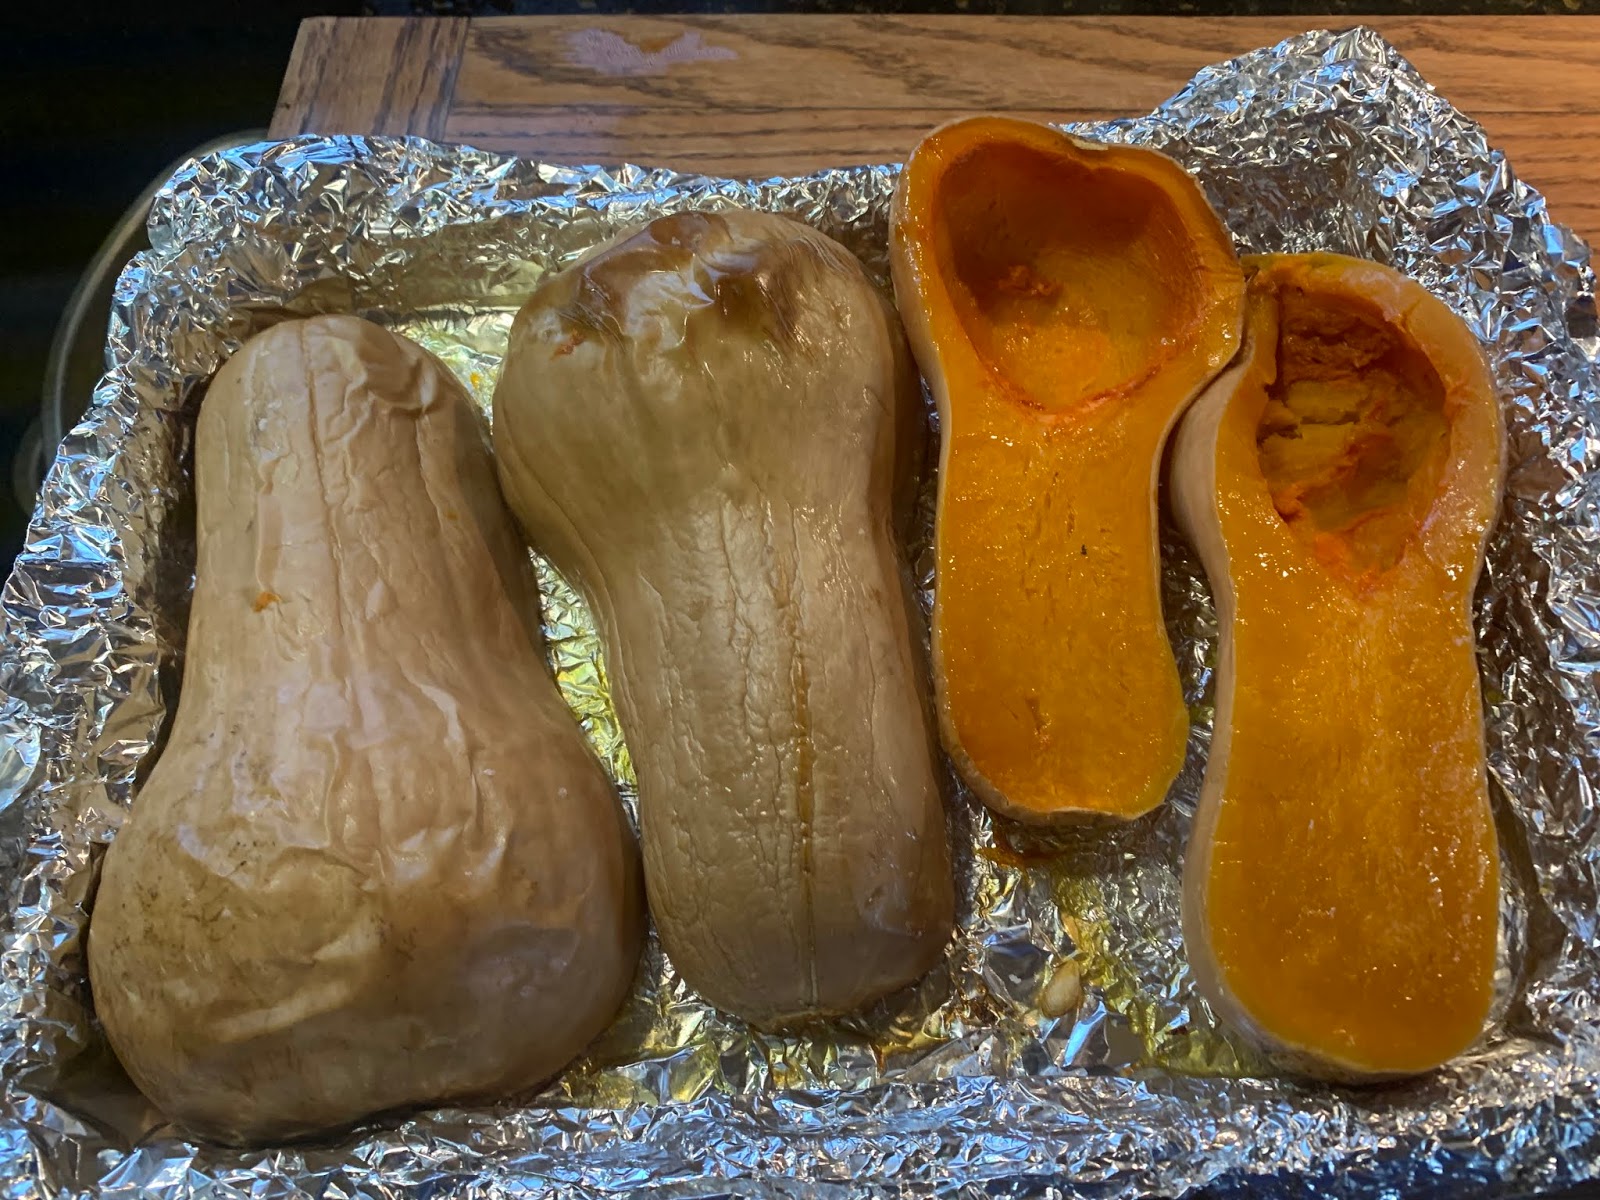
2.   Place both squash halves, flesh side up, in a foil-lined baking pan with sides. Drizzle with olive oil and sprinkle with salt.
3.   Turn the squash flesh side down and pour about 1/4 cup of water in the bottom of the pan.
4.   Bake in the oven, uncovered, for about 40 to 45 minutes, until the squash becomes really soft and can easily be pierced with the tip of a sharp knife. Check from time to time—water should eventually completely evaporate allowing the squash to caramelize but not burn. Add a little more water if squash begins to appear dry. 

5.   Cider Cream: Boil 1/2 cup cider in heavy small saucepan until reduced to 1/4 cup, about 5 minutes.  Cool. 
6.   Place 2/3 cup sour cream in small bowl and whisk in reduced cider. Refrigerate until ready to use. 
7.   SoupWhile the squash is cooling, heat 2 to 3 tablespoons+ olive oil in a medium to large saucepan and then add the 1 small finely chopped onion, 1 finely chopped garlic clove, 1/2 tsp. salt, 1/4 tsp. white pepper, 1/8 tsp. cardamom and 1/8 tsp. nutmeg; cook until fragrant and slightly caramelized, about 3 to 4 minutes. 

8.   Add several sprigs fresh thyme and 3 cups broth and bring to a quick boil; reduce heat and simmer about 20 minutes, adding more stock if needed. Remove from heat and set aside. Remove thyme sprigs.
9.   With a large spoon, scoop the flesh out of the squash and measure out 4 cups. Add to seasoned broth.

10. Working in batches, process squash-broth mixture in food processor or heavy-duty blender until really smooth and velvety, about 2 to 3 minutes.

11. Return soup mixture to saucepan and bring to simmer. Stir in 1/2 cup heavy whipping cream. 
12. Add soup to serving bowls and garnish with a dollop of Cider Cream and a sprig of thyme or thyme leaves.

Vegan Alternative:  Use vegetable broth and substitute coconut milk for cream or omit cream altogether. 

MAKE AHEAD OPTION: Butternut squash may be roasted ahead; scoop out squash and freeze in 4 cups bags. Prepare soup through step #11 a few days ahead; refrigerate and then heat up and add cream to serve. Cider Cream may be made a couple of days in advance

Recipe without photos . . .
Roasted Butternut Soup with Cider Cream   Makes 7 to 8 cups
Roasted Squash Ingredients
  3 to 4 medium butternut squash (4 cups cooked squash needed for soup recipe)
  Olive oil
  Kosher salt 
  About 1/4 cup water
Cider Cream 
  1/2 cup apple cider
   2/3 cup sour cream
Soup Ingredients
  2 to 3 tablespoons+ olive oil
  1 small onion finely chopped
  1 clove garlic finely chopped
  1/2 teaspoon kosher salt
  1/4 teaspoon white pepper 
  1/8 teaspoon ground cardamom
  1/8 teaspoon ground nutmeg
  2 sprigs fresh thyme
  3 cups+ chicken broth
  1/2 cup heavy cream
Garnish
  Fresh thyme

1.   Roasting Squash: Preheat the oven to 375°F. For easy cutting: Using a knife, make several cuts into butternut squash, then microwave for up to 2 1/2 minutes in l minute intervals (1 minute for smaller sized). Cool slightly, then cut the butternut squash in half and scoop out the seeds with a spoon; discard. (This technique also makes the squash a lot easier to peel if a recipe calls for a peeled squash.)
2.   Place both squash halves, flesh side up, in a foil-lined baking pan with sides. Drizzle with olive oil and sprinkle with salt.
3.   Turn the squash flesh side down and pour about 1/4 cup of water in the bottom of the pan.
4.   Bake in the oven, uncovered, for about 40 to 45 minutes, until the squash becomes really soft and can easily be pierced with the tip of a sharp knife. Check from time to time—water should eventually completely evaporate allowing the squash to caramelize but not burn. Add a little more water if squash begins to appear dry.
5.   Cider Cream: Boil 1/2 cup cider in heavy small saucepan until reduced to 1/4 cup, about 5 minutes.  Cool. 
6.   Place 2/3 cup sour cream in small bowl and whisk in reduced cider. Refrigerate until ready to use. 
7.   SoupWhile the squash is cooling, heat 2 to 3 tablespoons+ olive oil in a medium to large saucepan and then add the 1 small finely chopped onion, 1 finely chopped garlic clove, 1/2 tsp. salt, 1/4 tsp. white pepper, 1/8 tsp. cardamom and 1/8 tsp. nutmeg; cook until fragrant and slightly caramelized, about 3 to 4 minutes. 
8.   Add several sprigs fresh thyme and 3 cups broth and bring to a quick boil; reduce heat and simmer about 20 minutes, adding more stock if needed. Remove from heat and set aside. Remove thyme sprigs.
9.   With a large spoon, scoop the flesh out of the squash and measure out 4 cups. Add to seasoned broth.
10. Working in batches, process squash-broth mixture in food processor or heavy-duty blender until really smooth and velvety, about 2 to 3 minutes.
11. Return soup mixture to saucepan and bring to simmer. Stir in 1/2 cup heavy whipping cream. 
12. Add soup to serving bowls and garnish with a dollop of Cider Cream and a sprig of thyme or thyme leaves.

Vegan Alternative:  Use vegetable broth and substitute coconut milk for cream or omit cream altogether. 

MAKE AHEAD OPTION: Butternut squash may be roasted ahead; scoop out squash and freeze in 4 cups bags. Prepare soup through step #11 a few days ahead; refrigerate and then heat up and add cream to serve. Cider Cream may be made a couple of days in advance

Truffle Oil Mashed Potatoes

We first tasted Truffle Oil Mashed Potatoes at The Culinary Center of Kansas City. Their executive chef was preparing a catered meal while we were there prepping for a cooking class. She offered us a bite and we sold on adding a drizzle of truffle oil to Barry's already delicious mashed potatoes that are filled with sour cream, and butter and seasoned with white pepper and paprika.

We made a trip to The Tasteful Olive, right down the street from the Culinary Center, and purchased a bottle of truffle oil. It is expensive but a little goes a long way!

Truffle Oil Mashed Potatoes     Serves 6
2 1/2 lbs. russet potatoes, peeled & chunked
About 1/4 to 1/2 cup sour cream
1/2 stick+ butter
Salt and white pepper to taste
Drizzle of truffle oil
Paprika & pats of butter for garnish 
  1. Add potatoes to salted water; turn heat on and bring to a boil, reduce heat and simmer until potatoes are tender.
  2. Drain potatoes, saving a little of the potato water to use as needed to adjust consistency of potatoes.
  3. Mash potatoes. Stir in sour cream and butter, adding potatoes water if needed.
  4. Season with salt and white pepper to taste.
  5. Drizzle with truffle oil. To serve: Sprinkle with paprika and top with pats of butter.
Make Ahead: Prepare and add to a slow cooker sprayed with pan release. Keep warm on LOW for a couple of hours.

Salt Free Seasoning “Salt”

My mom's on a restricted salt diet so here's a homemade salt-free seasoning I mixed up for her using the spices we had on hand (we have lots). Most all typical spices used in the salt-free seasoning recipes I checked out. However I added turmeric and curry powder since these are "healthy" spices we like to add while we are cooking.

Salt-free Seasoning “Salt”
1 tablespoons lemon pepper (salt free version or use a blend of black pepper & dried lemon peel)
1 tablespoon Italian seasoning
1 tablespoon garlic powder
1 tablespoon onion powder
1 tablespoon white pepper
1 tablespoon dry mustard
1 tablespoon paprika
1 tablespoon ground celery seed (grind celery seeds in a spice grinder)       
1 teaspoon turmeric  & 1 teaspoon curry powder                                                                                                                                                                                                                        
  1. Put lemon pepper and Italian seasoning in a spice grinder or NutraBullet and grind to make a powder. (All the remaining spices are already in powder form).
  2. Combine all ingredients.

  3. Store in an air-tight container.
Recipe without photos . . .
Salt-free Seasoning “Salt”
1 tablespoons lemon pepper  (salt free version or use a blend of black pepper & dried lemon peel)
1 tablespoon Italian seasoning
1 tablespoon garlic powder
1 tablespoon onion powder
1 tablespoon white pepper
1 tablespoon dry mustard
1 tablespoon paprika
1 tablespoon ground celery seed (grind celery seeds in a spice grinder)       
1 teaspoon turmeric & 1 teaspoon curry powder                                                                                                             
  1. Put lemon pepper and Italian seasoning in a spice grinder or NutraBullet and grind to make a powder. (All the remaining spices are already in powder form).
  2. Combine all ingredients.
  3. Store in an air-tight container.

Easter Peppernut Buns

Although these is not what I typically think of when thinking of peppernuts, recipes like this one were brought by German Mennonites who immigrated from Russia  to the U.S. in the 1870s. Having read several of Norma Jost Voth's books on Russian Mennonites cookery, I was also aware that peppernuts were not just confined to Christmas. Mrs. Voth relates stories of eating peppernuts and drinking fresh squeezed lemonade during the summer. And, then I discovered that with a little frosting and some sprinkles, you could turn the yeast peppernuts into Easter buns.
I used a recipe from Mrs. Voth (“Peppernuts, Plain and Fancy," 1978, pp. 67 & 69) and just added sprinkles.

Easter Peppernut Buns    Makes about 60 buns
2 tablespoon dry active yeast
½ cup warm water (about 110-115° F.)
2 tablespoons granulated sugar
2/3 cup shortening (Crisco)
¾ cup granulated sugar
½ cup molasses
2 large eggs
2 cups warm milk (about 110-115° F.)
1 teaspoon salt
1 tablespoon ground cinnamon
1 teaspoon ground cardamom
¾ teaspoon white pepper
7 to 8 cups unbleached or bread flour

1.  In a small bowl, dissolve yeast in warm water and 2 tablespoons sugar; let proof until bubbly.

2.  Cream shortening ¾ cup sugar and molasses.

3.  Beat in eggs.

4.  Add warm milk, spices, proofed yeast and half the flour; beat 5 minutes with electric mixer.

5.  Gradually add enough of the remaining flour to create a smooth dough that leaves side of bowl.

6.  Turn out onto floured board (or add dough hook to electric mixer) and knead until smooth and elastic (5 to 10 minutes), adding more flour if dough becomes sticky. (Avoid too much flour so you will not have dry dough!)

7.  Place in a greased bowl and turn dough to cover all surfaces.

8.  Cover with a kitchen towel (or plastic wrap) and let rise until doubled in bulk (about an hour). Note: To test for double in size . . . press the tips of two fingers lightly and quickly ½” into the dough; if the dent stays, it is double.

9.  Punch dough down and let rise again. (The long rising time yields a fluffy bun.)

10. Turn onto floured board and knead lightly.
11. Pinch or cut off 2” pieces of dough (1 ½ oz. each), making balls between palms of hands.

12. Place close together on greased (or sprayed) baking sheet(s) so they rise high; spray tops of rolls lightly with pan spray.

13. Cover and let rise until almost doubled in size (up to an hour).

14. Bake in a preheated 350° F. oven for 25 to 30 minutes or until golden brown. Another indication of doneness: remove a roll and tap the bottom — it should have a hollow sound.

15. Cool slightly on rack and then frost with  powdered sugar icing and decorate with sprinkles.

Powdered Sugar Icing: Combine 2 cups sifted powdered sugar, 1 teaspoon milk, 1 tablespoon softened butter, ½  teaspoon vanilla or other flavoring of choice. Adjust amounts until desired consistency is achieved,     
The buns are ready and the table is set.

Recipe without photos . . .
Easter Peppernut Buns    Makes about 60 buns
2 tablespoon dry active yeast
½ cup warm water (about 110-115° F.)
2 tablespoons granulated sugar
2/3 cup shortening (Crisco)
¾ cup granulated sugar
½ cup molasses
2 large eggs
2 cups warm milk (about 110-115° F.)
1 teaspoon salt
1 tablespoon ground cinnamon
1 teaspoon ground cardamom
¾ teaspoon white pepper
7 to 8 cups unbleached or bread flour

1.  In a small bowl, dissolve yeast in warm water and 2 tablespoons sugar; let proof until bubbly.
2.  Cream shortening ¾ cup sugar and molasses.
3.  Beat in eggs.
4.  Add warm milk, spices, proofed yeast and half the flour; beat 5 minutes with electric mixer.
5.  Gradually add enough of the remaining flour to create a smooth dough that leaves side of bowl. 
6.  Turn out onto floured board (or add dough hook to electric mixer) and knead until smooth and elastic (5 to 10 minutes), adding more flour if dough becomes sticky. (Avoid too much flour so you will not have dry dough!)
7.  Place in a greased bowl and turn dough to cover all surfaces.
8.  Cover with a kitchen towel (or plastic wrap) and let rise until doubled in bulk (about an hour). Note: To test for double in size . . . press the tips of two fingers lightly and quickly ½” into the dough; if the dent stays, it is double.
9.  Punch dough down and let rise again. (The long rising time yields a fluffy bun.)
10. Turn onto floured board and knead lightly. 
11. Pinch or cut off 2” pieces of dough (1 ½ oz. each), making balls between palms of hands. 
12. Place close together on greased (or sprayed) baking sheet(s) so they rise high; spray tops of rolls lightly with pan spray.
13. Cover and let rise until almost doubled in size (up to an hour).
14. Bake in a preheated 350° F. oven for 25 to 30 minutes or until golden brown. Another indication of doneness: remove a roll and tap the bottom — it should have a hollow sound.
15. Cool slightly on rack and then frost with  powdered sugar icing and decorate with sprinkles.

Powdered Sugar Icing: Combine 2 cups sifted powdered sugar, 1 teaspoon milk, 1 tablespoon softened butter, ½  teaspoon vanilla or other flavoring of choice. Adjust amounts until desired consistency is achieved,   

Potato-Turnip Mash


As fall approaches, we like to combine potatoes with turnips to create a homey side dish with a kick!


Potato-Turnip Mash     4+ servings
4 white potatoes, peeled & diced
2 turnips, peeled & diced
¼+ cup milk
3 to 4 tablespoons butter
¼+ cup sour cream
1 teaspoon+ white pepper
Kosher salt to taste
  1. In a medium saucepan, bring turnips, potatoes to a boil in salted water over high; cook until vegetables are tender when pierced with a knife, about 20 minutes.
  2. Drain, and return vegetables to pan.
  3. Add milk, butter and sour cream; mash until mostly smooth.
  4. Season to taste with salt and pepper.

We served our Potato-Turnip Mash with Country Fried Steak, Cream Gravy,
Zucchini & Corn + sliced tomatoes.