Brian Hart Hoffman, a spokesman for Red Star Yeast, demonstrated how to make Milk Bread at the 2019 National Festival of Breads in Manhattan KS. The bread incorporates a Japanese “tangzhong” — a technique that creates a milk-flour paste. (Briann Hart Hoffman's website: Bake From Scratch.)
Milk bread is a soft white bread but despite its softness, it does have body and an interesting, somewhat dense texture. The taste is incredible and I am definitely a fan. Brian also used the dough to create sweet rolls and said it make delicious dinner rolls and the cinnamon rolls stay soft for several days..
Barry used part of the loaf to make fantastic French toast. So good!
This Japanese technique cooks a small percentage of the flour and liquid (water or milk) in a yeast recipe very briefly before combining the resulting thick slurry with the remaining ingredients.
How does this technique affect yeast dough? It pre-gelatinizes the starches in the flour, meaning they can absorb more water. In fact, flour will absorb twice as much hot water or milk as it does the cool/lukewarm water or milk you’d usually use in yeast dough.
Not only does the starch in the flour absorb more liquid; since heating the starch with water creates structure, it’s able to hold onto that extra liquid throughout the kneading, baking, and cooling processes. Which in turn means:
• Since there’s less free (unabsorbed) water in the dough, it’s less sticky and easier to knead;
• The bread or rolls may rise higher, due to more water creating more internal steam (which makes bread rise in the oven — along with the carbon dioxide given off by the yeast);
• Having retained more water during baking, bread and rolls will be moister, and will stay soft and fresh longer.
I made the recipe exactly like the handout provided by Red Star Yeast (recipe with ingredients is on their website) except that in step 1, the recipe says to cook the tangzhong until it registers 149°F (65°C) on an instant-read thermometer—the milk-flour turned into a thick paste long before it reached that temp so I took it off the heat, cooled it and proceeded with the recipe. This is a Red Star recipe in partnership with Genie Prado.
Milk Bread Makes 1 9x5-inch loaf
1. Tangzhong: In a small saucepan, whisk together milk and flour. Cook over medium-low heat, whisking constantly, until mixture thickens and whisk leaves lines on bottom of saucepan. Transfer to a small bowl, and let cool to room temperature before using.
 |
| After a few minutes of cooking, the Tangzhong should look like this. |
2. In a mixing bowl, stir together flour, sugar, yeast, and salt by hand. Add Tangzhong.
3. In another smaller bowl, lightly whisk together warm milk, melted butter, and 1 egg.
4. Then, add milk mixture to flour mixture; beat at low speed (using a stand mixer with the flat blade attachment) until a soft dough forms, about 3 minutes. Scrape sides of bowl, and switch to the dough hook attachment. Beat at low speed for 3 minutes. Increase mixer speed to medium-low, and beat for about 8 minutes.
 |
Above: After 3 minutes using dough hook, the dough is still sticky.
Below: After 8 additional minutes, without added flour, the dough is cohesive and ready to form into a ball. |
5. Lightly oil a large bowl. Shape dough into a smooth ball, and place in bowl, turning to grease top. 6. Cover and let rise in a warm, draft-free place until doubled in size, about 1 hour.
7. Spray a 9x5-inch loaf pan with pan release.
8. Punch down dough, and turn out onto a lightly floured surface. Divide dough into 3 equal portions . Shape each portion into a ball. Roll each ball into a 12x5-inch oval. With one oval horizontally in front, fold right third over middle third. Fold left side over middle. Using a rolling pin, flatten dough, and reroll into a 12x5-inch oval. Starting with one short side, roll up dough, jelly roll style, into a tube-like shape. Place seam side down in the center of the prepared pan. Repeat with remaining two portions of dough and place in the pan on either side of the first tube. Cover and let rise in a warm, draft-free place until puffed and dough fills pan, 30 to 45 minutes.
 |
| Weigh the dough for equal sized balls. |
 |
| Roll each ball into a 12x5-inch oval. |
 |
| Fold right third over middle third. |
 |
| Fold left side over middle. |
 |
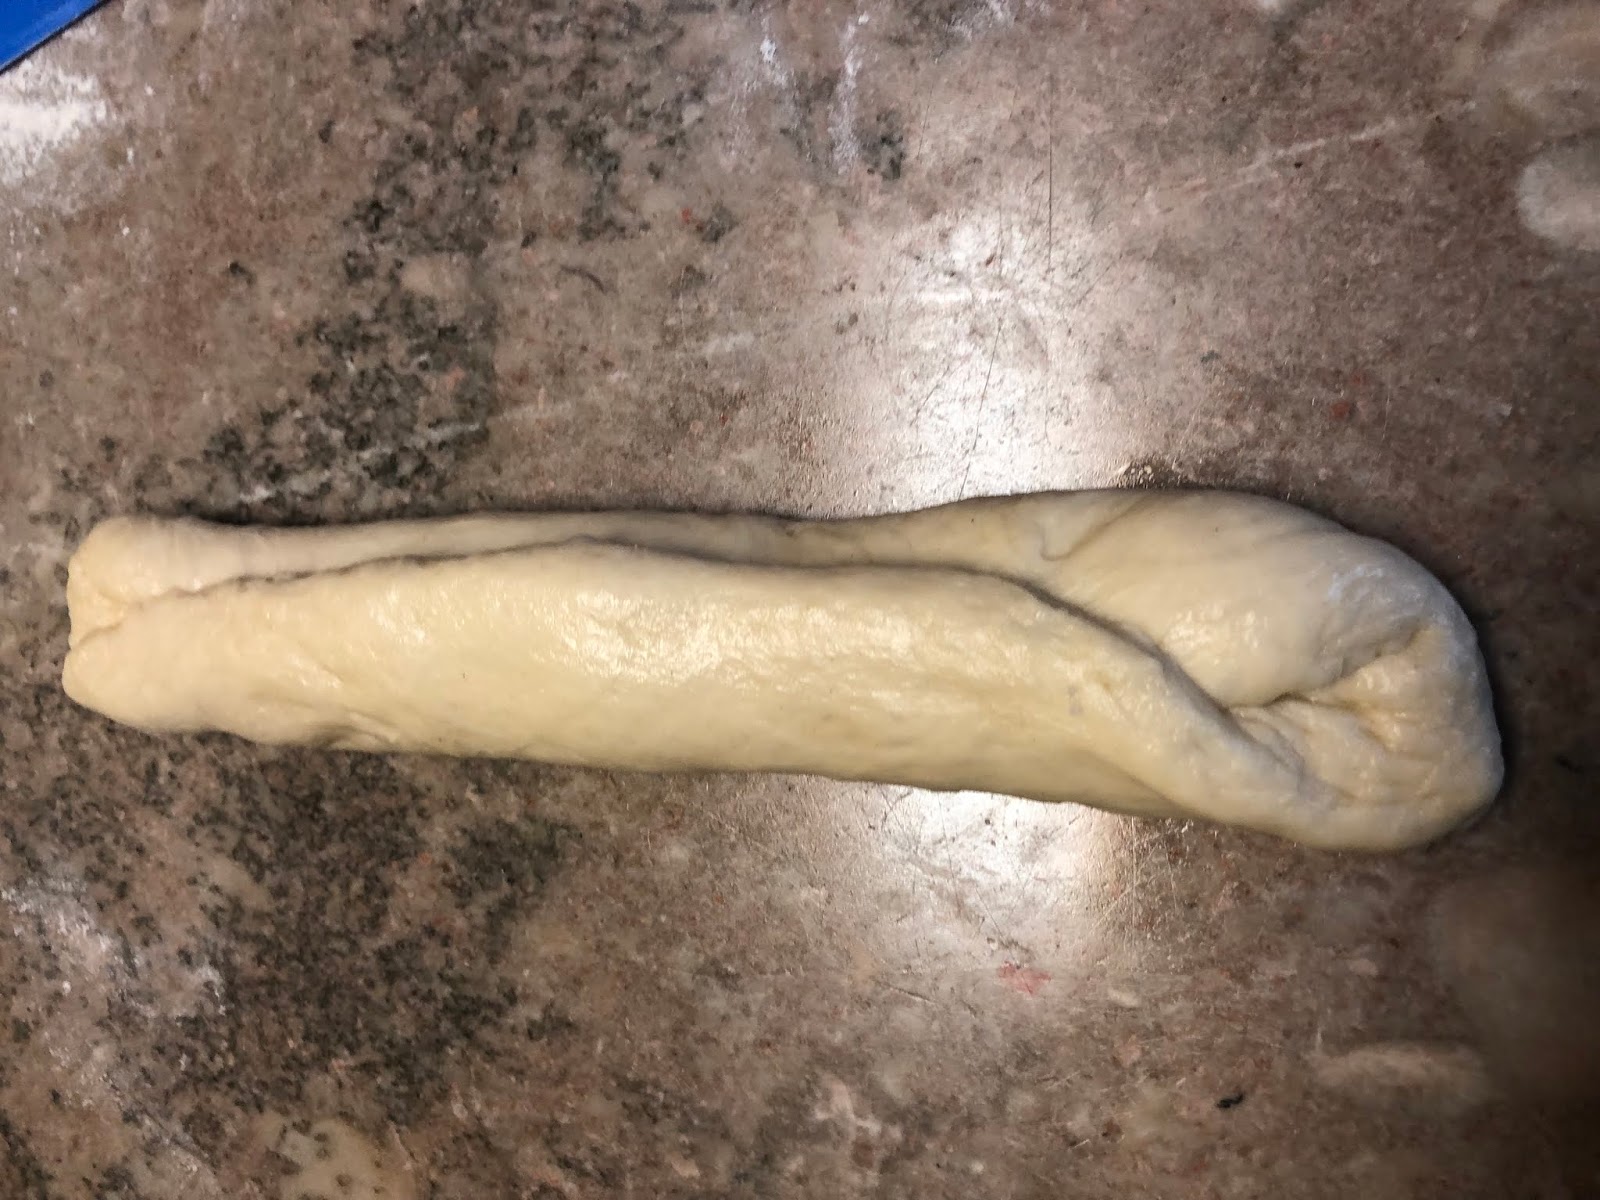
| Using a rolling pin, flatten dough, and reroll into a 12x5-inch oval. Starting with one short side, roll up dough, jelly roll style, into a tube-like shape. Place seam side down in the center of the prepared pan. |
 |
| Place seam side down in the center of the prepared pan. |
 |
| Repeat with remaining two portions of dough and place in the pan on either side of the first tube. |
9. Preheat oven to 350°F.
10. In a small bowl, whisk together milk and remaining 1 egg . Brush top of loaf with egg wash.
11. Bake until golden brown and an instant-read thermometer inserted in center registers 190°F., about 30 minutes, covering with foil during last 10 minutes of baking to prevent excess browning. Let cool in pan for 15 minutes. Remove from pan, and let cool completely on a wire rack.