Roasted Cherry Tomatoes with garlic & rosemary

A tasty way to use a batch of the cherry tomatoes from our garden. 


Roasted Cherry Tomatoes with garlic & rosemary

About 10 ounces cherry tomatoes, halved or leave small ones whole

3 garlic cloves, minced

1 or 2 sprigs fresh rosemary

1 to 2 tablespoons olive oil

1/2 to 1 teaspoon kosher salt

1 teaspoons fresh cracked black pepper

1 teaspoons fresh cracked black pepper

  1. Preheat oven to 375°F.
  2. Arrange tomatoes, garlic and rosemary on baking sheet. Drizzle with olive oil, stir and spread out  tomatoes in an even layer on tray. Season with salt and pepper. 
  3. Bake for about 20 minutes or until tomatoes are soft and start to caramelize.
Recipe without photos . . . Roasted Cherry Tomatoes with garlic & rosemary

About 10 ounces cherry tomatoes, halved or leave small ones whole

3 garlic cloves, minced

1 or 2 sprigs fresh rosemary

1 to 2 tablespoons olive oil

1/2 to 1 teaspoon kosher salt

1 teaspoons fresh cracked black pepper

  1. Preheat oven to 375°F.
  2. Arrange tomatoes, garlic and rosemary on baking sheet. Drizzle with olive oil, stir and spread out  tomatoes in an even layer on tray. Season with salt and pepper. 
  3. Bake for about 20 minutes or until tomatoes are soft and start to caramelize.

Apple-Walnut Milk Bread Babka . . . experimenting with a new technique

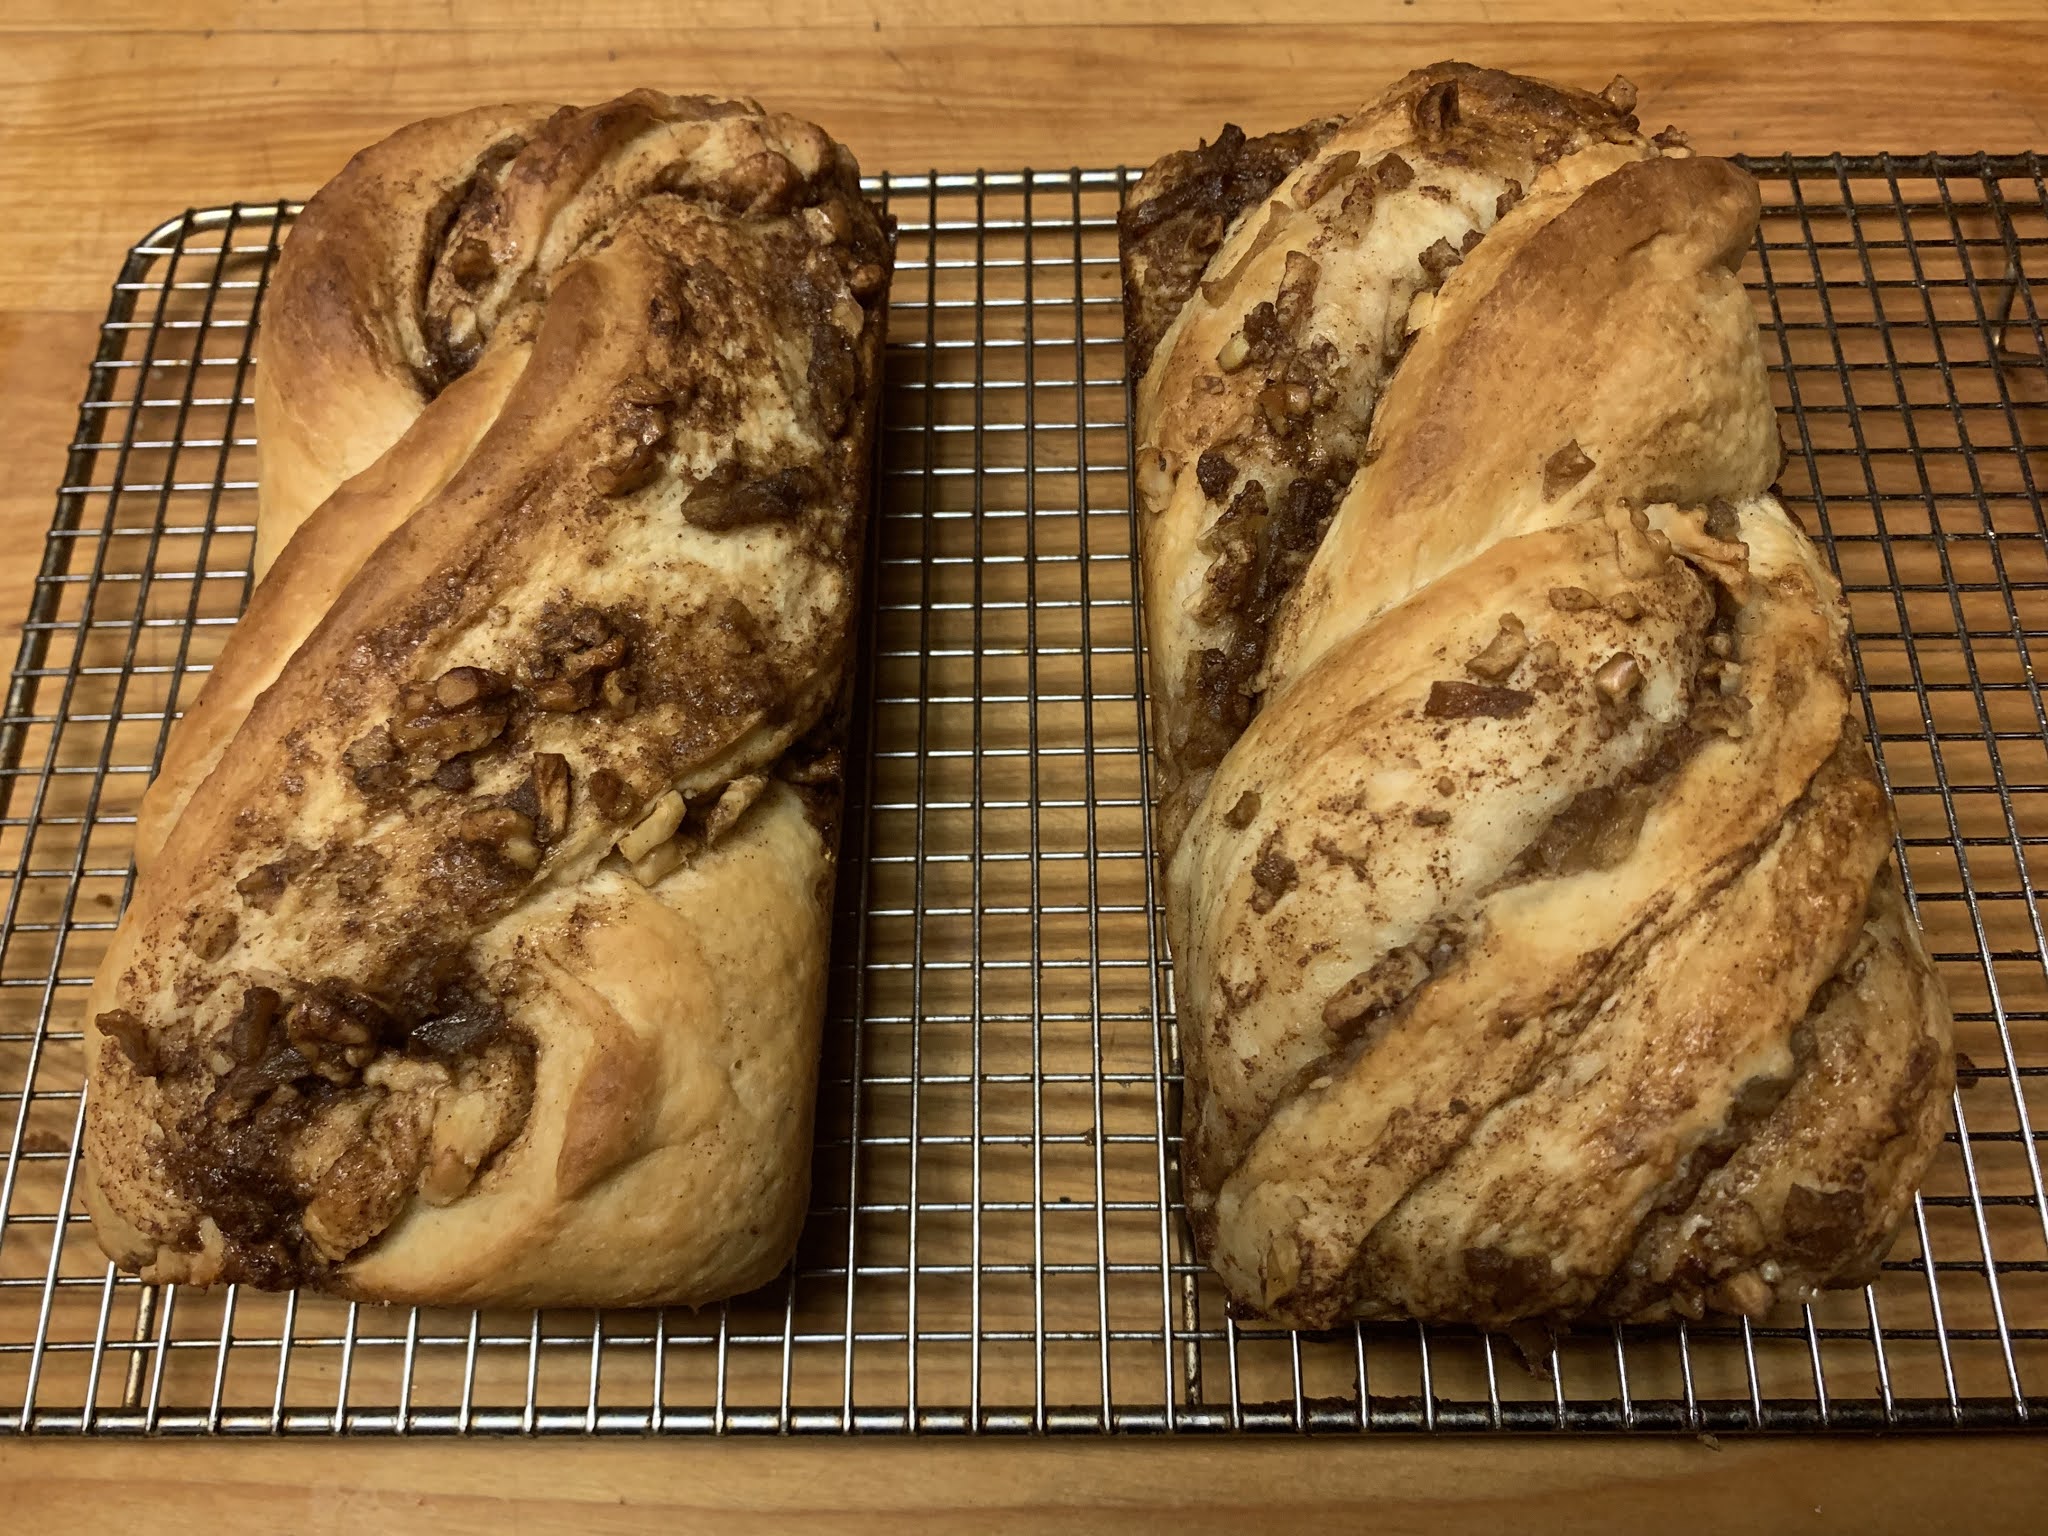
Babka recipes abound and are quite popular now. Many are filled with chocolate or a cinnamon sugar mixture. One for Pecan Pie Babka caught my eye and I’ve saved it for future use. However, I wanted to fill today’s fall version with apples and walnuts. I also wanted to use the Milk Bread Honey Bun dough for the base as they dough is so tender and retains it’s freshness once it is baked. This is what I came up with . . .     


Apple-Walnut Milk Bread Babka  Makes 2 loaves

INGREDIENTS

One recipe of Milk Bread Honey Buns dough (risen and cooled in refrigerator) -- note that it can be made and refrigerated overnight if desired

Filling:

2 cups peeled, cored and finely diced fresh apples 

1/3 cup packed brown sugar

1 teaspoon all-purpose flour

2 to 3 teaspoons ground cinnamon 

4 tablespoons softened butter

1/2 cup chopped walnuts


DIRECTIONS            

Filling:             

  1. Place cut apples in a microwave safe bowl, and microwave on HIGH for 2 minutes to partially cook apples. Drain off any liquid that comes off the apples. Set warm apples aside or in refrigerator and allow to cool to room temperature.
  2. Combine 1/3 cup brown sugar, 1 teaspoon flour, and 2 to 3 teaspoons cinnamon in a small bowl. Set aside. 

Assemble the Babka:

  1. Use parchment to line two 8 ½ x 5-inch loaf pans so that the paper drapes over the sides of the pan (this prevents the sticky filling from adhering to the pan & makes it easier to lift out the loaf ). . Spray with pan release Set aside.
  2. Remove the dough from the refrigerator. Roll it out to a 13x18-inch rectangle.
  3. Spread 4 tablespoons butter evenly over dough.
  4. Sprinkle dough with cinnamon sugar & flour mixture. Sprinkle with chopped wanuts and then add apples evenly over dough.

  5. Starting from the long side, roll the dough up tightly, as if making a jelly roll, then turn the roll seam-side down on the sheet pan. (I rolled dough on a silicon sheet and then transferred to a sheet pan.) Cover with plastic wrap and refrigerate for 20 minutes to make dough easier to handle.
  6. When the roll has chilled, first cut it in half crosswise, so you have two equal rolls. 
  7. Then cut each roll lengthwise down the center, exposing the layers of filling. 
  8. For each roll, twist the two halves around each other, keeping the cut sides facing up as much as possible. Note: This is a new technique I tried for the first time. I overlapped the halves at one end and began to twist. However, I later found another recipe that suggests placing one half on top of the other to form an X; start braiding the babka from the middle up and then from the middle down. See Pies & Tacos blog for a visual. Think I’ll try this next time and see if I can get more consistent results.  
  9. Tuck the loaves into the prepared pans, cover with plastic wrap and let rise until doubled in size, 45 minutes to an hour.
  10. About 15 minutes before baking, preheat oven to 350°F and set a rack to the middle position. 
  11. Bake until nicely browned and cooked through, 45 to 50 minutes. 
  12. Transfer the pans to a wire rack to cool, then remove the loaves by lifting the parchment paper. 

  13. To Freeze: Place loaves in freezer bags, squeezing out excess air, and freeze for up to a month. Or, wrap in foil.

Not that you need it but if you want to make this bread even more decedent, drizzle it with . . .

Maple Glaze:

1 cups powdered sugar

2 tablespoons butter, melted

2 tablespoons whole milk

1 tablespoon pure maple syrup


Combine all glaze ingredients with a whisk in a medium sized  bowl until smooth and pourable. 

Drizzle on warm bread.


Origin of Babka? This is what I found at Wikipedia:

Babka developed in the Jewish community in Poland in the early 19th century. Extra challah dough was rolled up with fruit jam or cinnamon and baked as a loaf alongside the challah. Chocolate was not originally used, as it was not generally available; the chocolate babka was likely a mid-20th century American development. It's name (though not necessarily the dish itself) may be related to a type of Easter Cake popular in Poland and western Ukraine known as baba or the diminutive babka, which means "grandmother" in Polish, related to the Yiddish bubbe.

Babka was mostly unheard of outside of the Polish Jewish community until the latter part of the 20th century. European-style bakeries started to offer it in late 1950s Israel and in the US. In addition to chocolate, various fillings including poppy seeds, almond paste, cheese, and others became popular, and some bakers began to top it with streusel.  

Babka can be baked in a loaf pan, a round Bundt pan or on a baking pan arranged in a free-form wreath shape. 


Recipe without photos . . .

Apple-Walnut Milk Bread Babka  Makes 2 loaves

INGREDIENTS

One recipe of Milk Bread Honey Buns dough (risen and cooled in refrigerator) -- note that it can be made and refrigerated overnight if desired

Filling:

2 cups peeled, cored and finely diced fresh apples 

1/3 cup packed brown sugar

1 teaspoon all-purpose flour

2 to 3 teaspoons ground cinnamon 

4 tablespoons softened butter

1/2 cup chopped walnuts


DIRECTIONS            

Filling:             

  1. Place cut apples in a microwave safe bowl, and microwave on HIGH for 2 minutes to partially cook apples. Drain off any liquid that comes off the apples. Set warm apples aside or in refrigerator and allow to cool to room temperature.
  2. Combine 1/3 cup brown sugar, 1 teaspoon flour, and 2 to 3 teaspoons cinnamon in a small bowl. Set aside. 

Assemble the Babka:

  1. Use parchment to line two 8 ½ x 5-inch loaf pans so that the paper drapes over the sides of the pan (this prevents the sticky filling from adhering to the pan & makes it easier to lift out the loaf ). Spray with pan release Set aside.
  2. Remove the dough from the refrigerator. Roll it out to a 13x18-inch rectangle.
  3. Spread 4 tablespoons butter evenly over dough.
  4. Sprinkle dough with cinnamon sugar & flour mixture. Sprinkle with chopped wanuts and then add apples evenly over dough.
  5. Starting from the long side, roll the dough up tightly, as if making a jelly roll, then turn the roll seam-side down on the sheet pan. (I rolled dough on a silicon sheet and then transferred to a sheet pan.) Cover with plastic wrap and refrigerate for 20 minutes to make dough easier to handle.
  6. When the roll has chilled, first cut it in half crosswise, so you have two equal rolls. 
  7. Then cut each roll lengthwise down the center, exposing the layers of filling. 
  8. For each roll, twist the two halves around each other, keeping the cut sides facing up as much as possible. Note: This is a new technique I tried for the first time. I overlapped the halves at one end and began to twist. However, I later found another recipe that suggests placing one half on top of the other to form an X; start braiding the babka from the middle up and then from the middle down. See Pies & Tacos blog for a visual. Think I’ll try this next time and see if I can get more consistent results.  
  9. Tuck the loaves into the prepared pans, cover with plastic wrap and let rise until doubled in size, 45 minutes to an hour.
  10. About 15 minutes before baking, preheat oven to 350°F and set a rack to the middle position. 
  11. Bake until nicely browned and cooked through, 45 to 50 minutes. 
  12. Transfer the pans to a wire rack to cool, then remove the loaves by lifting the parchment paper. 
  13. To Freeze: Place loaves in freezer bags, squeezing out excess air, and freeze for up to a month. Or, wrap in foil.

Not that you need it but if you want to make this bread even more decedent, drizzle it with . . .

Maple Glaze:

1 cups powdered sugar

2 tablespoons butter, melted

2 tablespoons whole milk

1 tablespoon pure maple syrup


Combine all glaze ingredients with a whisk in a medium sized  bowl until smooth and pourable. 

Drizzle on warm bread.

Brown Sugar Baked Custard Cups

Hildebrand Dairy whole milk and farm eggs combine to create a wholesome dessert that is sweetened with brown sugar. We topped it with Half Day Honey Yogurt produced in Topeka, KS by the Half Day Creamery using Hildebrand milk. By the way, the yogurt in rich, creamy and not overly sweet – the best we’ve ever tasted! Half Day Honey Yogurt

Brown Sugar Baked Custard Cups served with Half Day Honey Yogurt & chocolate mint. 

Brown Sugar Baked Custard Cups   Yield: 6 servings

2 large eggs

1/3 cup packed brown sugar 

1’4 teaspoon salt

2 cups whole milk, scalded (heat to 150° F)

1/4 teaspoon ground nutmeg + extra for sprinkling on top

1/2 teaspoon vanilla

  1. Preheat oven to 350°F. 
  2. Beat eggs, sugar and salt to mix. Stir in scalded milk. Add vanilla.
  3. Pour into 6 custard cups. Sprinkle additional nutmeg over the top of each cup of custard.
  4. Set custard cups in a baking pan and add 1-inch of hot water.

  5. Bake 45 to 50 minutes of just until a knife inserted into the 1-inch from the edge comes out clean. (soft center sets as it cools). 
  6. Immediately remove from oven, remove custard cups from pan of water to a cooling rack.
  7. Serve cool or cold in custard cups or unmold.
Recipe without photos . . .Brown Sugar Baked Custard Cups   Yield: 6 servings

2 large eggs

1/3 cup packed brown sugar 

1’4 teaspoon salt

2 cups whole milk, scalded (heat to 150° F)

1/4 teaspoon ground nutmeg + extra for sprinkling on top

1/2 teaspoon vanilla

  1. Preheat oven to 350°F. 
  2. Beat eggs, sugar and salt to mix. Stir in scalded milk. Add vanilla.
  3. Pour into 6 custard cups. Sprinkle additional nutmeg over the top of each cup of custard.
  4. Set custard cups in a baking pan and add 1-inch of hot water.
  5. Bake 45 to 50 minutes of just until a knife inserted into the 1-inch from the edge comes out clean. (soft center sets as it cools). 
  6. Immediately remove from oven, remove custard cups from pan of water to a cooling rack.
  7. Serve cool or cold in custard cups or unmold.

Chocolate Chip Pumpkin Muffins

Last February Sandy Tronson delivered warm Chocolate Chip Pumpkin Muffins to our condo in New Braunfels, TX. Instead of saving them for breakfast, we decided to sample one and that led to polishing off the rest. They were SO good — tender and moist with just the right amount of sweetness and spice. And, we discovered that chocolate and pumpkin are fabulous flavor combos! 

Sandy, who lives in North Dakota, shared her recipe and now that pumpkin season is upon us in Kansas, I decided to give them a try using the pumpkin purée processed from our crop of volunteer Fairy Tale pumpkins.  

Recipe source: Tracy @ The Kitchen is My Playground. We agree totally with the statement that she has on her blog . . 

There's just something amazing that happens when pumpkin, 

pumpkin pie spice, and chocolate flavors collide.


Chocolate Chip Pumpkin Muffins    Yield 12 to 15 muffins

1 cup granulated sugar

1 2/3 cup all-purpose flour

1 tablespoon pumpkin pie spice (commercial or homemade

1 teaspoon baking soda

1/4 teaspoon baking powder

1/4 teaspoon salt

2 eggs

1/2 cup (1 stick) butter, melted

1 cup 100% pure pumpkin (canned or homemade purée

1 cup dark chocolate or semi-sweet chocolate chips

1/2 cup chopped pecans

  1. Combine dry ingredients in a large bowl - sugar, flour, pumpkin pie spice, baking soda, baking powder, and salt; stir with a whisk.
  2. In a smaller bowl, combine wet ingredients - eggs, melted butter, and pumpkin; whisk together. 
  3. Add wet ingredients to dry; stir until just combined. Gently stir in chocolate chips and pecans.
  4. Scoop batter into 12 greased muffin cups.
  5. Bake at 350 for 20-25 minutes until center springs back when touched. Cool in pan for about 5 minutes, then remove to a cooling rack to cool completely. 

Notes: 

Mini Muffin Alternative: Use mini muffin pans, and bake for about 15 minutes. Makes approximately 40 mini muffins.

Freezing Muffins: Place cooled muffins in freezer bags. Freeze for up to 3 months. Muffins can be thawed completely at room temperature, or heat frozen muffins in the microwave or conventional oven.

Above: Barry is enjoying coffee and muffins with Terry Bence while catching up after about 30 years. (Terry was one of Barry's former art students.)           

Below: A few of the volunteer Fairy Tale pumpkins that popped up in our garden arranged in the cart that Barry built and pulled by one of his outdoor sculptures! 


Recipe without photos . . .

Chocolate Chip Pumpkin Muffins    Yield 12 to 15 muffins

1 cup granulated sugar

1 2/3 cup all-purpose flour

1 tablespoon pumpkin pie spice (commercial or homemade

1 teaspoon baking soda

1/4 teaspoon baking powder

1/4 teaspoon salt

2 eggs

1/2 cup (1 stick) butter, melted

1 cup 100% pure pumpkin (canned or homemade purée

1 cup dark chocolate or semi-sweet chocolate chips

1/2 cup chopped pecans

  1. Combine dry ingredients in a large bowl - sugar, flour, pumpkin pie spice, baking soda, baking powder, and salt; stir with a whisk.
  2. In a smaller bowl, combine wet ingredients - eggs, melted butter, and pumpkin; whisk together. 
  3. Add wet ingredients to dry; stir until just combined. Gently stir in chocolate chips and pecans.
  4. Spoon batter into 12 greased muffin cups.
  5. Bake at 350 for 20-25 minutes until center springs back when touched. Cool in pan for about 5 minutes, then remove to a cooling rack to cool completely. 

Notes: 

Mini Muffin Alternative: Use mini muffin pans, and bake for about 15 minutes. Makes approximately 40 mini muffins.

Freezing Muffins: Place cooled muffins in freezer bags. Freeze for up to 3 months. Muffins can be thawed completely at room temperature, or heat frozen muffins in the microwave or conventional oven.

Smoked Paprika Roasted Chicken

Tried this tasty recipe the other evening. The smoked paprika blend is a nice compliment to chicken. 


Smoked Paprika Roasted Chicken       4 servings

4 chicken thighs bone-in, skinless

1tablespoon olive oil

1 to 1 1/2 tablespoons+ Paprika Spice Blend (recipe listed below)

1/2 tsp kosher salt

Chopped parsley for garnish

  1. Preheat oven to 450°F with the baking rack in the middle.
  2. Remove the skin and trim off any fat off the chicken thighs.
  3. Brush thighs with oil and sprinkle with Paprika Spice Blend and salt on both the top & underside of each thigh. Massage oii and spices into surface the chicken, adding more as needed to create an even coating 
  4. Add the chicken to a sprayed baking pan and bake, uncovered, in preheated to 450°F degrees for 30 to 45 minutes+ or until the chicken thighs are easily pierced with a fork or knife and juices run clear when pierced; an instant read thermometer insertedt into the thickest part of the meat should register 165° F.
  5. Garnish with chopped parsley if desired.

Paprika Spice Blend 

2 tablespoons smoked paprika

1 1/2 tablespoons garlic powder

1/2 tablespoon onion powder

1 1/2 tablespoon ground black pepper

1/4 to 1/2 teaspoon cayenne pepper  

1 1/2 tablespoons brown sugar 


Combine all the ingredients for the Meat Spice Blend in a small container and shake until well combined. You will use only about 1 1/2 tablespoon of this blend in the recipe Save the rest for another time. 


Fun with Mexican Layered Dip

Some call it Mexican Layered Dip, others refer to it as 7-Layer Dip or Tex-Mex Dip. This dip had it’s origins in Texas and, according to online sources, made its debut nationwide when it was published in Family Circle magazine in 1981.

I made just a typical dip (recipe included below) but cut down amounts for a smaller batch and then reorganized the layers slightly so I ended with taco-seasoned sour cream. Then the fun began --- arranging extra ingredients and additions (cherry tomatoes, jalapeno pepper slices & chives) to resemble a flower garden! 


Mexican Layered Dip    Fills an 8”x8” pan; about 12 servings

1 (16 oz.) can refried beans 

3/4 cup guacamole   

2 to 3+ tablespoons taco seasoning (homemade or commercial)

1 cup sour cream

1/2 cup chunky salsa; drain if it contains a lot of liquid

2 to 3+ tablespoons taco seasoning (homemade or commercial)

4 ounces shredded Cheddar cheese

4 ounces shredded Monterey Jack cheese

2 medium green onions, chopped

About 2 ounces sliced black olives, drained

Tortilla Chips for serving

  1. Spread the refried bean layer into the bottom of a square 8”x8” glass dish. Smooth out the layer with the back of a spoon.
  2. Spread the guacamole on top of the refried beans. Smooth with the back of the spoon
  3. Add a layer of salsa and spread evenly.
  4. Mix sour cream with taco seasoning and spread over salsa. . . or if you are making my version, add sour cream as the last layer and then decorate to resemble a garden.
  5. Sprinkle the shredded cheese, chopped green onion, and sliced black olives on top.
  6. Cover the 7 layer dip with plastic wrap and place in the refrigerator. Let the layered dip chill for at least 30 minutes, serve cold with tortilla chips. Note: Layered dip lasts 3 to 4 days in the fridge. After 24 hours layers begin to meld together but it is still tasty though it is not as attractive as it is right after assembly.  

Crunchy Oven-Fried Okra

Fried okra straight from the garden is always a summer treat for us. This crunchy  “fried” okra recipe uses a fraction of the oil that you would need when pan frying This recipe also works with frozen okra—just thaw before breading and cook as directed below.

Crunchy Oven-Fried Okra  2 to 3 generous servings

2 cups fresh-cut okra

4 tablespoons cornmeal

6 tablespoons panko breadcrumbs 

2 tablespoons seasoned flour

2 teaspoons Italian seasoning

1/2 teaspoon salt

1/2 teaspoon pepper

2 tablespoons grated Parmesan cheese

1 eggs, beaten

3 to 4 tablespoons olive oil 

Optional—Serve with Comeback Sauce

  1. Preheat the oven to 425°. 
  2. Combine the cornmeal, panko, seasoned flour, Italian seasoning, salt, pepper, and Parmesan cheese in a ziplock-style bag.
  3. In a separate bowl, gently toss the okra with the beaten egg until evenly coated.
  4. Pour oil onto a rimmed baking sheet and place in the preheated oven for just a few minutes to warm up the oil--be careful to not let it start to smoke.
  5. In the meantime, add the wet okra a little at a time to the bag and shake until coated. 
  6. Carefully add the okra to the hot baking sheet.
  7. Bake for 20 to 25 minutes, or until tender, turning the okra halfway through baking. To get a nice golden brown, increase oven heat to broil and watch carefully, stirring as needed.
  8. Serve with Comeback Sauce if desired.

Recipe without photos . . . 

Crunchy Oven-Fried Okra  2 to 3 generous servings

2 cups fresh-cut okra

4 tablespoons cornmeal

6 tablespoons panko breadcrumbs 

2 tablespoons seasoned flour

2 teaspoons Italian seasoning

1/2 teaspoon salt

1/2 teaspoon pepper

2 tablespoons grated Parmesan cheese

1 eggs, beaten

3 to 4 tablespoons olive oil 

Optional—Serve with Comeback Sauce

  1. Preheat the oven to 425°. 
  2. Combine the cornmeal, panko, seasoned flour, Italian seasoning, salt, pepper, and Parmesan cheese in a ziplock-style bag.
  3. In a separate bowl, gently toss the okra with the beaten egg until evenly coated.
  4. Pour oil onto a rimmed baking sheet and place in the preheated oven for just a few minutes to warm up the oil--be careful to not let it start to smoke.
  5. In the meantime, add the wet okra a little at a time to the bag and shake until coated. 
  6. Carefully add the okra to the hot baking sheet.
  7. Bake for 20 to 25 minutes, or until tender, turning the okra halfway through baking. To get a nice golden brown, increase oven heat to broil and watch carefully, stirring as needed.
  8. Serve with Comeback Sauce if desired.