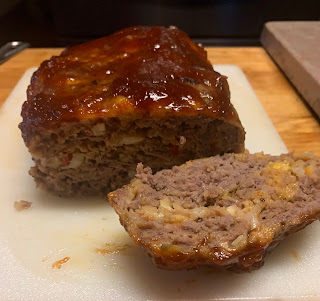
Ritzy (Cracker) Meatloaf . . . including convenience assemble ahead instructions.

Ritz (butter) crackers, along with ground beef (ours was Midwest Meats in Abilene) form the basis for this tasty meatloaf. While we love meatloaf as an entrée, we certainly look forward to tomorrow’s meatloaf sandwiches! 


Meatloaf Sandwich on a 40-Minute Everything Bagel Bun 

MAKE AHEAD INSTRUCTIONS — The other thing I really like about meatloaf . . . is that it can be made ahead. I assembled the sauce and meatloaf (steps 2-4) and placed them in the refrigerator. When ready to bake, I pulled them out and followed steps 5-7. 


Ritzy (Cracker) Meatloaf    6+ servings

Meatloaf Glaze

1/2 cup ketchup

1/4 to 1/3 cup brown sugar 

1 tablespoon yellow mustard

1 teaspoon Worcestershire sauce  

Meatloaf

1 lb. ground beef (lean 85%)

1/2 cup yellow onion, finely diced

1/4 cup red, yellow, orange or green peppers, finely dice

 2 eggs

 4 oz. (1 cup) sharp Cheddar cheese

1/4 cup whole milk

32 (1 sleeve) Ritz crackers (or any brand of butter cracke), finely crushed  

1 teaspoon each: salt, pepper & Italian seasoning

1/2 teaspoon garlic powder  

  1. Preheat oven to 350°F. (Do this later if following the make ahead instructions explained above.)
  2. In a small bowl combine the glaze ingredients, whisk untils mooth. Set aside for later.
  3. In a large mixing bowl add the ground beef, onion, green pepper, eggs, cheese, milk, crushed Ritz crackers, salt, and pepper. Using clean hands, thoroughly combine all ingredients but avoid overmixing.

  4. Place meatloaf mixture onto a baking pan lined with  parchment paper (that has been spritzed  with non-stick spray) and form it into a loaf shape.
  5. Bake at 350°F for 30 minutes, remove from the oven and apply the glaze over the top of the meatloaf.
  6. Return meatloaf to the oven and continue baking for 30 minutes or until the meatloaf is 160°F when the temperature is checked in the center of the loaf.
  7. Remove from oven and allow to rest for 10 minutes. 


Recipe without photos . . . Ritzy (Cracker) Meatloaf    6+ servings

Meatloaf Glaze

1/2 cup ketchup

1/4 to 1/3 cup brown sugar 

1 tablespoon yellow mustard

1 teaspoon Worcestershire sauce  

Meatloaf

1 lb. ground beef (lean 85%)

1/2 cup yellow onion, finely diced

1/4 cup red, yellow, orange or green peppers, finely dice

 2 eggs

 4 oz. (1 cup) sharp Cheddar cheese

1/4 cup whole milk

32 (1 sleeve) Ritz crackers (or any brand of butter cracke), finely crushed  

1 teaspoon each: salt, pepper & Italian seasoning

1/2 teaspoon garlic powder  

  1. Preheat oven to 350°F. (Do this later if following the make ahead instructions explained above.)
  2. In a small bowl combine the glaze ingredients, whisk untils mooth. Set aside for later.
  3. In a large mixing bowl add the ground beef, onion, green pepper, eggs, cheese, milk, crushed Ritz crackers, salt, and pepper. Using clean hands, thoroughly combine all ingredients but avoid overmixing.
  4. Place meatloaf mixture onto a baking pan lined with  parchment paper (that has been spritzed  with non-stick spray) and form it into a loaf shape.
  5. Bake at 350°F for 30 minutes, remove from the oven and apply the glaze over the top of the meatloaf.
  6. Return meatloaf to the oven and continue baking for 30 minutes or until the meatloaf is 160°F when the temperature is checked in the center of the loaf.
  7. Remove from oven and allow to rest for 10 minutes. 

Easy, Overnight Focaccia

A focaccia recipe that requires minimum effort, yet yields maximum results. Mix it the night before, refrigerate and then move to move it to the baking container and allow to rest fro 2 to 4 hours . . . dimple, add toppings and bake! Recipe is credited to Alexandra’s Kitchen; check out her blog for additional details, explanations, and focaccia variations. 
Above: Half  batch focaccia with rosemary & sea salt, baked in a cast iron skillet.
Below: Half batch focaccia with rosemary, chives, sea salt & olives, baked in a quarter pan.


Easy, Overnight Focaccia   Yields: two 8-10” rounds or one 9×13” focaccia

4 cups (512 g) bread flour

2 teaspoons (10 g) salt

2 teaspoons (8 g) instant yeast 

2 cups (455 g) lukewarm water water (mix ½ cup boiling water with 1 ½ cups cold water)

Olive oil for “slicking” and for pan preparation / Butter for pan preparation

Additions: Rosemary and flaky sea salt

  1. Whisk together the flour, salt, and yeast in a bowl that can be used to both mix and store the bread dough.
  2. Add the water.
  3. Use a spatula or Danish whisk to stir the two together.
  4. Lift up the dough and drizzle olive oil on the bottom. Return dough to bowl and “slick” the surface of the dough with olive oil; then cover the bowl with a sheet of plastic wrap or a plastic bowl cover..
  5. Leave it there to rise for 12 to 18 hours (or even up to 3 days). NOTE: If you do not slick the dough with enough oil, you risk the dough drying out and forming a crust over the top layer.
  6. Remove from refrigerator, and remove the cover.
  7. Deflate the dough and transfer to a prepared pan such two 9” to 10” cast iron skillet (two 8 or 9” pie plates,  or for a big batch, use a 9x13” baking pan or something similar. If you are using glass baking dishes be sure to grease the dishes with butter before pouring a tablespoon of olive oil into each. (The butter will ensure the bread doesn’t stick.) Don’t touch the dough again for 2 to 4 hours depending on your environment.
    Half of the dough that has been placed in a buttered and oiled 10" cast iron skillet. I did oil the top liberally before moving on to step #8.

  8. After two to four hours, or when the dough has expanded to fill the pan and appears to be light and airy. 
  9. Now, it’s time to dimple it! f you are using rosemary, sprinkle it over the dough. Then pour two tablespoons of olive oil over the dough. Using your fingers, press straight down into the dough to create deep dimples creating a bubbly surface. Sprinkle with flaky sea salt (such as Maldon flaky salt).
  10. Immediately transfer to oven and bake in PREHEATED 425ºF for 25 minutes or until golden all around. Remove focaccia from pans and place on cooling racks. 
    After cooling the bread on a rack, I cut it into wedges and returned it to the cast iron skillet for serving. I served it with herbed butter and/or olive oil & balsamic vinegar.

Recipe without photos . . . Easy, Overnight Focaccia   Yields: two 8-10” rounds or one 9×13” focaccia

4 cups (512 g) bread flour

2 teaspoons (10 g) salt

2 teaspoons (8 g) instant yeast 

2 cups (455 g) lukewarm water water (mix ½ cup boiling water with 1 ½ cups cold water)

Olive oil for “slicking” and for pan preparation / Butter for pan preparation

Additions: Rosemary and flaky sea salt

  1. Whisk together the flour, salt, and yeast in a bowl that can be used to both mix and store the bread dough.
  2. Add the water.
  3. Use a spatula or Danish whisk to stir the two together.
  4. Lift up the dough and drizzle olive oil on the bottom. Return dough to bowl and “slick” the surface of the dough with olive oil; then cover the bowl with a sheet of plastic wrap or a plastic bowl cover. 
  5. Leave it there to rise for 12 to 18 hours (or even up to 3 days). NOTE: If you do not slick the dough with enough oil, you risk the dough drying out and forming a crust over the top layer.
  6. Remove from refrigerator, and remove the cover.
  7. Deflate the dough and transfer to a prepared pan such two 9” to 10” cast iron skillet (two 8 or 9” pie plates,  or for a big batch, use a 9x13” baking pan or something similar. If you are using glass baking dishes be sure to grease the dishes with butter before pouring a tablespoon of olive oil into each. (The butter will ensure the bread doesn’t stick.) Don’t touch the dough again for 2 to 4 hours depending on your environment.
  8. After two to four hours, or when the dough has expanded to fill the pan and appears to be light and airy. 
  9. Now, it’s time to dimple it! f you are using rosemary, sprinkle it over the dough. Then pour two tablespoons of olive oil over the dough. Using your fingers, press straight down into the dough to create deep dimples creating a bubbly surface. Sprinkle with flaky sea salt (such as Maldon flaky salt).
  10. Immediately transfer to oven and bake in PREHEATED 425ºF for 25 minutes or until golden all around. Remove focaccia from pans and place on cooling racks. 

Lemon Loaf Cake

Moist and tender, this cake is packed with tangy, citrus flavors. It’s is idea for a small group gathering — we served it as a birthday cake but it would be great for breakfast, too. 


Lemon Loaf Cake   Servings: 8 to 10 slices

Cake:

1 1/2 cups all-purpose flour

1 1/2 teaspoons baking powder

1 tablespoon lemon zest

1/2 teaspoon salt

1/2 cup (1 stick) butter @ room temperature 

1 cup granulated sugar

2 large eggs, room temperature

2 tablespoons fresh squeezed lemon juice (about 1/2 lemon)

1/2 cup buttermilk (or use regular milk that has been soured with about 1 1/2 teaspoons lemon juice – the juice will cause the milk to curdle)

Lemon Syrup:

1/4 cup lemon juice (about 1 lemon)

1/4 cup powdered sugar

Lemon Icing:

1 1/2 cups powdered sugar, sifted 

1 1/2 tablespoons fresh squeezed lemon juice 

1 tablespoon milk (more or less as need to achieve desired consistency. 

  1. Preheat oven to 350°F. Grease a 9x5-inch (or 8x4-inch) loaf pan. I also lined the pan with an overlapping sheet of parchment paper for easy removal of the cake. 
  2. In a medium bowl combine the flour, baking powder, lemon zest, and salt. Set aside.
  3. In the bowl of a stand mixer fitted with the paddle attachment (or using an electric mixer), cream the butter and sugar together at medium-high speed until pale and fluffy, about 4 to 6 minutes. Scrape the sides of the bowl as needed.
  4. With the mixer running on low-speed, add the eggs one at a time, then beat in the lemon juice. Beat on medium-high speed until combined.
  5. With the mixer on low, add about 1/3 of the flour mixture and mix until almost combined, then add half the buttermilk and mix until just combined. Repeat with another third of flour mixture and then the last half of the buttermilk, ending with the last third of the flour. Beat until just incorporated.
  6. Scrape the batter into the prepared loaf pan and bake for 45 to 55 minutes until the cake is golden brown and a toothpick comes out mostly clean with only a couple moist crumbs. 
  7. Let the cake cool for about 15 minutes in the pan. Stir together the lemon juice and powdered sugar for the lemon syrup.
  8.  Carefully invert the loaf pan, and transfer the cake to a cooling rack, then brush the syrup on the cake while it’s still warm. Allow cake to cool completely.
    Above: Cake right after it was removed from oven.
    Below: Cake after the upturned bottom and sides has been brushed with lemon syrup. 
  9. When the cake is cooled, combine all the icing ingredients, start with 1 tablespoon lemon juice and milk and add the remaining lemon juice and extra milk as needed. The icing should be thick and not runny. 
  10. Pour icing over cake, allowing it to drip down the sides and ends.  
  11. Let dry before serving. 
  12. Garnish and decorate if desired. I used  fresh berries (I used blueberries and strawberries), toasted almonds, a lemon twist and fresh mint leaves. 

Recipe without photos . . . Lemon Loaf Cake   Servings: 8 to 10 slices

Cake:

1 1/2 cups all-purpose flour

1 1/2 teaspoons baking powder

1 tablespoon lemon zest

1/2 teaspoon salt

1/2 cup (1 stick) butter @ room temperature 

1 cup granulated sugar

2 large eggs, room temperature

2 tablespoons fresh squeezed lemon juice (about 1/2 lemon)

1/2 cup buttermilk (or use regular milk that has been soured with about 1 1/2 teaspoons lemon juice – the juice will cause the milk to curdle)

Lemon Syrup:

1/4 cup lemon juice (about 1 lemon)

1/4 cup powdered sugar

Lemon Icing:

1 1/2 cups powdered sugar, sifted 

1 1/2 tablespoons fresh squeezed lemon juice 

1 tablespoon milk (more or less as need to achieve desired consistency. 

  1. Preheat oven to 350°F. Grease a 9x5-inch (or 8x4-inch) loaf pan. I also lined the pan with an overlapping sheet of parchment paper for easy removal of the cake. 
  2. In a medium bowl combine the flour, baking powder, lemon zest, and salt. Set aside.
  3. In the bowl of a stand mixer fitted with the paddle attachment (or using an electric mixer), cream the butter and sugar together at medium-high speed until pale and fluffy, about 4 to 6 minutes. Scrape the sides of the bowl as needed.
  4. With the mixer running on low-speed, add the eggs one at a time, then beat in the lemon juice. Beat on medium-high speed until combined.
  5. With the mixer on low, add about 1/3 of the flour mixture and mix until almost combined, then add half the buttermilk and mix until just combined. Repeat with another third of flour mixture and then the last half of the buttermilk, ending with the last third of the flour. Beat until just incorporated.
  6. Scrape the batter into the prepared loaf pan and bake for 45 to 55 minutes until the cake is golden brown and a toothpick comes out mostly clean with only a couple moist crumbs. 
  7. Let the cake cool for about 15 minutes in the pan. Stir together the lemon juice and powdered sugar for the lemon syrup. 
  8. Carefully invert the loaf pan, and transfer the cake to a cooling rack, then brush the syrup on the cake while it’s still warm. Allow cake to cool completely.
  9. When the cake is cooled, combine all the icing ingredients, start with 1 tablespoon lemon juice and milk and add the remaining lemon juice and extra milk as needed. The icing should be thick and not runny. 
  10. Pour icing over cake, allowing it to drip down the sides and ends.  
  11. Let dry before serving. 
  12. Garnish and decorate if desired. I used  fresh berries (I used blueberries and strawberries), toasted almonds, a lemon twist and fresh mint leaves. 

Quick Pickled Red Onions — Cuisine at Home style

This quick-fix version of pickled red onions, from the latest Cuisine at Home magazine (issue #159, summer 2024), add a burst of flavor to salads (greens, pasta, potato, etc.) tacos, burgers and sandwiches, and, roasted meats. Or use them as a garnish on soups. (I did cut it in half.)


Quick Pickled Red Onions — Cuisine at Home style

1/2 pound red onions, halved & thinly sliced (about 2 cups)

1/2 cup white wine vinegar

1/2 cup water 

3 tablespoons granulated sugar

2 teaspoons kosher salt

1/2 teaspoon coriander seeds

1/4 teaspoon  red pepper flakes 

1/2 teaspoon black peppercorns (my addition)

  1. Place sliced onions in medium glass, ceramic or stainless steel bowl.
  2. Combine vinegar, water and all the remaining ingredients in a small nonreactive saucepan (not aluminum), and bring to a toil over medium-high heat. Boil for 2 minutes. Remove from heat.
  3. Pour hot vinegar mixture over onion slices. Let cool to room temperature, about 30 minutes. Transfer to an air-tight container and refrigerate for up to 1 month.