Flourless Monster Cookies (gluten-free)

This is a copy-cat of cookies made locally that are one of Barry's favorites. They are packed with protein (peanut butter), oats but also their fair share of sugar and fat (butter). I divided the dough into balls and froze so we can practice portion control! 

We served the cookies with hot tea using mugs and a teapot that Barry made while he was an undergraduate at Kansas State University!

Flourless Monster Cookies (gluten-free) Makes 22 large or 44 smaller cookies

1 stick (½ cup) butter, softened

1 ⅓ cup creamy peanut butter (do not use natural peanut butter as it is too oily)

¾ cup packed light brown sugar (I have cut this down to 1/2 cup)

¾ cup granulated sugar (I have cut this down to 1/2 cup)

2 large eggs

2 teaspoons vanilla 

1 ½ teaspoon baking soda

3 cups quick-cooking oats, gluten-free

1 cup mini M&M chocolate candies

1 cup mini chocolate chips 

  1. Preheat the oven to 350°F. Line baking sheets with parchment paper that has been sprayed with pan release or use silicone baking mats. 
  2. In a large bowl cream together the softened butter, peanut butter, and both sugars. Mix on high for 2 minutes, until creamy. 
  3. Add eggs, vanilla, and baking soda. Mix well then add the oats. Mix on low until all combined. 
  4. Add M&Ms and chocolate chips. Mix on low or stir by hand.
  5. Use a large cookie scoop or trigger ice cream scoop to portion out large balls, or to make smaller cookies use a medium cookie scoop (1.5 tablespoons); place cookies about 2 inches apart on prepared baking sheets. Press down slightly with the back of the scoop. Add a few additional M&Ms, if desired, to surface of cookie.
  6. Bake large cookies  for 11 minutes, rotating pans halfway through; reduce baking time fro smaller cookies by 1 to 2 minutes. Be careful to not over bake (edges will be set and middle will be slightly underdone). 
  7. Cool on baking sheets 5 minutes before transferring to a wire rack to cool. 

To Make Ahead:

Baked Cookies - Bake and cool the cookies completely before storing. Stack in an airtight container and store at room temperature up to four days. To store longer, store in a freezer bag and freeze up to 3 months.

Unbaked Cookies - Make the monster cookie dough and portion out the cookie balls on parchment paper lined baking sheet. Flash freeze until the balls are hard to touch. Transfer the unbaked balls to freezer bag and freeze up to 3 months. Do not thaw the dough before baking, but they will have to bake for 1 to 2 minutes longer.


Recipe without photos . . . Flourless Monster Cookies (gluten-free) Makes 22 large or 44 smaller cookies

1 stuck (½ cup) butter, softened

1 ⅓ cup creamy peanut butter (do not use natural peanut butter as it is too oily)

¾ cup packed light brown sugar

¾ cup granulated sugar

2 large eggs

2 teaspoons vanilla 

1 ½ teaspoon baking soda

3 cups quick-cooking oats, gluten-free

1 cup mini M&M chocolate candies

1 cup mini chocolate chips 

  1. Preheat the oven to 350°F. Line baking sheets with parchment paper that has been sprayed with pan release or use silicone baking mats. 
  2. In a large bowl cream together the softened butter, peanut butter, and both sugars. Mix on high for 2 minutes, until creamy. 
  3. Add eggs, vanilla, and baking soda. Mix well then add the oats. Mix on low until all combined. 
  4. Add M&Ms and chocolate chips. Mix on low or stir by hand.
  5. Use a large cookie scoop or trigger ice cream scoop to portion out large balls, or to make smaller cookies use a medium cookie scoop (1.5 tablespoons); place cookies about 2 inches apart on prepared baking sheets. Press down slightly with the back of the scoop. Add a few additional M&Ms, if desired, to surface of cookie.
  6. Bake large cookies  for 11 minutes, rotating pans halfway through; reduce baking time fro smaller cookies by 1 to 2 minutes. Be careful to not over bake (edges will be set and middle will be slightly underdone). 
  7. Cool on baking sheets 5 minutes before transferring to a wire rack to cool. 

To Make Ahead:

Baked Cookies - Bake and cool the cookies completely before storing. Stack in an airtight container and store at room temperature up to four days. To store longer, store in a freezer bag and freeze up to 3 months.

Unbaked Cookies - Make the monster cookie dough and portion out the cookie balls on parchment paper lined baking sheet. Flash freeze until the balls are hard to touch. Transfer the unbaked balls to freezer bag and freeze up to 3 months. Do not thaw the dough before baking, but they will have to bake for 1 to 2 minutes longer.

Chocolate Caramel Cream-Filled Cake Roll

Happy Birthday Amira! Chocolate Caramel Cream-Filled Roll was a festive way to celebrated our great-great niece’s birthday this weekend. The light and fluffy cake, the basis for the roll, was made using a recipe that was demonstrated at a Taste of Home Cooking School held in Abilene years ago that my high school catering students helped with. That particular recipe was filled with Cool-Whip and cherry pie filling. My version uses a buttercream frosting flavored with caramel. 


Chocolate Caramel Cream-Filled Cake Log   Yield:  8  serving

Cake:

Parchment Paper

4 eggs, separated

1/2 cup granulated sugar

1 teaspoon vanilla

1/3 cup granulated sugar

1/3 ccup baking cocoa powder

1/2 cup all-purpose flour

1/4 teaspoon baking powder

1/4 cup baking soda

1/8 teaspoon salt

1/3 cup water

  1. Cake: Line a 15 1/2” x 10 1/2” jelly roll pan with parchment paper allowing paper to overhang edges for easy removeal; generously spray the parchment with pan release
  2. In a large clean mixing bowl, beat egg whites until foamy; gradually add 1/2 cup sugar, beating until stiff peaks form. Set aside.
  3. In another mixing bowl, beat egg yolks and vanilla on high speed for about 3 minutes.
  4. Gradually add 1/3 cup sugar, continue beating for 2 minutes. 
  5. Combine cocoa, flour, baking powder, baking soda and salt; add to egg yolk mixture alternately with water on low speed, beating just until batter is smooth. 
  6. Gradually fold chocolate mixture into egg whites
    Partially fold chocolate and eggs mixtures.
  7. Spread cake batter evenly in jelly roll pan.
  8. Bake at 375° for 12 to15 minutes or until the top springs back when touched lightly in center.  
  9. Using edges of parchment, lift cake from pan. 
  10. Starting at short end, fold excess parchment over cake and roll the cake; place on wire rack to cool with seam down.
  11. Let cool 10 to 15 minutes; cake should be barely warm . 
  12. To assemble cake roll: Unroll cake. Spread with Caramel Cream Filling (recipe follows). 
  13. Reroll (again from a short end) using parchment to lift and create a tight roll; remove parchment as you roll.
  14. Transfer cake to a serving tray or board, seam side down. Chill slightly to firm. Trim ends of roll if preferred to show off the swirl.
  15. Spoon warm Ganache down the cent of the roll allowing it to drip down the sides. Garnish with chopped pecans. 


Caramel Cream Filling:

1/2 cup butter, softened

1/4 cup caramel sauce (purchased or homemade)

https://cookingwithbarryandmeta.blogspot.com/2016/12/caramel-sauce-without-heavy-cream.html

2 cups powdered sugar, sifted


Combine butter and caramel sauce in mixer and blend. Add powdered sugar, a little at a time, and mix to combine. 


Topping: 

Chocolate Ganache, thinned with milk if needed 

https://cookingwithbarryandmeta.blogspot.com/2023/09/chocolate-ganache-made-with-evaporated.html

Chopped pecans


Recipe without photos . . . Chocolate Caramel Cream-Filled Cake Roll   Yield:  8  serving

Cake:

Parchment Paper

4 eggs, separated

1/2 cup granulated sugar

1 teaspoon vanilla

1/3 cup granulated sugar

1/3 ccup baking cocoa powder

1/2 cup all-purpose flour

1/4 teaspoon baking powder

1/4 cup baking soda

1/8 teaspoon salt

1/3 cup water

  1. Cake: Line a 15 1/2” x 10 1/2” jelly roll pan with parchment paper allowing paper to overhang edges for easy removeal; generously spray the parchment with pan release
  2. In a large clean mixing bowl, beat egg whites until foamy; gradually add 1/2 cup sugar, beating until stiff peaks form. Set aside.
  3. In another mixing bowl, beat egg yolks and vanilla on high speed for about 3 minutes.
  4. Gradually add 1/3 cup sugar, continue beating for 2 minutes. 
  5. Combine cocoa, flour, baking powder, baking soda and salt; add to egg yolk mixture alternately with water on low speed, beating just until batter is smooth. 
  6. Gradually fold chocolate mixture into egg whites.
  7. Spread cake batter evenly in jelly roll pan.
  8. Bake at 375° for 12 to15 minutes or until the top springs back when touched lightly in center.  
  9. Using edges of parchment, lift cake from pan. 
  10. Starting at short end, fold excess parchment over cake and roll the cake; place on wire rack to cool with seam down.
  11. Let cool 10 to 15 minutes; cake should be barely warm . 
  12. To assemble cake roll: Unroll cake. Spread with Caramel Cream Filling (recipe follows). 
  13. Reroll (again from a short end) using parchment to lift and create a tight roll; remove parchment as you roll.
  14. Transfer cake to a serving tray or board, seam side down. Chill slightly to firm. Trim ends of roll if preferred to show off the swirl.
  15. Spoon warm Ganache down the cent of the roll allowing it to drip down the sides. Garnish with chopped pecans. 

Caramel Cream Filling:

1/2 cup butter, softened

1/4 cup caramel sauce (purchased or homemade)

https://cookingwithbarryandmeta.blogspot.com/2016/12/caramel-sauce-without-heavy-cream.html

2 cups powdered sugar, sifted


Combine butter and caramel sauce in mixer and blend. Add powdered sugar, a little at a time, and mix to combine. 


Topping: 

Chocolate Ganache, thinned with milk if needed 

https://cookingwithbarryandmeta.blogspot.com/2023/09/chocolate-ganache-made-with-evaporated.html

Chopped pecans

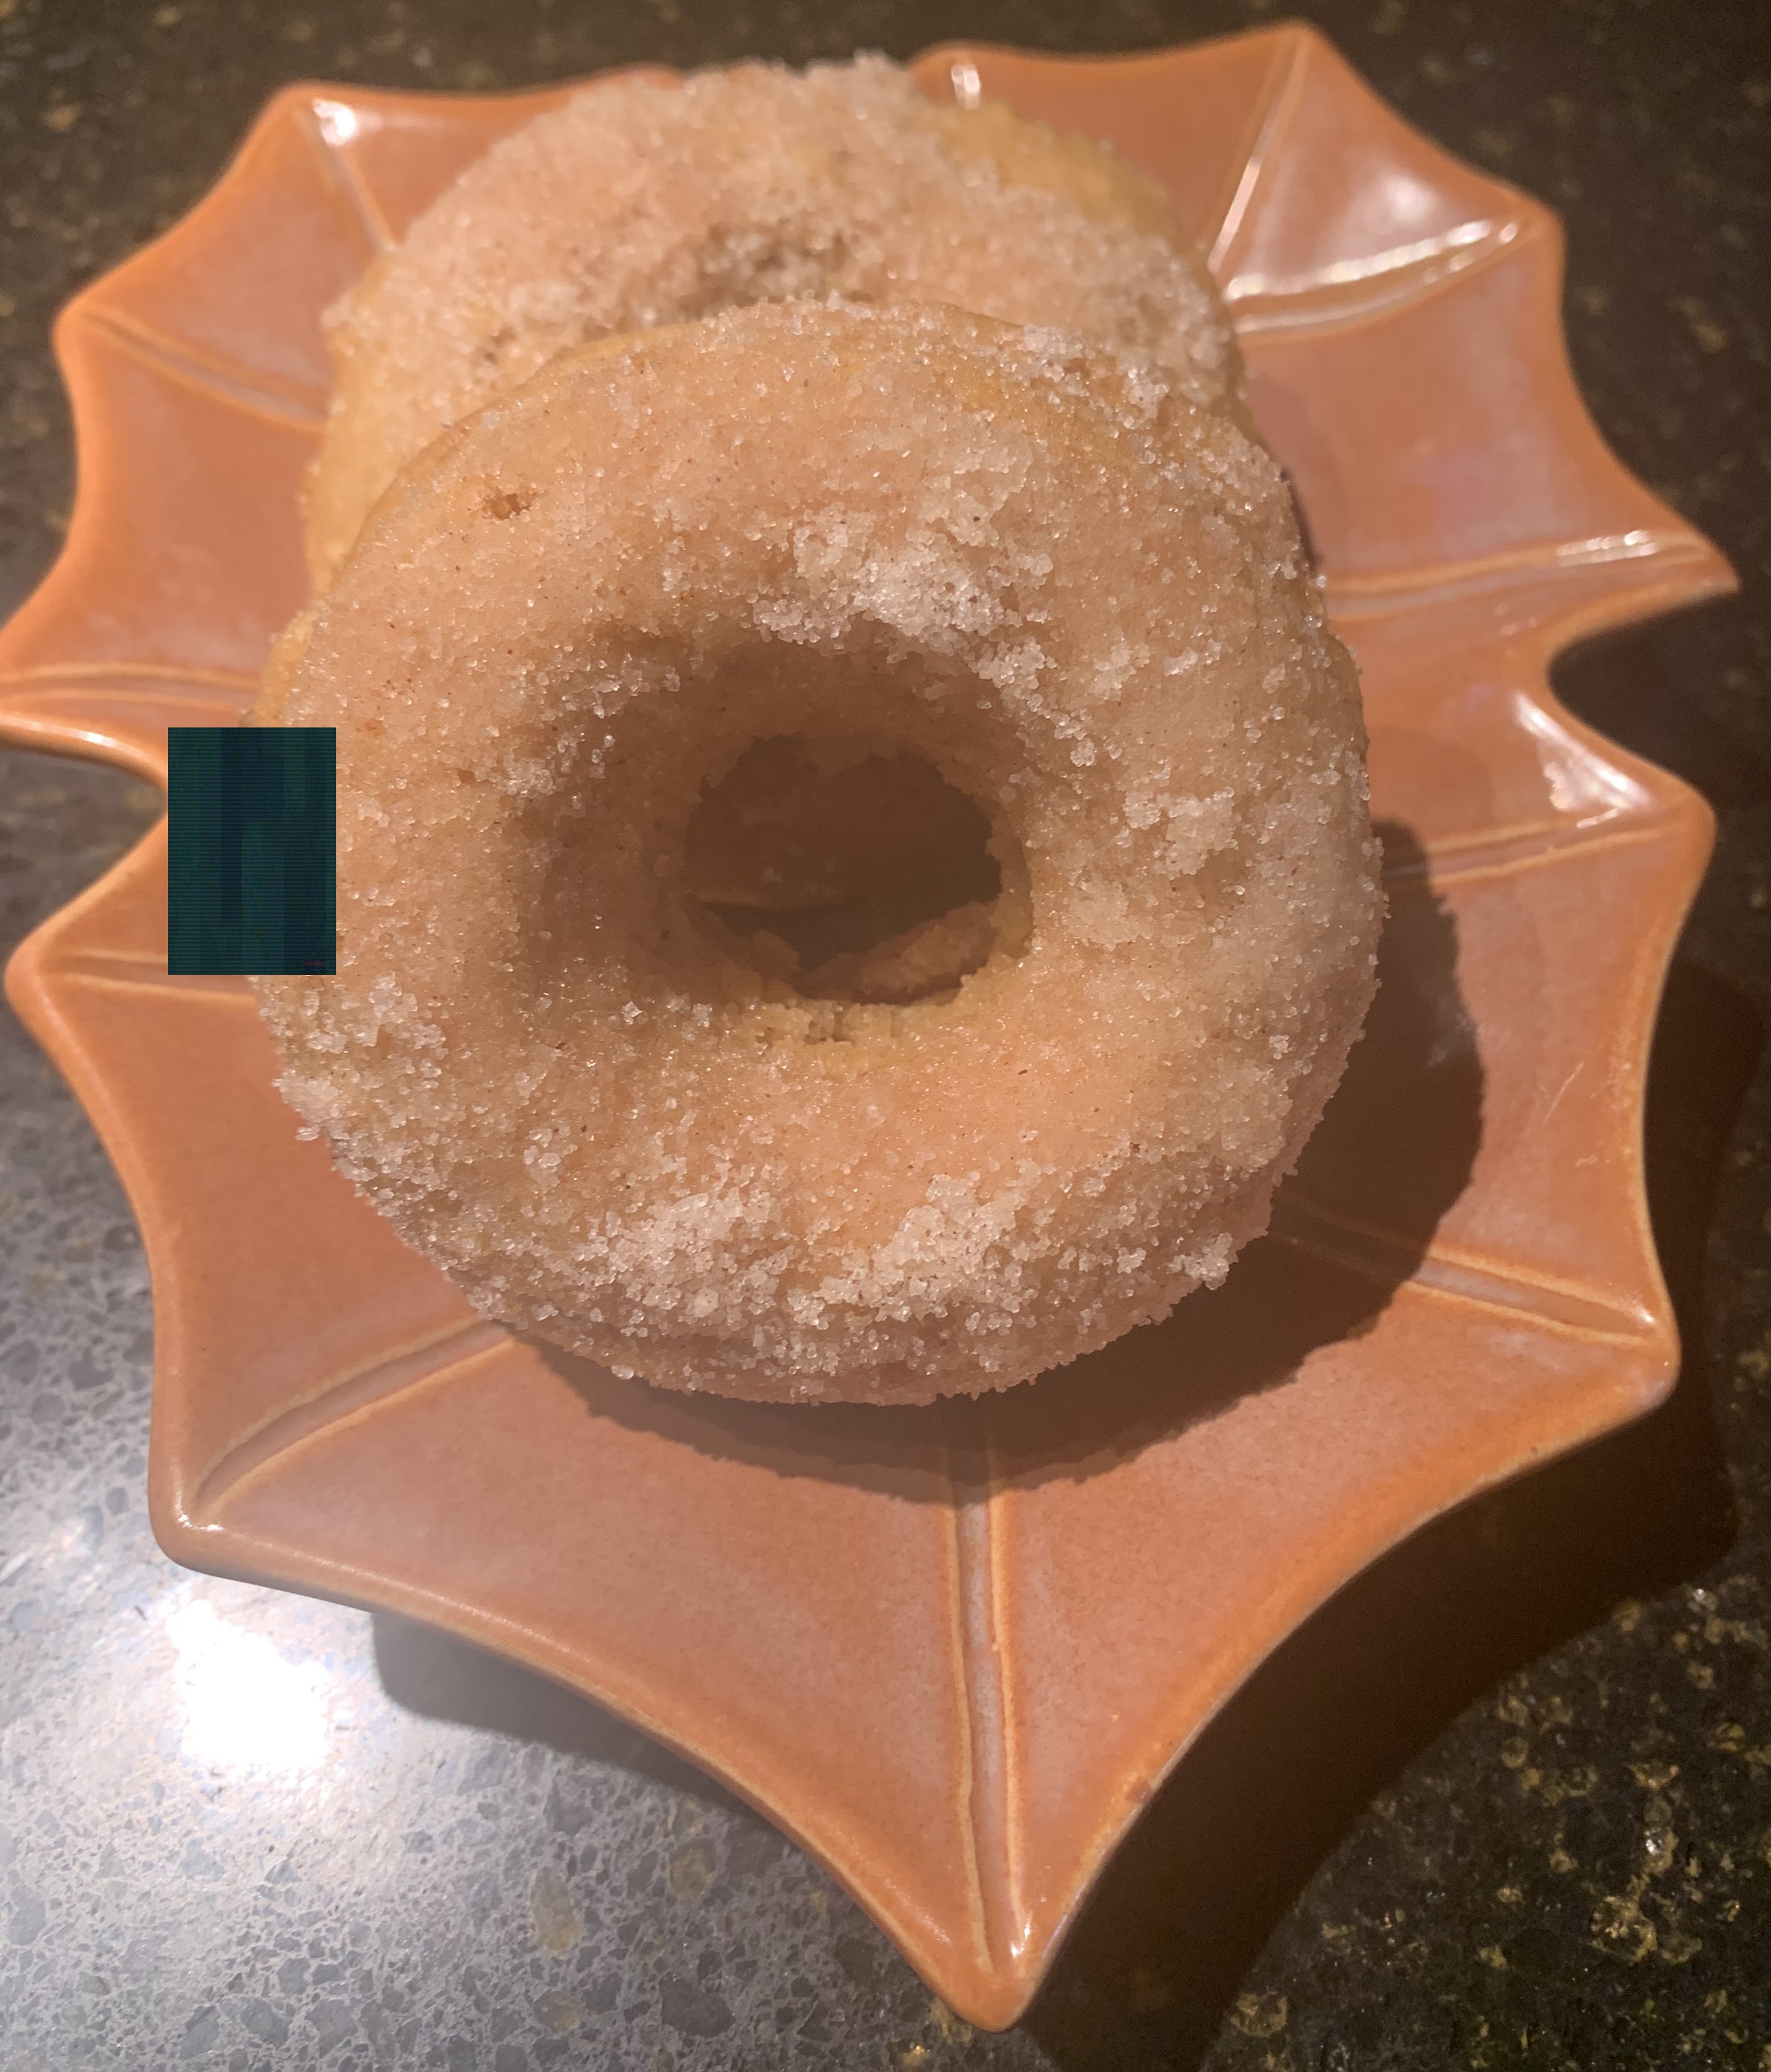
Pumpkin Cinnamon Sugar Donuts, baked not fried

Finally. Pumpkin season is here again! Knowing of my obsession with pumpkins, my sister,  Marla Payne, shared a recipe she found on the internet. She was back in Kansas this past weekend and I made a batch of Pumpkin Cinnamon Sugar Donuts; the spicy and filling morsels received rave reviews.  Marla found this small batch recipe on the Back to Nature Blog . . . they also have a vegan variation at this site. 


We also recommend our Glazed Pumpkin-Pecan Cake Donuts that are also baked,  not fried. Use the search box on the upper left hand of our blog to search for other pumpkin recipes. Or, on the right hand side, check out the Holidays / Special Events & Occasions — Fall — for other pumpkin favorites. https://cookingwithbarryandmeta.blogspot.com/p/mixes-more.html


Pumpkin Cinnamon Sugar Donuts, baked not fried    Yield: 6 donuts 

Donuts:

1 cup + 1/4 cups all-purpose flour

1/2 cup light brown sugar, packed

1/2 teaspoon salt

1 teaspoon baking powder

3/4 teaspoon pumpkin pie spice (a homemade version can be found in the Mixes and More section on our blog)

1/4 cup pumpkin pie puree (if using homemade puree or commercial pumpkin pie pie puree,  add 1/2 teaspoon ground cinnamon, 1/4 teaspoon ground ginger, 1/4 teaspoon ground nutmeg, and a pinch of cloves to the dry ingredients) 

2 1/2 tablespoons unsalted butter, melted

1/2 cup milk

Cinnamon Sugar Coating:

3 tablespoons unsalted butter, melted

1 cup granulated sugar

1 1/2 tablespoons ground cinnamon

  1. Preheat oven to 350° F.  
  2. Generously grease a doughnut pan; set aside.
  3. Donuts: In a large bowl whisk together the dry ingredients. 
  4. In a separate bowl whisk together the pumpkin puree, melted butter, and milk. Gently fold the wet mixture into the dry mixture - don't over mix!
  5. Spoon mixture into prepared doughnut pan. 
  6. Bake for 10 to11 minutes, or until the donuts spring back when lightly pressed. 
  7. Allow doughnuts to cool a few minutes in the pan before transferring to a wire wrack to cool for a few more minutes.
  8. Cinnamon Sugar Coating: In the meantime, melt the butter for the cinnamon sugar coating; set aside. Mix the sugar and cinnamon together in a medium-sized bowl; set aside.
  9. Once the donuts are cool enough to handle, dip them in the melted butter, then roll them in the cinnamon sugar mixture; repeat until all donuts have been covered.

Note: Although these donuts are best eaten the day they are made, they can be frozen and warmed up in the microwave. 


Recipe without photos . . . Pumpkin Cinnamon Sugar Donuts, baked not fried    Yield: 6 donuts 

Donuts:

1 cup + 1/4 cups all-purpose flour

1/2 cup light brown sugar, packed

1/2 teaspoon salt

1 teaspoon baking powder

3/4 teaspoon pumpkin pie spice (a homemade version can be found in the Mixes and More section on our blog)

1/4 cup pumpkin pie puree (if using homemade puree  e or commercial pumpkin pie pie puree,  add 1/2 teaspoon ground cinnamon, 1/4 teaspoon ground ginger, 1/4 teaspoon ground nutmeg, and a pinch of cloves to the dry ingredients) 

2 1/2 tablespoons unsalted butter, melted

1/2 cup milk

Cinnamon Sugar Coating:

3 tablespoons unsalted butter, melted

1 cup granulated sugar

1 1/2 tablespoons ground cinnamon

  1. Preheat oven to 350° F.  
  2. Generously grease a doughnut pan; set aside.
  3. Donuts: In a large bowl whisk together the dry ingredients. 
  4. In a separate bowl whisk together the pumpkin puree, melted butter, and milk. Gently fold the wet mixture into the dry mixture - don't over mix!
  5. Spoon mixture into prepared doughnut pan. 
  6. Bake for 10 to11 minutes, or until the donuts spring back when lightly pressed. 
  7. Allow doughnuts to cool a few minutes in the pan before transferring to a wire wrack to cool for a few more minutes.
  8. Cinnamon Sugar Coating: In the meantime, melt the butter for the cinnamon sugar coating; set aside. Mix the sugar and cinnamon together in a medium-sized bowl; set aside.
  9. Once the donuts are cool enough to handle, dip them in the melted butter, then roll them in the cinnamon sugar mixture; repeat until all donuts have been covered.

Note: Although these donuts are best eaten the day they are made, they can be frozen and warmed up in the microwave. 

Cream of Tomato Soup with basil

Ready-to-use garden tomatoes + extra Hildebrand (whole) Milk and fresh basil combine to create a creamy and delicious soup for lunch. We served it with grilled cheese sandwiches for a classic combo. 

NOTE: The acid in tomatoes can curdle milk. To avoid curdling, the milk used in cream soups is thickened to create a roux and then a little of the roux is gradually added to the tomatoes. 


Cream of Tomato Soup with basil   4 to 6 servings

1/4 cup butter

1/3 cup finely diced onions (yellow)

1 teaspoon minced garlic

1/4 cup all-purpose flour

1 teaspoon kosher salt

1/2 teaspoon pepper

3 tablespoons basil, chopped or 1/2 to 1 teaspoon dried

1 tablespoon basil pesto (optional but it adds a nice flavor boost)

1 tablespoon granulated sugar

2 1/2 cups milk

About 28 ounces chopped garden tomatoes, peeled & excess seeds removed (or use equivalent amount of canned tomatoes

3 tablespoons tomato paste

1/2 cup grated Parmesan cheese

Fresh basil leaves and dollops of sour cream for garnish, optional 

  1. In a large pot, melt butter over medium heat.
  2. Add onions and cook until it begins to turn transparent. Add garlic and cook an additional minute.
  3. Whisk flour into butter, add salt and pepper; cook for a minute or two to avoid a raw flour taste. 
  4. Add basil, pesto and 1 tablespoon sugar; stir to combine.  
  5. Slowly add milk, and whisk until combined. Cook and stir (I like to change to a wooden spoon) until mixture is thickened.
    Above: Flour-milk mixture (roux) when first combined.
    Below: Thickened roux/ 
  6. Mix tomatoes and tomato paste in a bowl. Add a little of the thickened milk mixture (the roux) to the tomatoes stirring as they are added. Then pour that tomato & thickened milk mixture back into the pan along with the Parmesan cheese; stir to combine. Taste and adjust seasonings as needed. Simmer for a few minutes to merge the flavors. 
  7. Puree with an immersion blender (or cool slightly and blend in a blender or food processor).
  8. Garnish with basil leaves and dollops of sour cream if desired. 
Recipe without photos . . .Cream of Tomato Soup with basil   4 to 6 servings

1/4 cup butter

1/3 cup finely diced onions (yellow)

1 teaspoon minced garlic

1/4 cup all-purpose flour

1 teaspoon kosher salt

1/2 teaspoon pepper

3 tablespoons basil, chopped or 1/2 to 1 teaspoon dried

1 tablespoon basil pesto  (optional but it adds a nice flavor boost)

1 tablespoon granulated sugar

2 1/2 cups milk

About 28 ounces chopped garden tomatoes, peeled & excess seeds removed (or use equivalent amount of canned tomatoes

3 tablespoons tomato paste

1/2 cup grated Parmesan cheese

Fresh basil leaves and dollops of sour cream for garnish, optional 

  1. In a large pot, melt butter over medium heat.
  2. Add onions and cook until it begins to turn transparent. Add garlic and cook an additional minute.
  3. Whisk flour into butter, add salt and pepper; cook for a minute or two to avoid a raw flour taste. 
  4. Add basil, pesto and 1 tablespoon sugar; stir to combine.  
  5. Slowly add milk, and whisk until combined. Cook and stir (I like to change to a wooden spoon) until mixture is thickened.
  6. Mix tomatoes and tomato paste in a bowl. Add a little of the thickened milk mixture (the roux) to the tomatoes stirring as they are added. Then pour that tomato & thickened milk mixture back into the pan along with the Parmesan cheese; stir to combine. Taste and adjust seasonings as needed.Simmer for a few minutes to merge the flavors. 
  7. Puree with an immersion blender (or cool slightly and blend in a blender or food processor).
  8. Garnish with basil leaves and dollops of sour cream if desired. 

Chocolate Ganache made with evaporated milk

Fudgy Brownies are good without frosting but for an extra special treat I topped them with a layer of creamy chocolate ganacehe. However, instead of using heavy cream (I had none on hand), I used evaporated milk and it worked just like the cream! Growing up on a farm, we learned to use replacements and this blog contains a  Mixes and More section (listed in the heading above) that includes substitutions along with homemade mixes.

Creamy Chocolate Ganache (above) spread over 
Fudgy Brownies (below). 

Chocolate Ganache made with evaporated milk

1 1/4 cups dark chocolate chips (or semi-sweet) 

1/3 cup evaporated milk 

1/3 cup butter

  1. Place chocolate chips into a small bowl. 
  2. In a microwave safe measuring cup, heat evaporated milk in 30 second intervals until it comes to a boil. 
  3. Add this hot milk to the chocolate chips and cover with plastic wrap; let set for 30 seconds and then stir. 
  4. Add butter and stir until everything has dissolved completely. Let cool until spreading consistency is achieved. 

Banilla Cream Pudding

No, it's not a typo — It's my name for homemade Brown Sugar Vanilla Pudding . . . essentially vanilla pudding made with brown sugar versus white sugar for a flavor boost. 

I gave our Banilla Cream Pudding an additional flavor boost by topping it with fresh Colorado peaches, walnuts and whipped cream.

Banilla Cream Pudding   4 or 5 servings 

1/2 cup packed brown sugar

3 tablespoons cornstarch

1/2 teaspoon salt

2 cups whole milk

2 egg yolks, lightly beaten in a medium size bowl

1 tablespoon butter

1 teaspoon vanilla 

  1. Add brown sugar, cornstarch and salt to saucepan; thoroughly combine in order to avoid cornstarch lumps while cooking.
  2. Gradually add milk, whisking mixture to combine.
  3. Cook over medium heat, stirring constantly. Once mixtures comes to a full boil, continue to boil and stir for 1 minute. 
  4. Remove from heat.
  5. Gradually stir a third to half of the pudding into the lightly beaten egg yolk, whisking the mixture during the process. This will gradually temper the eggs so that they are not scrambled!
  6. Add tempered egg mixture back to the sauce pan and heat over medium another 2 minutes, stirring constantly.
  7. Remove from heat. Stir in butter and vanilla.  Mixture will still be somewhat runny at this point but will thicken as it cools.
  8. Pour mixture into a bowl and refrigerate to thicken. (Add a piece of plastic wrap to the top to prevent the formation of a thin skin.)
Recipe without photos . . . Banilla Cream Pudding   4 or 5 servings 

1/2 cup packed brown sugar

3 tablespoons cornstarch

1/2 teaspoon salt

2 cups whole milk

2 egg yolks, lightly beaten in a medium size bowl

1 tablespoon butter

1 teaspoon vanilla 

  1. Add brown sugar, cornstarch and salt to saucepan; thoroughly combine in order to avoid cornstarch lumps while cooking.
  2. Gradually add milk, whisking mixture to combine.
  3. Cook over medium heat, stirring constantly. Once mixtures comes to a full boil, continue to boil and stir for 1 minute. 
  4. Remove from heat.
  5. Gradually stir a third to half of the pudding into the lightly beaten egg yolk, whisking the mixture during the process. This will gradually temper the eggs so that they are not scrambled!
  6. Add tempered egg mixture back to the sauce pan and heat over medium another 2 minutes, stirring constantly.
  7. Remove from heat. Stir in butter and vanilla.  Mixture will still be somewhat runny at this point but will thicken as it cools.
  8. Pour mixture into a bowl and refrigerate to thicken. (Add a piece of plastic wrap to the top to prevent the formation of a thin skin.)

Zucchini Crust Pizza earns a 5 star rating!

Vickie Gill’s plate of Zucchini Crust Pizza (posted on her Facebook page) looked so good that I had to give it a try. She shared the recipe via a  link (with a video). This internet sensation uses a zucchini-based crust that is finished with pizza-style toppings. I made it for dinner last night and we thought it was Super Delicious! Barry gave it a 5 out of 5 star rating. Heated up the leftover of lunch today and again marveled at this yummy way to use up excess garden process. Thanks Vickie for recommending this recipe. 


Zucchini Crust Pizza  

Crust: 

4 cups shredded zucchini (after shredding, drain and then squeeze out excess moisture as the zucchini needs to be as dry as possible; if using larger zucchini remove the seedy center that can add to the moisture content)

3 large eggs

1 cup shredded mozzarella cheese

1/4 cup grated Parmesan cheese

1/2teaspoon salt

1/2 teaspoon black pepper

3/4 teaspoon powdered garlic 

Sauce:

1 lb sausage (or combo of sausage & ground beef 

1/4 teaspoon red pepper flakes

1 tablespoon Italian seasoning 

1/2 teaspoon salt

14 ounces tomato sauce

Toppings: 

1 medium red bell pepper chopped

1 small onion chopped

1 1/2 cups shredded mozzarella cheese

1/4  cup grated Parmesan cheese

  1. Crust: Preheat the oven to 375°F. Grease a quarter-size sheet pan, and set aside.

  2. Place the shredded zucchini in a large bowl (as instructed above, make sure the zucchini is as dry as possible. 
  3. Separately, in a small bowl, whisk the eggs until combined. 
  4. Add the whisked eggs, mozzarella cheese, Parmesan cheese, salt, black pepper, and garlic granules to the zucchini. Stir together until incorporated.
  5. Pour into a quarter sized sheet pan (9×13 baking pan with sides). Spread the mixture out evenly and push up the sides of the dish approximately 1 inch, creating a crust edge. 

  6. Place the crust in the preheated oven. While the crust is baking, prepare the sauce. Bake until the crust is set in the middle and the edges begin to brown, 12 to 15 minutes. I baked mine longer—until the mixture was dry (cover with foil if it browns too much during this additional baking). 
  7. Once baked, remove the crust from the oven, and assemble the pizza. 
  8. As crust bakes, prepare the Sauce: Heat a skillet over medium heat.  Add the ground sausage and cook, breaking up meat into small pieces and cook until completely browned, 8 to 12 minutes (vegetable oil can be added to lean meat.)

  9. Once the sausage is cooked, add the red pepper flakes, Italian seasoning and salt. Stir and add the tomato sauce. Bring the tomato sauce and meat to a simmer. Cook until the sauce is slightly thickened, 4 tp 6 minutes. Once cooked, remove from heat. 
  10. Finishing Pizza: Pour the prepared meat sauce mixture on the crust and spread evenly. Sprinkle on onion and red pepper. 
  11. Top with shredded mozzarella cheese and Parmesan cheese.

  12. Return to the oven and bake until the cheese is melted and beginning to brown, 15 to 18 minutes.

Recipe without photos . . . Zucchini Crust Pizza  

Crust: 

4 cups shredded zucchini (after shredding, drain and then squeeze out excess moisture as the zucchini needs to be as dry as possible; if using larger zucchini remove the seedy center that can add to the moisture content)

3 large eggs

1 cup shredded mozzarella cheese

1/4 cup grated Parmesan cheese

1/2teaspoon salt

1/2 teaspoon black pepper

3/4 teaspoon powdered garlic 

Sauce:

1 lb sausage (or combo of sausage & ground beef 

1/4 teaspoon red pepper flakes

1 tablespoon Italian seasoning 

1/2 teaspoon salt

14 ounces tomato sauce

Toppings: 

1 medium red bell pepper chopped

1 small onion chopped

1 1/2 cups shredded mozzarella cheese

1/4  cup grated Parmesan cheese

  1. Crust: Preheat the oven to 375°F. Grease a quarter-size sheet pan, and set aside.

  2. Place the shredded zucchini in a large bowl (as instructed above, make sure the zucchini is as dry as possible. 
  3. Separately, in a small bowl, whisk the eggs until combined. 
  4. Add the whisked eggs, mozzarella cheese, Parmesan cheese, salt, black pepper, and garlic granules to the zucchini. Stir together until incorporated.
  5. Pour into a quarter sized sheet pan (9×13 baking pan with sides). Spread the mixture out evenly and push up the sides of the dish approximately 1 inch, creating a crust edge. 

  6. Place the crust in the preheated oven. While the crust is baking, prepare the sauce. Bake until the crust is set in the middle and the edges begin to brown, 12 to 15 minutes. I baked mine longer—until the mixture was dry (cover with foil if it browns too much during this additional baking). 
  7. Once baked, remove the crust from the oven, and assemble the pizza. 
  8. As crust bakes, prepare the Sauce: Heat a skillet over medium heat.  Add the ground sausage and cook, breaking up meat into small pieces and cook until completely browned, 8 to 12 minutes (vegetable oil can be added to lean meat.)

  9. Once the sausage is cooked, add the red pepper flakes, Italian seasoning and salt. Stir and add the tomato sauce. Bring the tomato sauce and meat to a simmer. Cook until the sauce is slightly thickened, 4 to 6 minutes. Once cooked, remove from heat. 
  10. Finishing Pizza: Pour the prepared meat sauce mixture on the crust and spread evenly. Sprinkle on onion and red pepper. 
  11. Top with shredded mozzarella cheese and Parmesan cheese.

  12. Return to the oven and bake until the cheese is melted and beginning to brown, 15 to 18 minutes.