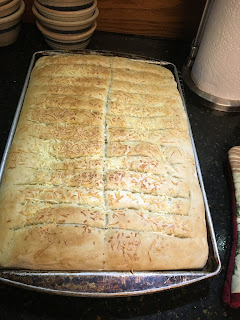
Quick and Easy Breadsticks

These breadsticks can be ready to serve in just about an hour, start to finish! Recipe source: https://jamiecooksitup.net/2009/10/quick-and-easy-breadsticks/
Leftover breadsticks can be warmed in microwave or split and toasted.

Quick and Easy Breadsticks        Yield: About 24 breadsticks
1 1/2 cups warm water (110 to 115°)
2 tablespoons granulated  sugar
1 tablespoon active dry (instant) yeast
1/2 teaspoon salt
3 1/2 to 4 cups all-purpose flour (I used about 1 cup of white wheat flour for part of the all-purpose -- Farmer's Direct Foods—PRIDE OF THE PRAIRIE"Sweet Wheat Flour", 
1/4 cup butter 
Garlic seasoning or powder
3/4 cup grated Parmesan 
  1.  Mix the water, sugar and yeast together in a measuring cup or in the bottom of your mixer. Let it sit for 5 minutes.
  2. Add the salt and the flour, one cup at a time, until it is well incorporated (I used the flat blade of the mixer for this task). 
  3. Mix on high for 5 minutes (I switched to the dough hook for this task). 
  4. Let the dough rest for 5 minutes.
  5. Melt the butter and pour half of it into a jelly roll pan (large cookie sheet).
  6. Place the dough in the center of the pan. Let it sit for 2 or 3 minutes. Letting the dough rest makes it MUCH easier to shape.
  7. Spread the dough out flat onto the pan until it reaches all of the edges. Doing all of the spreading and cutting of these bread sticks, in the pan makes cleaning up your counter so much easier!
  8. Pour the other half of the butter onto the dough. Spread it around with your hands. Sprinkle the Garlic seasoning all over the dough, and then the Parmesan cheese.
  9. With a pizza cutter cut the dough in half lengthwise, and then into about 12 strips crosswise. 
  10. Put the pan into a 170° oven for about 7 to10 minutes. The breadsticks should rise about 1".
  11. Turn you oven up to 350° and bake for about 12 minutes, or until golden brown (internal temperature should be at least 190°)
  12. When they come out of the oven let them sit and rest again for about 5 minutes. Then redefine your cutting lines with the pizza cutter, using scissors on edges where pizza cutter can’t reach.
Recipe without photos . . .
Quick and Easy Breadsticks        Yield: About 24 breadsticks
1 1/2 cups warm water (110 to 115°)
2 tablespoons granulated  sugar
1 tablespoon active dry (instant) yeast
1/2 teaspoon salt
3 1/2 to 4 cups all-purpose flour (I used about 1 cup of white wheat flour for part of the all-purpose -- Farmer's Direct Foods—PRIDE OF THE PRAIRIE"Sweet Wheat Flour", 
1/4 cup butter 
Garlic seasoning or powder
3/4 cup grated Parmesan 
  1.  Mix the water, sugar and yeast together in a measuring cup or in the bottom of your mixer. Let it sit for 5 minutes.
  2. Add the salt and the flour, one cup at a time, until it is well incorporated. Mix on high for 5 minutes. Let the dough rest for 5 minutes.
  3. Melt the butter and pour half of it into a jelly roll pan (large cookie sheet).
  4. Place the dough in the center of the pan. Let it sit for 2 or 3 minutes. Letting the dough rest makes it MUCH easier to shape.
  5. Spread the dough out flat onto the pan until it reaches all of the edges. Doing all of the spreading and cutting of these bread sticks, in the pan makes cleaning up your counter so much easier!
  6. Pour the other half of the butter onto the dough. Spread it around with your hands. Sprinkle the Garlic seasoning all over the dough, and then the Parmesan cheese.
  7. With a pizza cutter cut the dough in half lengthwise, and then into about 12 strips crosswise. 
  8. Put the pan into a 170° oven for about 7 to10 minutes. The breadsticks should rise about 1".
  9. Turn you oven up to 350° and bake for about 12 minutes, or until golden brown (internal temperature should be at least 190°)
  10. When they come out of the oven let them sit and rest again for about 5 minutes. Then redefine your cutting lines with the pizza cutter, using scissors on edges where pizza cutter can’t reach.

Zuppa Toscana

Definitely soup weather in Kansas! And Zuppa Toscana certainly hit the spot. It's Barry's copycat version one of Olive Garden signature soups; his is even better than the original! We served it with Quick & Easy Breadsticks.

Zuppa Toscana
1 lb. bulk Italian sausage
1 large onion, chopped
3 cloves garlic, minced
4 to 6 cups chicken broth
4 large russet potatoes, slice & diced with skins left on 
About 2 cups curly kale, leaves stripped and chopped
Kosher salt
Freshly ground black pepper
About 1 tablespoon Italian seasoning
Sprinkling of hot pepper flakes 
About 1 cup heavy cream
Freshly grated Parmesan, for serving
  1. In a large pot over medium heat, cook sausage, breaking up with the back of a wooden spoon, until browned and no longer pink, 5 to 7 minutes. Transfer to a plate to drain.
  2. Add onion to pot and let cook until soft, 5 minutes, then add garlic and cook until fragrant, 1 minute more. 
  3. Add chicken broth, potatoes, kale and seasoning; cook until potatoes and kale are tender, 23 to 25 minutes. 

  4. Check seasonings and stir in heavy cream and heat on low to medium temperature.
  5. Garnish with Parmesan cheese if desired.
Recipe without photos . . .
Zuppa Toscana
1 lb. bulk Italian sausage
1 large onion, chopped
3 cloves garlic, minced
4 to 6 cups chicken broth
4 large russet potatoes, slice & diced with skins left on 
About 2 cups curly kale, leaves stripped and chopped
Kosher salt
Freshly ground black pepper
About 1 tablespoon Italian seasoning
Sprinkling of hot pepper flakes 
About 1 cup heavy cream
Freshly grated Parmesan, for serving
  1. In a large pot over medium heat, cook sausage, breaking up with the back of a wooden spoon, until browned and no longer pink, 5 to 7 minutes. Transfer to a plate to drain.
  2. Add onion to pot and let cook until soft, 5 minutes, then add garlic and cook until fragrant, 1 minute more. 
  3. Add chicken broth, potatoes, kale and seasoning; cook until potatoes and kale are tender, 23 to 25 minutes. 
  4. Check seasonings and stir in heavy cream and heat on low to medium temperature.
  5. Garnish with Parmesan cheese if desired.

Yogurt Panna Cotta with Walnuts & Honey

Yogurt Panna Cotta with Walnuts & Honey combines Greek yogurt with a classic “cooked cream” Italian dessert. Although gelatin-based panna cotta can be unmolded, I added the creamy mixture to dessert glasses and then topped it with toasted almonds and locally produced honey. It could also be topped with fruit sauces (even chocolate) or servee with assorted berries or other fruits. 
Other panna cotta on our blog include:  Classic Panna Cotta and Grapefruit Topped Panna Cotta

Yogurt Panna Cotta with Walnuts & Honey    8 servings
1 1/2 teaspoons unflavored gelatin
2 tablespoons cold water
3 cups heavy whipping cream
1/4 cup granulated sugar
Pinch of salt
1 1/2 teaspoons vanilla
1 cup Honey Vanilla Greek Yogurt (I used Greek Gods® brand)

Toppings:
About ½ cup toasted walnuts (bake for 5 minutes in 350° oven)
Honey to drizzle
  1. Sprinkle the gelatin over cold water and let stand for 5 minutes.
  2. In a saucepan, warm the cream with the sugar, salt, and vanilla over medium-high heat. Do not let it boil.
  3. Stir gelatin into the warm cream until thoroughly dissolved. Take the cream off the heat and cool about 5 minutes. 
  4. Put the sour cream in a medium bowl. Gently whisk in the warm cream a little at a time until smooth.
  5. Fill 8 (2/3 cup capacity) ramekins, custard cups, or dessert glasses with the mixture.  Chill at least 4 to 6 hours. 
  6. Before serving, top with toasted walnuts and drizzle with honey.
For more info. on unflavored gelatin click on  http://whatscookingamerica.net/gelatintip.htm

Recipe without photos . . .
Yogurt Panna Cotta with Walnuts & Honey    8 servings
1 1/2 teaspoons unflavored gelatin
2 tablespoons cold water
3 cups heavy whipping cream
1/4 cup granulated sugar
Pinch of salt
1 1/2 teaspoons vanilla
1 cup Honey Vanilla Greek Yogurt (I used Greek Gods® brand)
Toppings:
About ½ cup toasted walnuts (bake for 5 minutes in 350° oven)
Honey to drizzle
  1. Sprinkle the gelatin over cold water and let stand for 5 minutes.
  2. In a saucepan, warm the cream with the sugar, salt, and vanilla over medium-high heat. Do not let it boil.
  3. Stir gelatin into the warm cream until thoroughly dissolved. Take the cream off the heat and cool about 5 minutes. 
  4. Put the sour cream in a medium bowl. Gently whisk in the warm cream a little at a time until smooth.
  5. Fill 8 (2/3 cup capacity) ramekins, custard cups, or dessert glasses with the mixture.  Chill at least 4 to 6 hours.
  6. Before serving, top with toasted walnuts and drizzle with honey.

Hummus with Meat All Over It

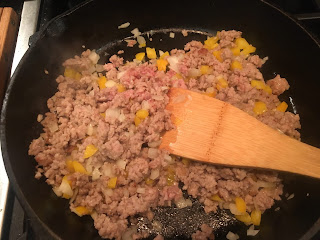
We are hummus fans so when I saw Molly Yeh making Hummus with Meat All Over It last weekend on Food Network, I knew this was a recipe I had to try. However, she used ground beef while I used sausage. I omitted her pomegranate seed garnish and instead sautéed some yellow peppers along with the onions—they added both color and flavor.
Lately I've tried several new recipes that I've deemed okay but they didn't really meet my expectations (and consequently was added to this blog). However, THIS RECIPE, with it's flavorful combination of spices, EXCEEDED MY EXPECTATION as did Molly's recipe for Whole Wheat Pitas that I served with this dish. 

Hummus with Meat All Over It       6 to 8 servings
1 lb. ground pork sausage + 2 tablespoon oil but only if needed
1 large onion, finely chopped
1 yellow, red or orange pepper, finely chopped
Kosher salt
2 1/2 teaspoons ground cumin
2 teaspoons ground cinnamon
1 teaspoon paprika
1/4 teaspoon allspice
1/4 teaspoon coarsely ground black pepper
2 cups hummus -- I used our recipe for Smooth & Creamy Hummus
1/4 cup toasted pine nuts
Chopped fresh parsley, for garnish

  1. Heat a large cast iron skillet on medium-high heat. Add the sausage and break it up into small pieces as it begins to cook. Add the onions and peppers, and cook until sausage is cooked through and onions and peppers are tender; after several minutes of cooking, add  the seasonings (salt, cumin, cinnamon, paprika, allspice and black pepper). Taste and add additional seasonings as desired.

  2. Swirl the hummus into a large serving bowl, creating a slight ridge at the top of the bowl . . . or divide hummus among individual bowls.

  3. Top hummus with sausage mixture; sprinkle with pine nuts and parsley. 
  4. Serve with Whole Wheat Pitas, using piece of the pita to scoop up bites of both hummus and sausage mixture. 
Recipe without photos . . .
Hummus with Meat All Over It       6 to 8 servings
1 lb. ground pork sausage + 2 tablespoon oil but only if needed
1 large onion, finely chopped
1 yellow, red or orange pepper, finely chopped
Kosher salt
2 1/2 teaspoons ground cumin
2 teaspoons ground cinnamon
1 teaspoon paprika
1/4 teaspoon allspice
1/4 teaspoon coarsely ground black pepper
2 cups hummus -- I used our recipe for Smooth & Creamy Hummus
1/4 cup toasted pine nuts
Chopped fresh parsley, for garnish

  1. Heat a large cast iron skillet on medium-high heat. Add the sausage and break it up into small pieces as it begins to cook. Add the onions and peppers, and cook until sausage is cooked through and onions and peppers are tender; after several minutes of cooking, add  the seasonings (salt, cumin, cinnamon, paprika, allspice and black pepper). Taste and add additional seasonings as desired.
  2. Swirl the hummus into a large serving bowl, creating a slight ridge at the top of the bowl . . . or divide hummus among individual bowls.
  3. Top hummus with sausage mixture; sprinkle with pine nuts and parsley.
  4. Serve with Whole Wheat Pitas, using piece of the pita to scoop up bites of both hummus and sausage mixture. . 

Whole Wheat Pita

These puffy pockets of baked dough are courtesy of Molly Yeh as demonstrated on her Food Network show—Girl Meets Farm. I've made pita before but this is the best results I've ever had! I believe the success of the puffy pitas may be due to the extra long rising period that is explained in the directions that follow.
I used Molly's Whole Wheat Pita with my version of her recipe that she called Hummus with Meat All Over It.
On another note—I used a locally grown and produced white wheat flour for the whole wheat called for in this recipe. Referred to as "Naturally Sweet Wheat," this product is produced from premium white whole wheat flour that has a consistent protein content of 13%. White wheat flour has all the benefits of regular whole wheat flour (made from red winter wheat) but is paler in color, sweeter in taste and produces lighter baked products. The white whole wheat used to make "Naturally Sweet Wheat" is grown in Kansas and milled in rural New Cambria by FARMER DIRECT FOODS. This small mill is unique in that it can track any particular bag of flour from field to shelf. Their flour is organic, stone ground, and has no added preservatives or artificial ingredients. And, if that's not impressive enough, FARMER FARMER DIRECT FOODS grinds and packages premium wheat flour for KING ARTHUR FLOUR; one to two semi's full of bagged flour leaves the mill daily. The same flour used in bags of KING ARTHUR FLOUR also goes into bags of FARMER DIRECT FOODS flour sold under the brand name—PRIDE OF THE PRAIRIE.
Their website - http://www.farmerdirectfoods.com - includes a listing of where PRIDE OF THE PRAIRIE product may be purchased.
Barry tours FARMER DIRECT FOODS plant with Bob Morando, President/CEO of Farmer Direct Foods, Inc.
The flour is bagged on an assembly line (above) and then stacked (below), ready to load on the semi's that ship flour to King Arthur Flour. 

Whole Wheat Pita      Yield: 12 pitas
1 1/2 cups warm water (110 to 115°)
4 1/2 teaspoons (or 1 tablespoon + 1 1/2 teaspoons) granulated sugar
2 1/4 teaspoons active dry yeast (instant)
3 tablespoons olive oil
1 1/2 teaspoons kosher salt
2 cups bread flour + more as needed + some for dusting, too (all-purpose flour can be used but bread flour is preferred)
3/4 cup whole wheat flour—I used FARMER DIRECT FOODSPRIDE OF THE PRAIRIE brand labeled as "Naturally Sweet Wheat"

Neutral oil or cooking spray, for the bowl
  1. In the bowl of a stand mixer fitted with a dough hook, mix together the water, sugar and yeast. Let it sit until foamy, about 5 minutes.
  2. With the mixer running on low speed, add the oil and salt, and then gradually add the bread and whole wheat flours. Increase the speed to medium high and mix for 7 to 10 minutes, adding just enough additional bread flour so that the dough no longer sticks the bowl. Do NOT add too much flour; the dough should be smooth and slightly sticky. 
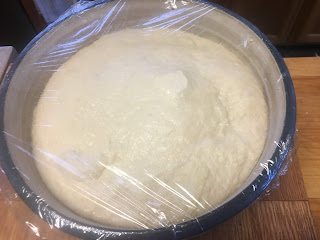
  3. Lightly coat a clean large bowl with oil or cooking spray and place the dough in the bowl, turning it once or twice to coat it in oil. Cover the bowl with plastic wrap and let it rise (proof) at room temperature until it has doubled in size, about 2 hours.
    Above -- dough added to the bowl for proofing.
    Below -- Expanded dough about 2 hours of proofing.
  4. Turn the dough out onto a clean work surface and divide it into 12 equal pieces. Mold each piece into a ball by stretching the top and tucking the edges under. 
  5. Place the balls 1" apart on a piece of parchment paper, cover them with plastic wrap and let rise for 30 minutes. 
  6. Preheat the fern to 500° and line 2 or 3 baking sheets with parchment. 
  7. Lightly dish a work surface with flour. With a rolling pin, roll out the balls of dough into circles, 1/3" thick (Molly emphasized on the show that 1/3" thickness was the ideal so I measured as I rolled.)
  8. Place them on the lined baking sheet and bake until cooked through and puffy, about 5 minutes (took a little longer in my oven). You do not want them to brown. Cool on a rack.
  9. Leftovers can be frozen in an airtight container or ziplock bag and then reheated in the microwave or toaster.
Recipe without photos . . .
Whole Wheat Pita      Yield: 12 pitas
1 1/2 cups warm water (110 to 115°)
4 1/2 teaspoons (or 1 tablespoon + 1 1/2 teaspoons) granulated sugar
2 1/4 teaspoons active dry yeast (instant)
3 tablespoons olive oil
1 1/2 teaspoons kosher salt
2 cups bread flour + more as needed + some for dusting, too (all-purpose flour can be used but bread flour is preferred)
3/4 cup whole wheat flour—I used FARMER DIRECT FOODSPRIDE OF THE PRAIRIE brand labeled as "Naturally Sweet Wheat"
Neutral oil or cooking spray, for the bowl
  1. In the bowl of a stand mixer fitted with a dough hook, mix together the water, sugar and yeast. Let it sit until foamy, about 5 minutes.
  2. With the mixer running on low speed, add the oil and salt, and then gradually add the bread and whole wheat flours. Increase the speed to medium high and mix for 7 to 10 minutes, adding just enough additional bread flour so that the dough no longer sticks the bowl. Do NOT add too much flour; the dough should be smooth and slightly sticky. 
  3. Lightly coat a clean large bowl with oil or cooking spray and place the dough in the bowl, turning it once or twice to coat it in oil. Cover the bowl with plastic wrap and let it rise (proof) at room temperature until it has doubled in size, about 2 hours.
  4. Turn the dough out onto a clean work surface and divide it into 12 equal pieces. Mold each piece into a ball by stretching the top and tucking the edges under. 
  5. Place the balls 1" apart on a piece of parchment paper, cover them with plastic wrap and let rise for 30 minutes. 
  6. Preheat the fern to 500° and line 2 or 3 baking sheets with parchment. 
  7. Lightly dish a work surface with flour. With a rolling pin, roll out the balls of dough into circles, 1/3" thick (Molly emphasized on the show that 1/3" thickness was the ideal so I measured as I rolled.)
  8. Place them on the lined baking sheet and bake until cooked through and puffy, about 5 minutes (took a little longer in my oven). You do not want them to brown. Cool on a rack.
  9. Leftovers can be frozen in an airtight container or ziplock bag and then reheated in the microwave or toaster.

Mini Cinnamon Rolls with Cream Cheese Frosting

Forgot the outer edges and enjoy the center of the cinnamon roll in every bite of these minis. Besides, they are fun to make, too! This recipe, along with the cutting and rolling technique come from Life Made Simple blog. I've made these twice and have make some adjustments, added extra explanations and tips + rearranged the list of ingredients so they appear in their order of use. 

Mini Cinnamon Rolls with Cream Cheese Frosting     Yield: 44 mini rolls
Rolls
2¾ cups all-purpose flour
1 tablespoon active dry yeast (instant)
1 teaspoon salt
¼ cup granulated sugar
2 tablespoons unsalted butter
½ cup water
¼ cup whole milk
1 egg

Filling
¼ cup (½ stick) butter, melted
⅔ cup packed  brown sugar
1 tablespoon. + 1 teaspoon ground cinnamon
1 teaspoon vanilla 

Cream Cheese Frosting
4 oz. cream cheese, room temperature
¼ cup (1/2 stick) unsalted butter, room temperature
1 cup powdered sugar
1 to 2 tablespoons whole milk (to desired thickness)
½ teaspoon vanilla
  1.  Rolls: In a large bowl or the bowl of a stand mixer, combine the flour, yeast and salt.
  2. In a small microwave safe bowl (or glass measuring cup), combine the sugar, butter, water and milk. 
  3. Heat in the microwave until the mixture is hot (about 1 minute) and the butter is almost melted; mixture should be 120°-let it cool if higher. 
  4. Gradually add the milk mixture into the flour mixture. 
  5. Add the egg and mix until a soft and sticky dough forms.
  6. Set oven on “ bread proof” or if proof setting if not available, set oven temperature to 200’.
  7. If using a stand mixer, switch to the dough hook and set on the lowest mixing setting for 4 minutes or until the dough becomes elastic or knead by hand on a lightly floured surface for 3 to 4 minutes. 
  8. Cover the dough with plastic wrap and allow it to rest on the counter for 10 minutes.
  9. Once the dough has rested, roll it out on a lightly floured surface until it ideally measures a 24×16” rectangle, or a 22x14” rectangle is fine . . . although a perfect rectangle would be easiest to work with, it  can certainly be rather rustic in shape.
  10. Filling: Prepare the filling by combining all of the ingredients in a small mixing bowl except for the butter. 
  11. Spread the butter over the top of the rolled dough, then cover with the filling. The filling will seem very thin but it is just the right amount so don’t be tempted to add more. 
  12. Shaping: Using a pizza roller/cutter, cut 1” strips of dough—a total of  22 to 24 strips; then cut down the middle of the dough, creating 44 to 48 rolls
  13. Roll each up into a tight roll. Use a Bench knife (dough scraper) to gently ease any sections that might stick to the work surface.

  14. Prepare 9x13” pan by lining with a piece of parchment that overlaps on the sides (for easy removal of roll); lightly spray paper. 
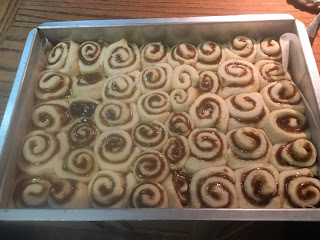
  15. Place the rolls into prepared baking dish and gently place a piece of aluminum foil over top. (I discovered that adding all of the rolls to this size pan caused some to meld with another; the second time I made them, I put 38 in the prepared pan and the remaining in another baking dish.) 
    Above -- all 44 are in one baking pan.
    Below -- 38 rollin are in the baking pan with the extra  in another baking dish. Notice the difference in step #16 after rolls have proofed.
  16. If oven has been set to 200°, turn it OFF your oven and place the covered rolls inside to rise for about 30 minutes or until rolls rise and fill pan – watch so they do not over-proof. Leave oven set to “bread proof” for the 30 minutes if oven has that option.
    Above -- 44 rolls in the baking pan caused overcrowding.
    Below -- 38 rolls in pan allowed rolls to retain their individual shapes. 
  17. Remove the rolls from the oven and turn ON your oven to 375°. Once heated, remove the foil and bake the rolls for 15 to 18 minutes or until the centers are lightly golden brown in color.
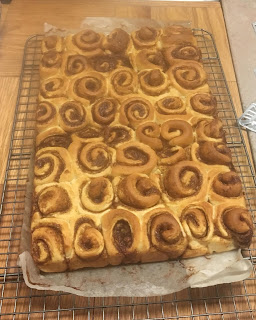
    Above -- 15 minutes in oven produced lightly browned rolls with  a soft texture. This was my preference.
    Below: 18 minute in oven produced markers, crisper rolls.
  18. Remove from the oven; using edges of parchment paper, transfer rolls from baking pan to cooling rack (as pictured above).  Allow to cool for a few minutes before frosting.  
  19. Frosting: While rolls are cooling, prepare the frosting by combining all of the ingredients in a small mixing bowl and beating by hand or with a hand mixer until smooth. Spread over the tops of the rolls.
Recipe without photos . . .
Mini Cinnamon Rolls with Cream Cheese Frosting     Yield: 44 mini rolls
Rolls
2¾ cups all-purpose flour
1 tablespoon active dry yeast (instant)
1 teaspoon salt
¼ cup granulated sugar
2 tablespoons unsalted butter
½ cup water
¼ cup whole milk
1 egg

Filling
¼ cup (½ stick) butter, melted
⅔ cup packed brown sugar
1 tablespoon  + 1 teaspoon ground cinnamon
1 tsp. vanilla 

Cream Cheese Frosting
4 oz. cream cheese, room temperature
¼ cup (1/2 stick) unsalted butter, room temperature
1 cup powdered sugar
1 to 2 tablespoons whole milk (to desired thickness)
½ teaspoon vanilla
  1.  Rolls: In a large bowl or the bowl of a stand mixer, combine the flour, yeast and salt.
  2. In a small microwave safe bowl (or glass measuring cup), combine the sugar, butter, water and milk. 
  3. Heat in the microwave until the mixture is hot (about 1 minute) and the butter is almost melted; mixture should be 120°-let it cool if higher. 
  4. Gradually add the milk mixture into the flour mixture. 
  5. Add the egg and mix until a soft and sticky dough forms.
  6. Set oven on “ bread proof” or if proof setting if not available, set oven temperature to 200’.
  7. If using a stand mixer, switch to the dough hook and set on the lowest mixing setting for 4 minutes or until the dough becomes elastic or knead by hand on a lightly floured surface for 3 to 4 minutes. 
  8. Cover the dough with plastic wrap and allow it to rest on the counter for 10 minutes.
  9. Once the dough has rested, roll it out on a lightly floured surface until it ideally measures a 24×16” rectangle, or a 22x14” rectangle is fine . . . although a perfect rectangle would be easiest to work with, it  can certainly be rather rustic in shape.
  10. Filling: Prepare the filling by combining all of the ingredients in a small mixing bowl except for the butter. 
  11. Spread the butter over the top of the rolled dough, then cover with the filling. The filling will seem very thin but it is just the right amount so don’t be tempted to add more. 
  12. Shaping: Using a pizza roller/cutter, cut 1” strips of dough—a total of  22 to 24 strips; then cut down the middle of the dough, creating 44 to 48 rolls
  13. Roll each up into a tight roll. Use a Bench knife (dough scraper) to gently ease any sections that might stick to the work surface.
  14. Prepare 9x13” pan by lining with a piece of parchment that overlaps on the sides (for easy removal of roll); lightly spray paper. 
  15. Place the rolls into prepared baking dish and gently place a piece of aluminum foil over top. (I discovered that adding all of the rolls to this size pan caused some to meld with another; the second time I made them, I put 38 in the prepared pan and the remaining in another baking dish.) 
  16. If oven has been set to 200°, turn it OFF your oven and place the covered rolls inside to rise for about 30 minutes or until rolls rise and fill pan – watch so they do not over-proof. Leave oven set to “bread proof” for the 30 minutes if oven has that option.
  17. Remove the rolls from the oven and turn ON your oven to 375°. Once heated, remove the foil and bake the rolls for 15 to 18 minutes or until the centers are lightly golden brown in color.
  18. Remove from the oven; using edges of parchment paper, transfer rolls from baking pan to cooling rack.  Allow to cool for a few minutes before frosting.  
  19. Frosting: While rolls are cooling, prepare the frosting by combining all of the ingredients in a small mixing bowl and beating by hand or with a hand mixer until smooth. Spread over the tops of the rolls.