Butternut Squash Risotto made with orzo

Risotto is defined as an Italian dish of rice (traditionally arborio) cooked in stock with other ingredients such as meat and vegetables. However, we prefer to use orzo pasta in place of the rice. I personally think it is the ultimate mac and cheese the starch minus the usual cheddar or processed cheese. As the pasta cooks, the starch is slowly released resulting in a dish with a super creamy creamy texture. 

Last night I paired it with butternut squash – some of the last of last summer’s garden produce that has been in cool storage. Although this could certainly stand alone as an entreé, we served it alongside roasted chicken. 


Butternut Squash Risotto made with orzo   4 servings 


1 tablespoon olive oil 

1 medium yellow onion, chopped

1/2 teaspoon kosher salt, plus more to taste

Freshly ground black pepper

2 cups cubed butternut squash, 1/4-inch cubes

2 garlic cloves, minced

1 teaspoon chopped sage leaves

1 cup uncooked orzo

1/2 cup dry white wine

4 cups warmed broth (I used chicken beef or vegetable works, too)

Small sage leaves or Chopped parsley or, optional, for garnish

1/2 cup grated Parmesan cheese, optional, for serving

  1. In a medium to large stock pot, heat the oil over medium heat. Add the onion, salt and several grinds of pepper, and cook for 2 to 3 minutes. Add the butternut squash and cook for 6 to 8 minutes. 
  2. Add the garlic, sage, and rice. Stir and let cook for about 1 minute.
  3. Then add the wine. Stir and cook for 1 to 3 minutes, or until the wine cooks down.

  4. Add the broth, 3/4 cup at a time, and stir continuously to allow each addition of broth to be absorbed before adding the next. Cook until the butternut squash is tender, and the risotto is soft and creamy. Season to taste. 

  5. Garnish with sage leaves or parsley and serve with grated cheese, if desired.
Recipe without photos . . . Butternut Squash Risotto made with orzo   4 servings 


1 tablespoon olive oil 

1 medium yellow onion, chopped

1/2 teaspoon kosher salt, plus more to taste

Freshly ground black pepper

2 cups cubed butternut squash, 1/4-inch cubes

2 garlic cloves, minced

1 teaspoon chopped sage leaves

1 cup uncooked orzo

1/2 cup dry white wine

4 cups warmed broth (I used chicken beef or vegetable works, too)

Small sage leaves or Chopped parsley or, optional, for garnish

1/2 cup grated Parmesan cheese, optional, for serving

  1. In a medium to large stock pot, heat the oil over medium heat. Add the onion, salt and several grinds of pepper, and cook for 2 to 3 minutes. Add the butternut squash and cook for 6 to 8 minutes. 
  2. Add the garlic, sage, and rice. Stir and let cook for about 1 minute.
  3. Then add the wine. Stir and cook for 1 to 3 minutes, or until the wine cooks down.

  4. Add the broth, 3/4 cup at a time, and stir continuously to allow each addition of broth to be absorbed before adding the next. Cook until the butternut squash is tender, and the risotto is soft and creamy. Season to taste. 

  5. Garnish with sage leaves or parsley and serve with grated cheese, if desired.

Sausage, Potato & Bean Soup

Barry’s been on KP duty the last couple of weeks as I had finger surgery and had to avoid water on my left hand. He’s been cooking up some of our favorites and a few new ones including this hearty sausage soup. 


Sausage, Potato & Bean  Soup   Serves 6

1 to 2  tablespoons olive oil

1 (14 ounce) package of smoked sausage, sliced into bite-size circles 

1 large onion, diced

1 teaspoon Italian seasoning

Pinch or two black pepper

½ teaspoon ground white pepper

4 cloves garlic, pressed through garlic press

3 small russet potatoes, peeled and diced (about ½” cubes)

6 cups chicken broth

2 (15 ounce) cans cannellini beans, undrained

2 cups roughly chopped hearty green such as spinach or kale (he used spinach) 

1 tablespoon chopped parsley

  1. Heat oil in a  large soup pot over medium-high heat; then  add in the slices of beef smoked sausage. Sear the slices for a few minutes until fairly browned, flipping them as needed.
  2. Add the diced onion to the pot, along with the Italian seasoning, black pepper and white pepper: sauté with the sausage until softened and golden; then, stir in the garlic and sauté just until fragrant.
  3. Add in the diced potatoes and stir to combine, followed by the chicken broth. Cover the pot with the lid askew, and allow the soup to simmer, gently, for about 12 minutes.
  4. After 12 minutes, add in the beans and greens, stir to combine, and allow the soup to simmer for about 10 minutes more, or just until the diced potatoes are tender.
  5. Add the parsley.

Chocolate Molten Cakes . . . a chocolate lover's dream

Individual ramekins of warm cake with a gooey pudding like center . . . a chocolate lover’s dream. Easy-to-make and they can be made up to two days ahead and baked at the last minute. Top them with ice cream or whipped cream for a delightful dessert. Although they can be turned out onto a dessert plate, I opted to serve them in our pretty pink Le Creuset ramekins. 

Chocolate Molten Cakes     Make 4 to 5 individual cakes

4 tablespoons (1/2 stick) unsalted butter, softened

1/3 cup granulated sugar

3 large eggs

1/3 cup all-purpose flour

1/4 teaspoon salt

1 1/3 cup semi-sweet chocolate chips, melted

  1. Preheat oven to 400 °F Grease the inside of 4 or 5 ( 4 –ounce) ramekins with some cooking spray or rub the bottoms and insides with butter.
  2. In a mixing bowl, combine the butter and sugar until creamy.
  3. Add in the eggs, one by one, beating after each egg.
  4. Add in the flour and salt; combine until smooth.
  5. Gently blend in your melted chocolate until just combined.
  6. Divide batter evenly amongst your ramekins, filling them 3/4 full. Put filled ramekins on a baking sheet.*
  7. Bake for 12 to 15 minutes or until the tops of the cake no longer jiggle when you shake the pan lightly.
  8. Let sit for 10 minutes. Serve in ramekins or, use a table knife to loosen the edges of the cakes and then turn each out onto a dessert plate. and go around the edge. 

* 2 Make Ahead Options:

1.     Make batter, cover it in plastic wrap, and keep it in the refrigerator for up to 2 days. When you are ready to bake, grease and fill the ramekins and pop them into a preheated oven. 

2.     Pour prepared batter into greased ramekins, cover them tightly with plastics wrap, and store them in the refrigerator for up to 24 hours. When you are ready to bake, just preheat the oven and pop the lava cakes into a preheated oven.

Recipe without photos . . .

Chocolate Molten Cakes     Make 4 to 5 individual cakes

4 tablespoons (1/2 stick) unsalted butter, softened

1/3 cup granulated sugar

3 large eggs

1/3 cup all-purpose flour

1/4 teaspoon salt

1 1/3 cup semi-sweet chocolate chips, melted

  1. Preheat oven to 400 °F Grease the inside of 4 or 5 ( 4 –ounce) ramekins with some cooking spray or rub the bottoms and insides with butter.
  2. In a mixing bowl, combine the butter and sugar until creamy.
  3. Add in the eggs, one by one, beating after each egg.
  4. Add in the flour and salt; combine until smooth.
  5. Gently blend in your melted chocolate until just combined.
  6. Divide batter evenly amongst your ramekins, filling them 3/4 full. Put filled ramekins on a baking sheet.*
  7. Bake for 12 to 15 minutes or until the tops of the cake no longer jiggle when you shake the pan lightly.
  8. Let sit for 10 minutes. Serve in ramekins or, use a table knife to loosen the edges of the cakes and then turn each out onto a dessert plate. and go around the edge. 

* 2 Make Ahead Options:

1.     Make batter, cover it in plastic wrap, and keep it in the refrigerator for up to 2 days. When you are ready to bake, grease and fill the ramekins and pop them into a preheated oven. 

2.     Pour prepared batter into greased ramekins, cover them tightly with plastics wrap, and store them in the refrigerator for up to 24 hours. When you are ready to bake, just preheat the oven and pop the lava cakes into a preheated oven.

7 or 8 Minute Oven-Fried Egg(s)

After seeing this idea on the internet, I had to give it a try. It's easy and pretty much foolproof cooking method for eggs No turning or covering . . . just bake and the egg is perfectly cooked.


7 or 8 Minute Oven-Fried Egg(s)

Egg or eggs

Butter

Salt & pepper or any preferred seasonings

  1. Butter a baking pan with sides. (Lining it with parchment or foil would help with clean up later.)
    I used a small eighth pan for just two eggs.
  2. Add desired number of eggs. (I used egg rings to hold whites in place.) Season as desired. 
    Eggs are ready to go into our Breville countertop oven.
  3. Place prepared pan of eggs in a preheated 425° oven and bake 7 to 8 minutes, depending on desired doneness. 


Recipe without photos . . .7 or 8 Minute Oven-Fried Egg(s)

Egg or eggs

Butter

Salt & pepper or any preferred seasonings

  1. Butter a baking pan with sides. (Lining it with parchment or foil would help with clean up later.)
  2. Add desired number of eggs. (I used egg rings to hold whites in place.) Season as desired.
  3. Place prepared pan of eggs in a preheated 425° oven and bake 7 to 8 minutes, depending on desired doneness. 

Super Rich, Easy & Quick Chocolate Pudding for 2

On a cold winter day in Kansas, a warm bowl of pudding is so inviting . . . 


Super Rich, Easy & Quick Chocolate Pudding for 2 

2 tablespoons granulated sugar

1 tablespoon cornstarch

1 cup whole milk

1/3 cup chocolate chips (dark or semi-sweet)

1/2 teaspoon vanilla

  1. Combine sugar and cornstarch in a small saucepan; stir until completely combined.
  2. Slowly add milk, stirring until smooth.
  3. Cook and stir over medium heat until mixture comes to a boil. Continue to cook and stir until thickened, 1 to 2 minutes longer.
  4. Stir in chocolate chips, cook and stir until melted. Remove from heat.

  5. Stir in vanilla. 
  6. Spoop into dishes. Serve warm or chilled. 
Recipe without photos . . .

Super Rich Easy & Quick Chocolate Pudding for 2 

2 tablespoons granulated sugar

1 tablespoon cornstarch

1 cup whole milk

1/3 cup chocolate chips (dark or semi-sweet)

1/2 teaspoon vanilla

  1. Combine sugar and cornstarch in a small saucepan; stir until completely combined.
  2. Slowly add milk, stirring until smooth.
  3. Cook and stir over medium heat until mixture comes to a boil. Continue to cook and stir until thickened, 1 to 2 minutes longer.
  4. Stir in chocolate chips, cook and stir until melted. Remove from heat.
  5. Stir in vanilla. 
  6. Spoop into dishes. Serve warm or chilled.

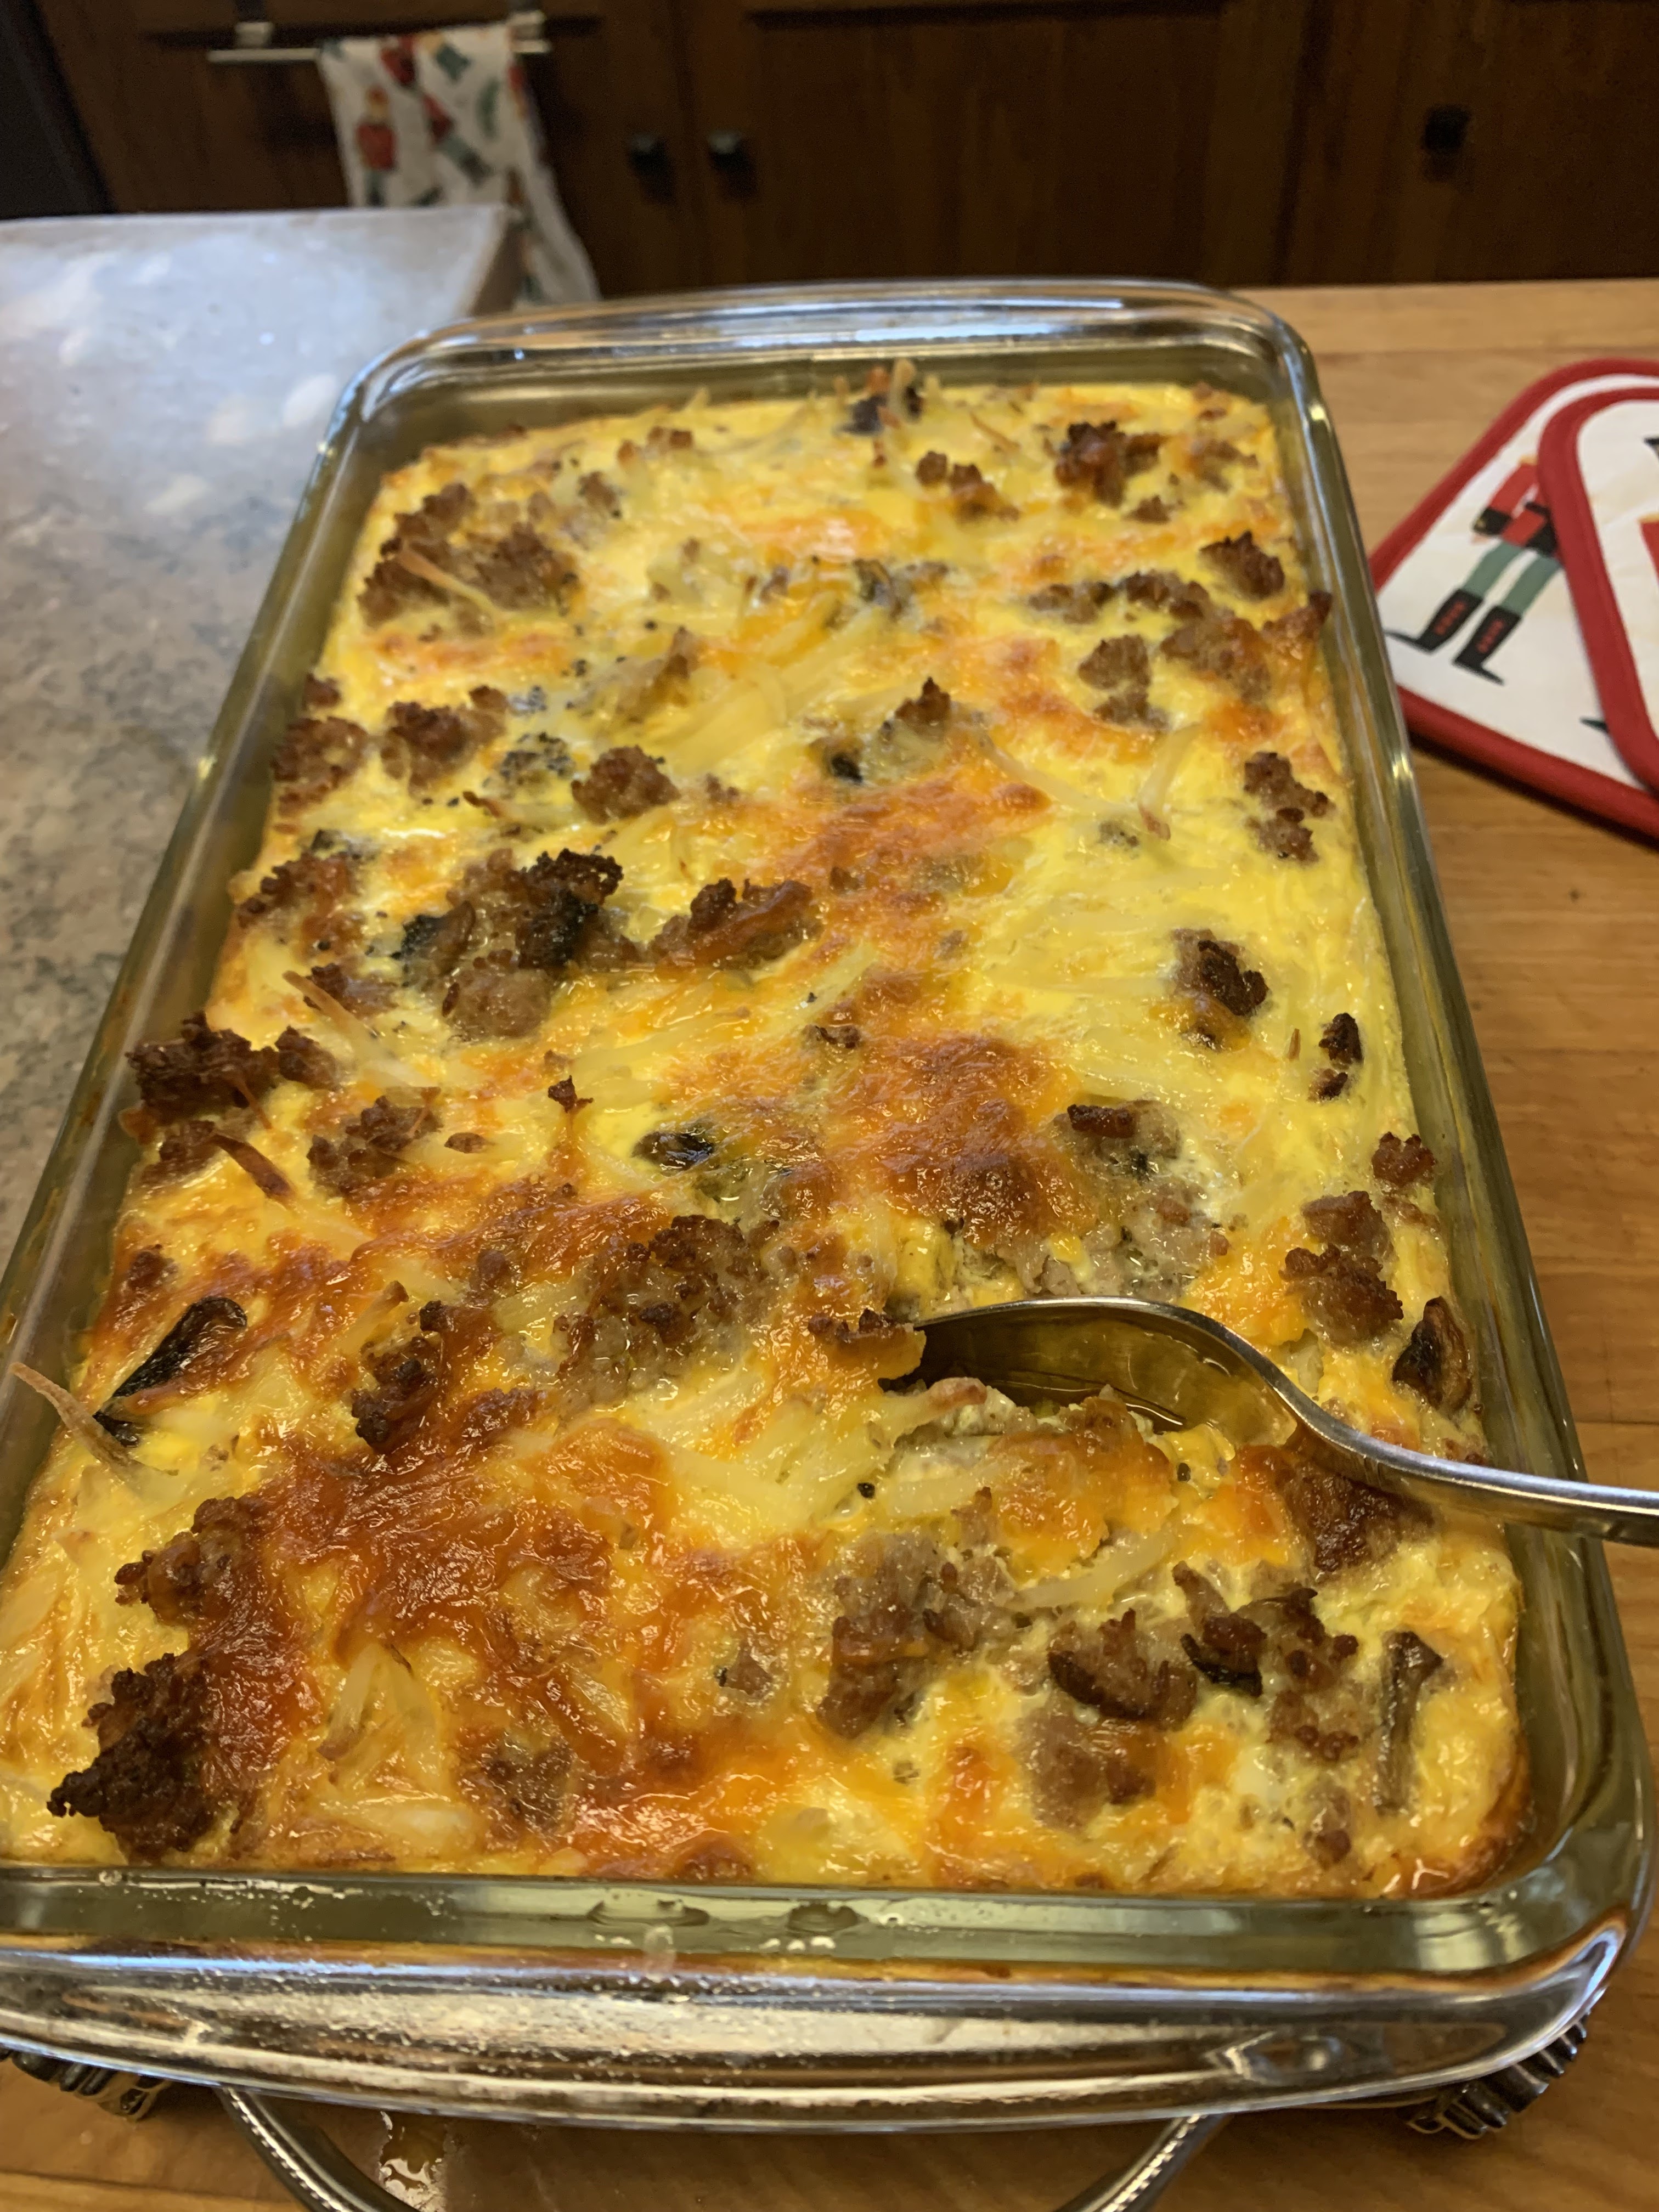
Sausage & Hashbrown Casserole with make ahead options

Although this is not a make ahead casserole as such, the various components can be prepared and assembled as a meal kit  . . . so all that needs to be done at the last minute is to assemble and bake.

To prepare the casserole as a make-ahead meal kit:

*Fry the sausage and onions; refrigerate.

* Add eggs, half and half, salt & pepper to a quart jar and shake.

*Shred & measure cheese. 


Sausage & Hashbrown Casserole     About 8 servings

1 pound pork sausage

1/2 to 1 onion, finely diced

6 eggs

2 cups half and half or whole milk

1 teaspoon salt

1/2 teaspoon pepper

1/2 of a 15 oz. package frozen hashbrowns (do not thaw)

2 cups shredded Cheddar cheese shredded 

  1. Preheat the oven to 350° F.
  2. Crumble sausage into a skillet on the stove and brown completely; add diced onion near the end of the cooking period and cook until onions become transulent. 
  3. In a large bowl, mix eggs and half and half together and whisk well
  4. Add salt and pepper to this mixture and stir.
1 teaspoon salt, 1/2 teaspoon pepper
  5. Spray a  7 ½ x 10” baking dish and then add  frozen hashbrowns, sausage, and cheese.  Cover with foil.
  6. Pour the egg/milk mixture over the hashbrown mixture. 
  7. Bake at 350° for about 30 minutues  covered with foil. Remove the foil and bake for about 10 to 15 minutes more until the dish is bubbly and cheese is melted. 

    Above: Casserole ready to go into the oven.
    Below: A simple Christmas morning brunch: Sausage & Hashbrown Casserole, Kringle & Tangerines. 


Crock Pot Black Eyed Peas

Surely we are destined to have good luck in 2024 as we served black eyed peas and a green salad containing cabbage on New Year’s day . . . both foods that are associated with good luck. This year I started with the dried peas and used the crock pot for a long, slow cooking time that infused them with lots of flavor. 

Soaked peas ready for the long, slow cooking process.

Crock Pot Black Eyed Peas  About 8 to 10 servings 

1 lb. dry black-eyed peas

32 oz. box chicken broth

14 oz. can tomatoes

Ham bone, ham hocks or about 1 cup+ diced ham 

1 onion, diced

2 teaspoons minced garlic  

1 teaspoon black pepper

--- 

Cooked rice for serving (we like to use basmati rice flavored sautéed onions and fresh parsley)

  1. To soak or not to soak? Soak the black-eyed peas overnight  and in n the morning drain the water. Or, skip the soaking and, cook on HIGH for 7 hours without opening the lid during the cooking time.
  2. Add the chicken broth, can of diced tomatoes, ham, onion, garlic, and pepper; stir.
  3. Cover and cook on LOW for 10 hours or HIGH for 6 hours. Do not open the lid during the cooking time.
  4. To serve: Spoon cooked rice in the bottom on the bowl and top with black eyed peas.